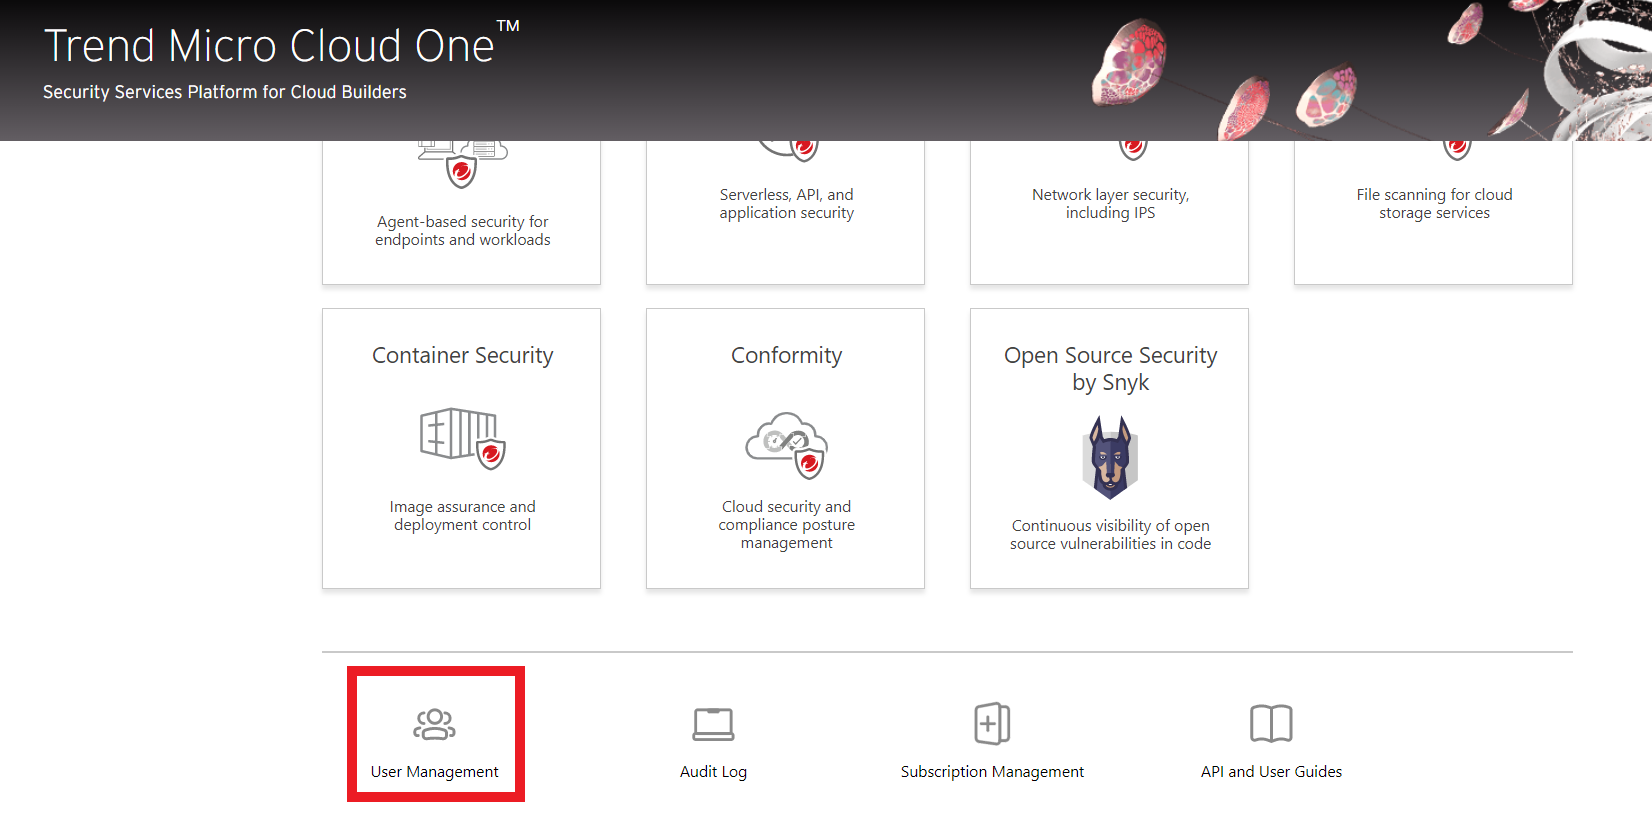
Security Tools
Introducing Trend Micro Cloud One™ – Container Security
Container Security is just one of seven solutions that make up Trend Micro Cloud One, a security services platform for developers building cloud-native applications, designed to simplify workflow and detect vulnerabilities. It provides security for your containers on the following stages of their lifecycle:
-
At deployment: Policy-based deployment control ensures that container images are run only when they meet the security criteria that you define.
-
After deployment: Continuous compliance allows you to intermittently scan your containers after they are deployed.
-
At runtime: Runtime security provides visibility into any container activity that violates a customizable set of rules.
1. Let’s deploy Trend Micro Container Security on our EKS that we just created
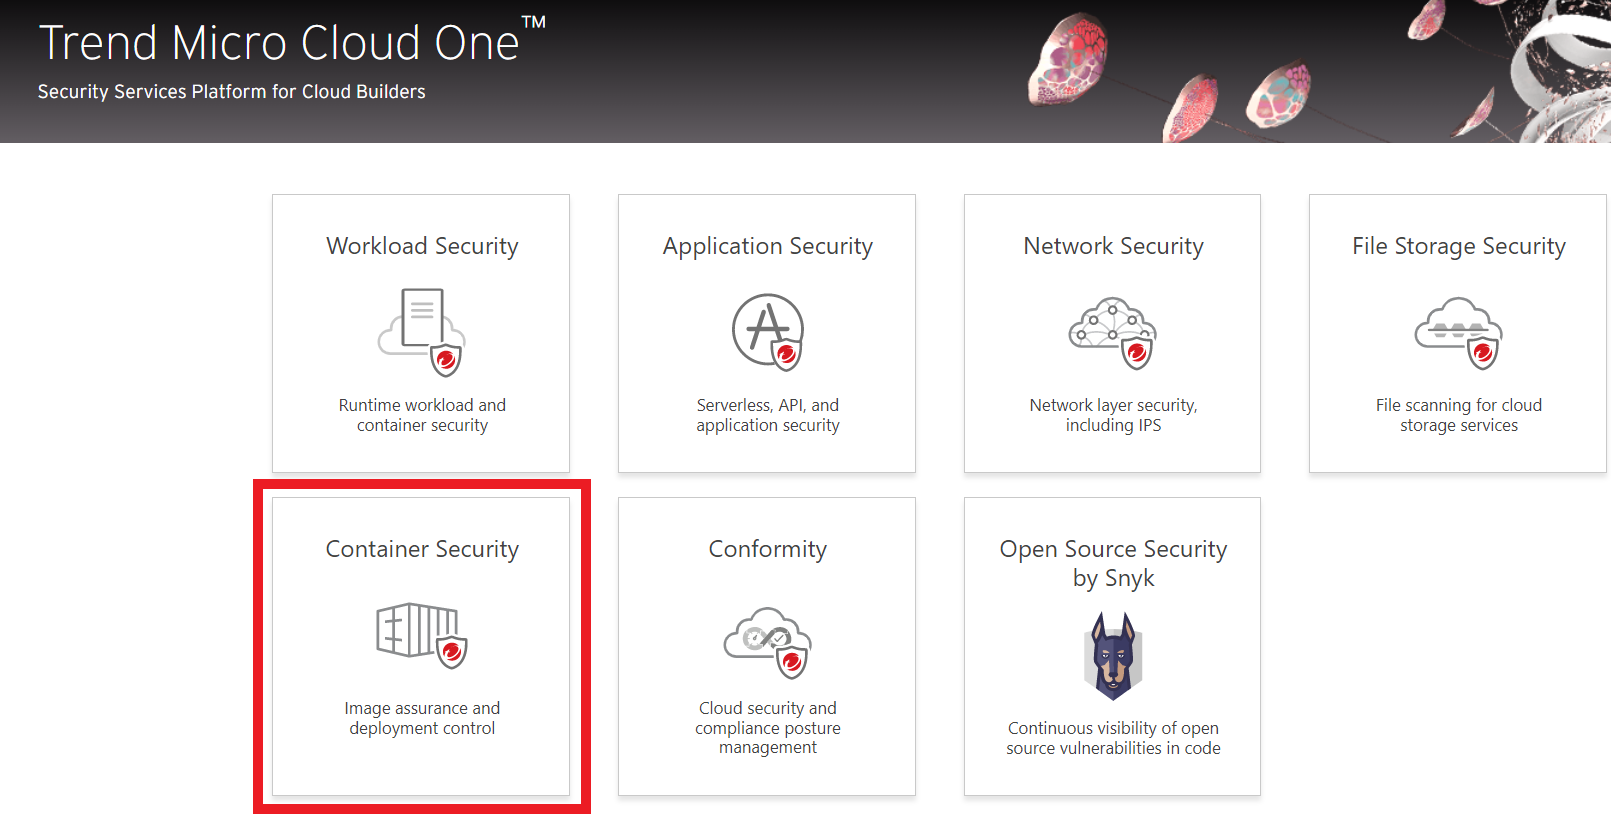
- On the Trend Micro Cloud One console
- Click on the Container Security box
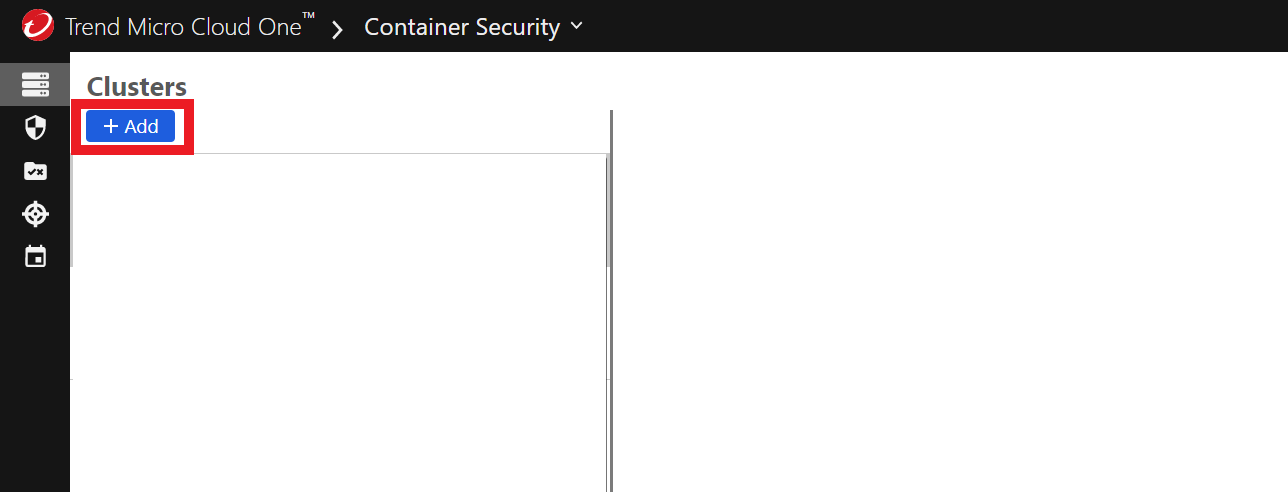
1.1. Click on the blue button +Add to add a Cluster
1.2. Fill in the required fields
- Name:
TrendMicroDevSecOpsWorkshop - Desciption (optional):
A EKS Cluster for the Trend Micro DevSecOps Workshop - Don’t need to select any policy for now
- In Namespace Exclusions make sure Kube System is checked and select Calico System
- Enable Runtime Security Checkbox

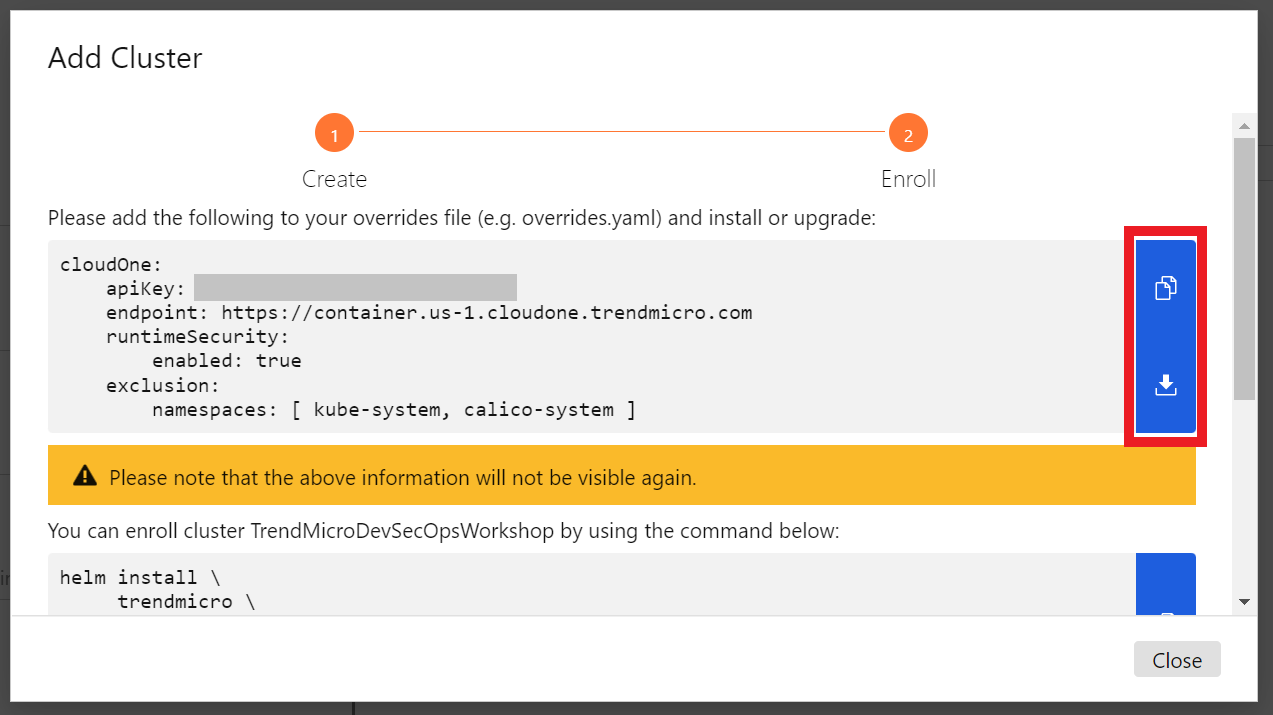
1.3. Copy or Download the first block that appears in the screen.
Note that this information will not be visible again.
- You can click on the First Button to Copy or on the Second Button to Download the content.
- After copying or downloading the content, you can close it
1.4. Let’s create a Policy for this Cluster
Policies define the rules that are used to control what is allowed to run in your Kubernetes cluster.
In the Cluster-Wide Policy Definition area, configure the rules that you want to enforce with this policy. There are three tabs, corresponding to three different types of rules:
- Deployment: These rules are enforced when an image is about to be deployed or an action is about to be applied
- Continuous: These rules are checked periodically while a pod is running.
- Runtime: On this tab, add one or more rulesets that contain rules you want to enforce while a pod is running. See Configure runtime security for information on how to enable runtime security and define a ruleset. The ruleset also defines what action Container Security takes if a pod violates any rule during runtime: log and event and allow the pod to keep running, isolate the pod's network traffic, or terminate the pod.
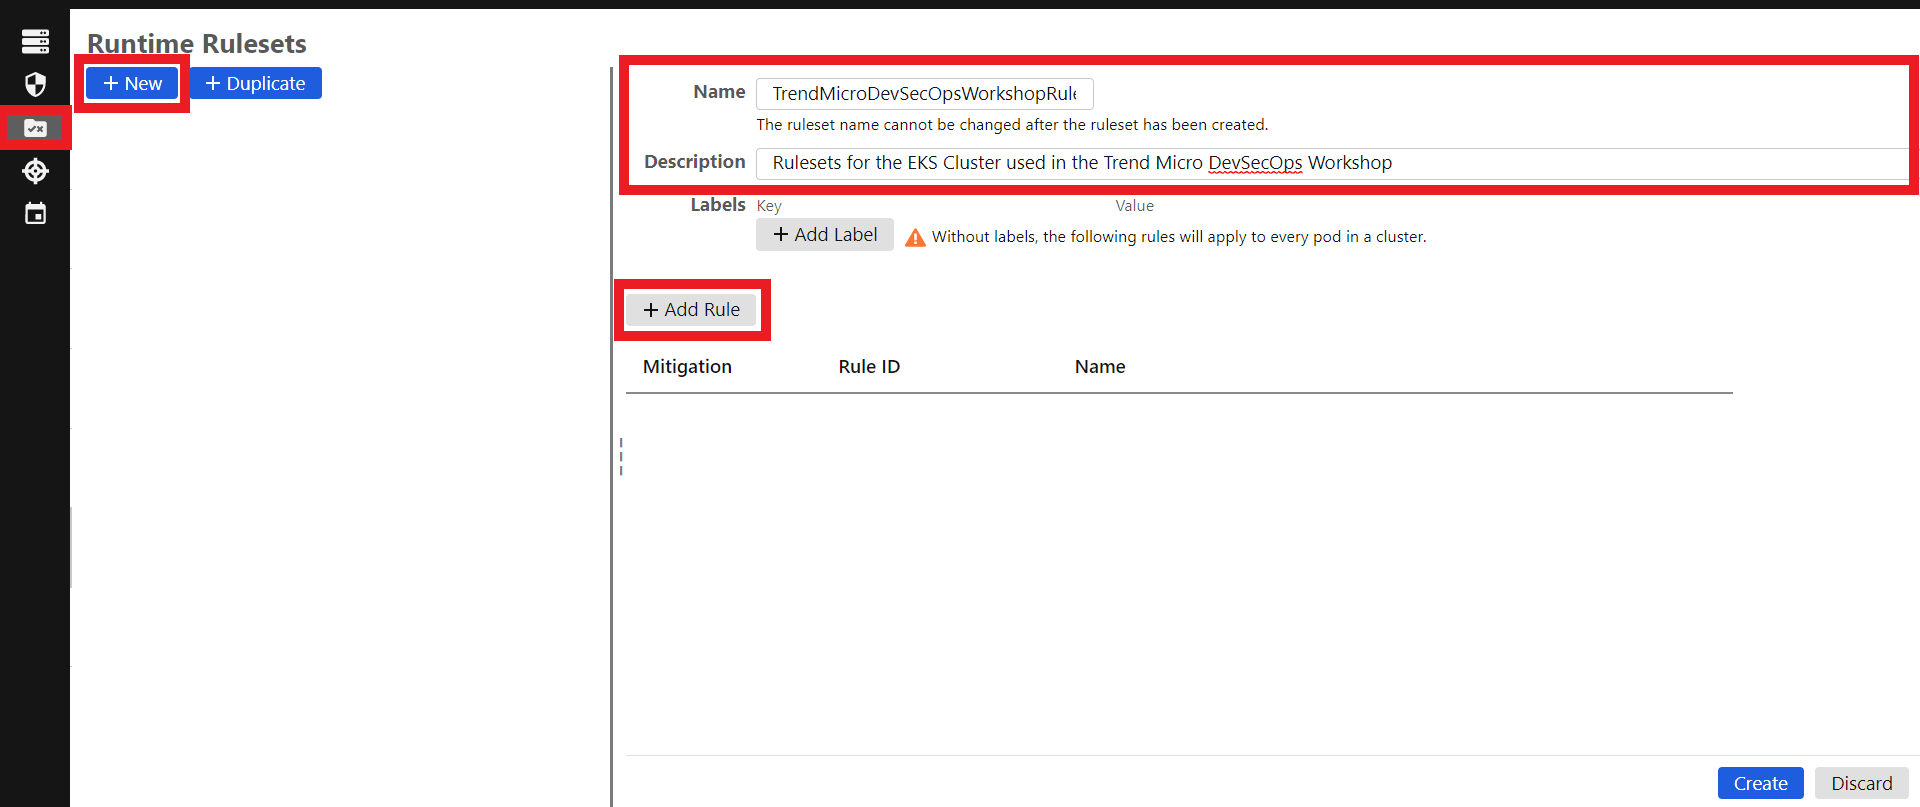
1.5. Firstly let’s configure the Runtime Rulesets
- In the left column, click on the third icon
- Click on the blue button +New
- Name:
TrendMicroDevSecOpsWorkshopRules - Description:
Rulesets for the EKS Cluster used in the Trend Micro DevSecOps Workshop - Now click on the button +Add Rule
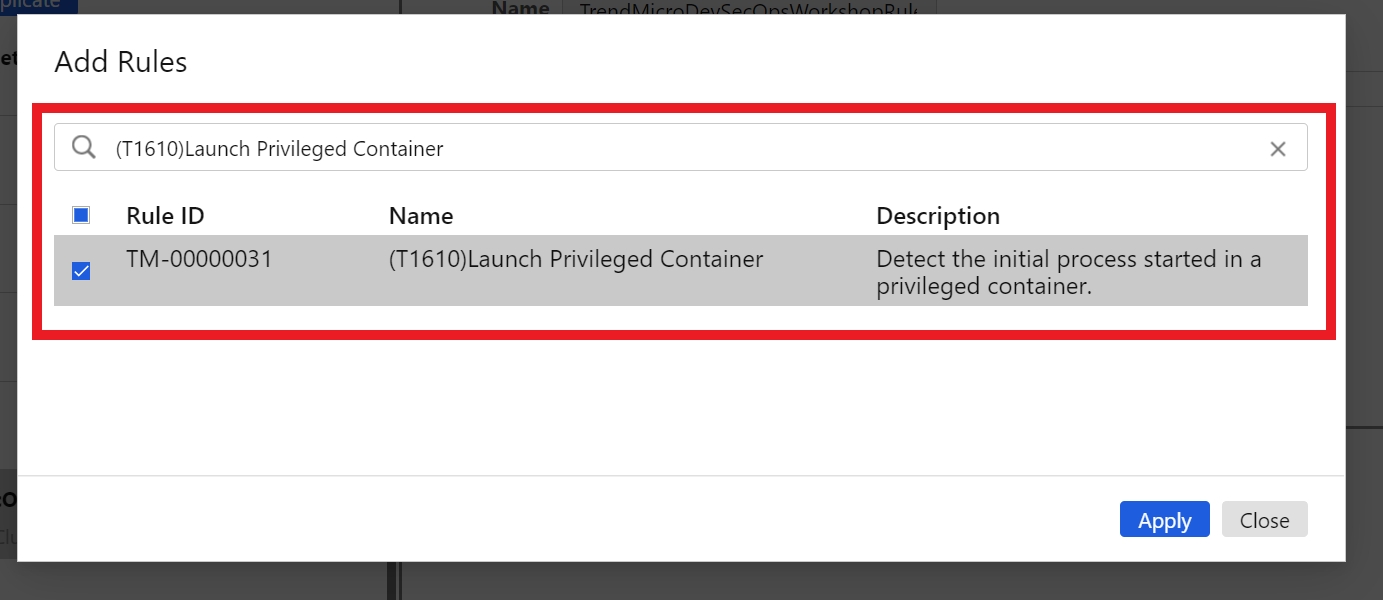
1.6. On the Add Rules page
Check the CheckBox for the rule - (T1610)Launch Privileged Container
Check the CheckBox for the rule - (T1041)Interpreted procs inbound network activity
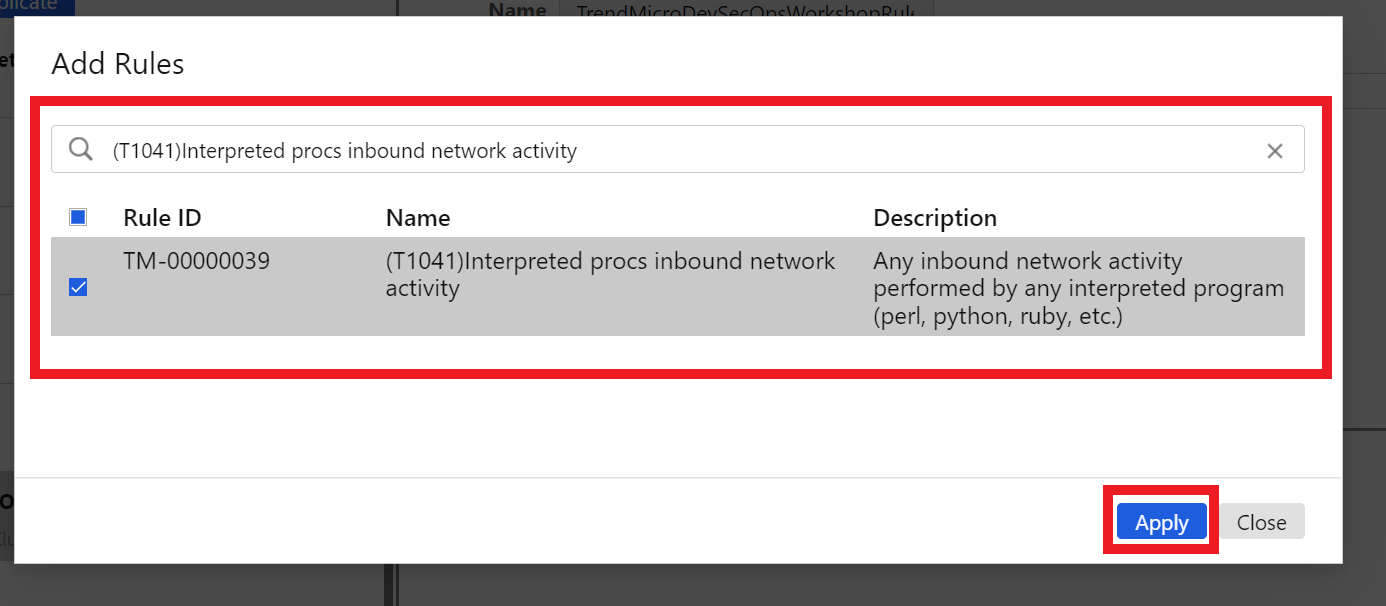
Click on the blue button Apply
Keep both of them as Log in Mitigation
Click on the blue button Save

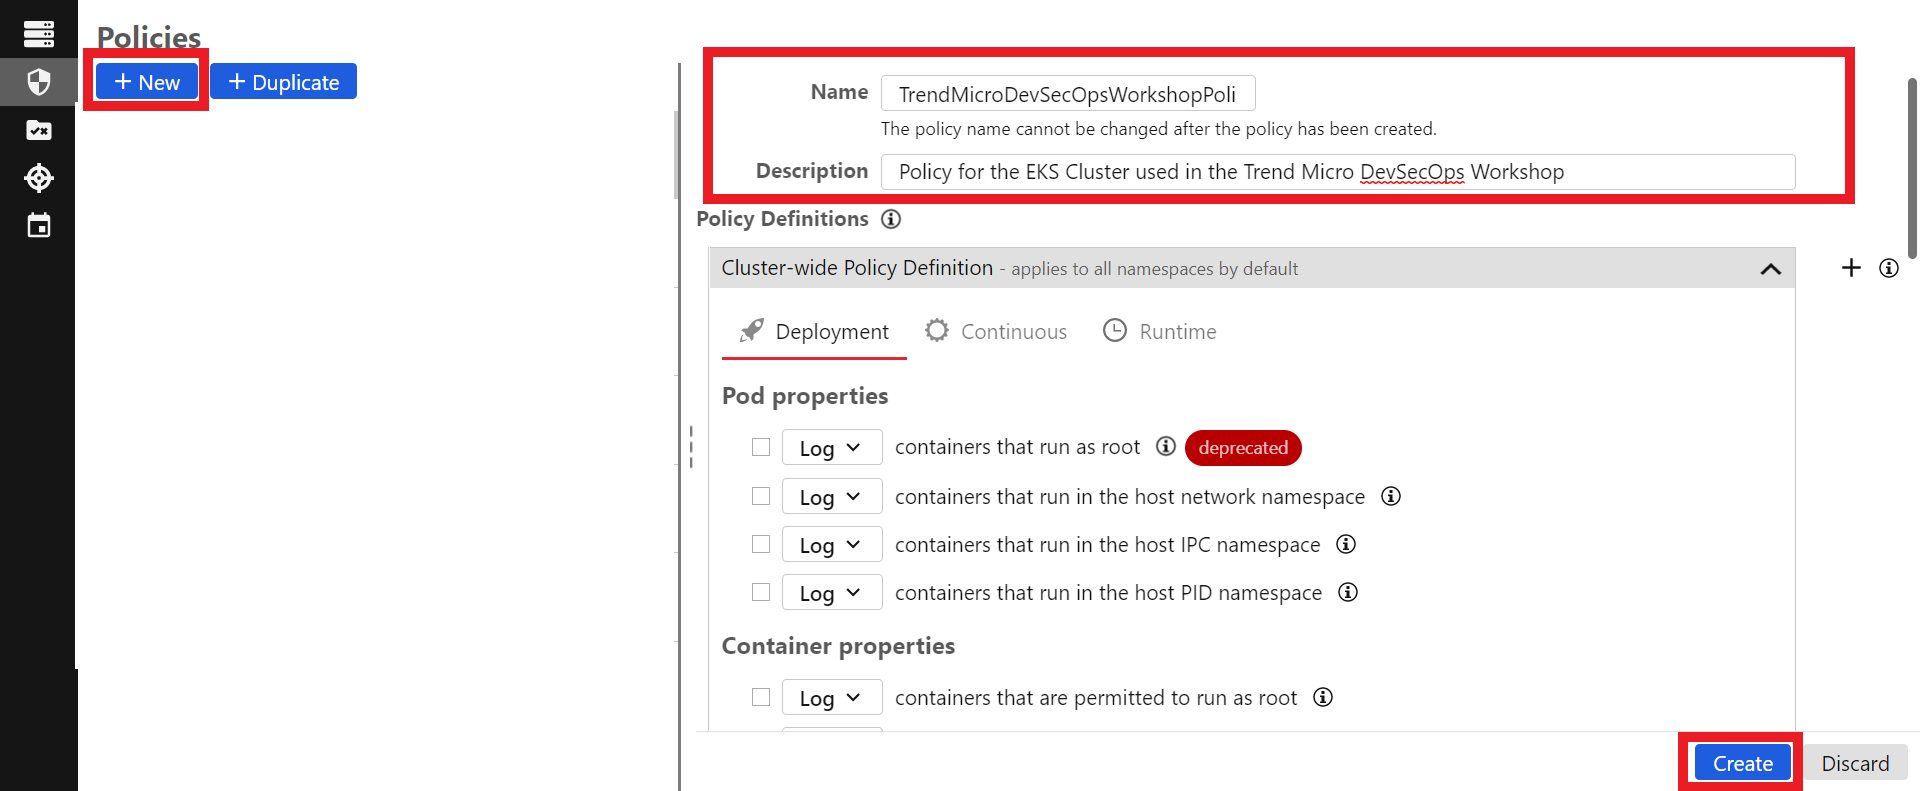
1.7. Let’s configure the policy
- In the left column, click on the second icon

- Click on the blue button +New
- Name:
TrendMicroDevSecOpsWorkshopPolicy - Description:
Policy for the EKS Cluster used in the Trend Micro DevSecOps Workshop - Click on the blue button Create
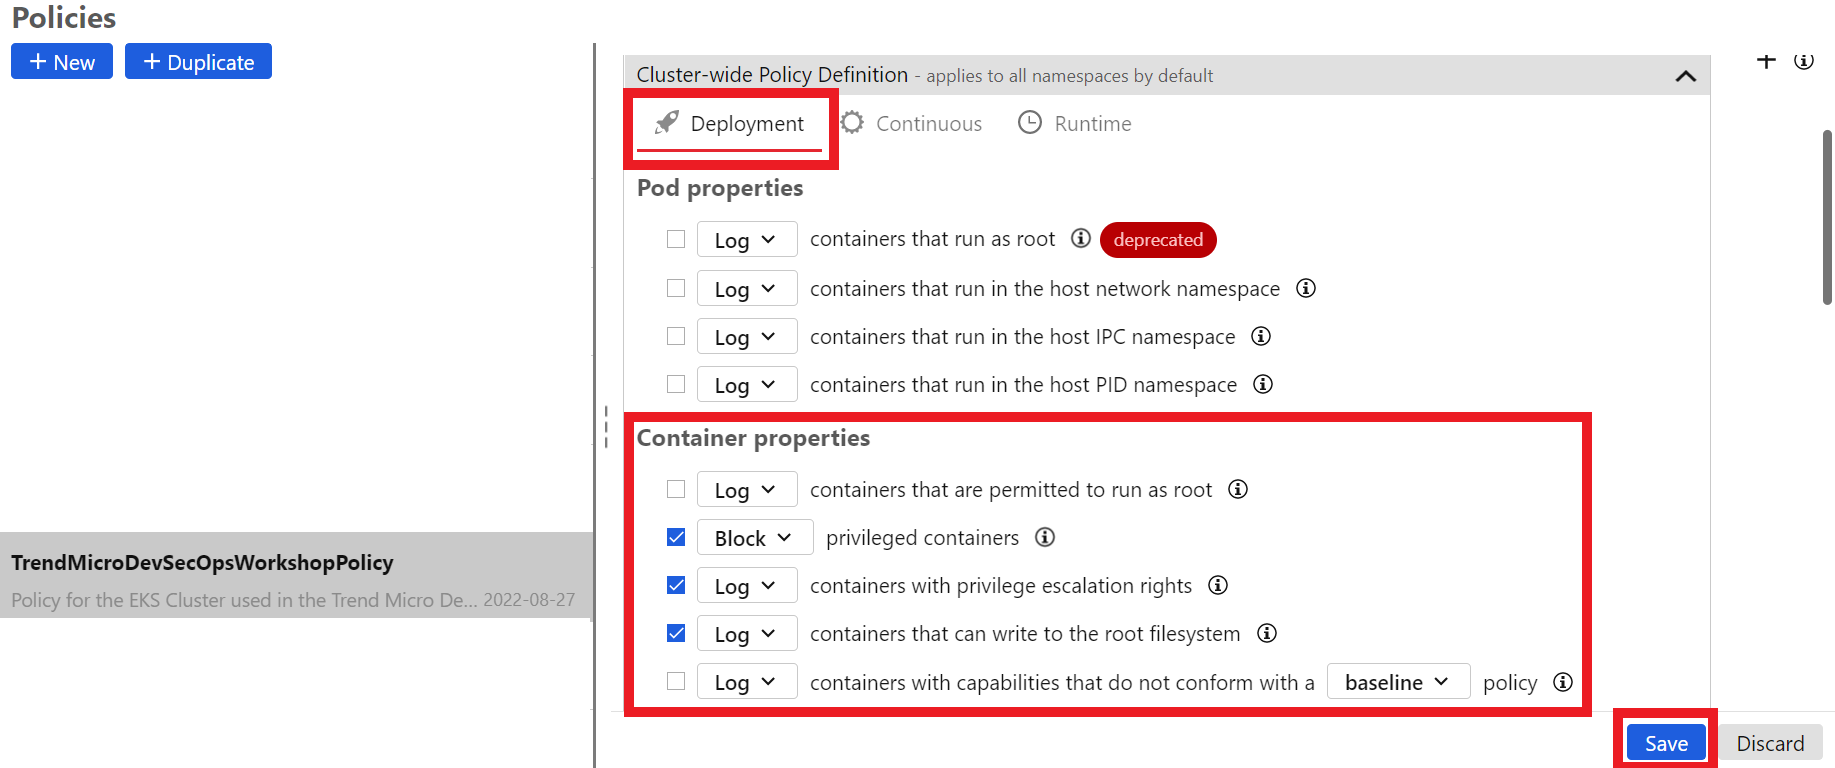
In the Deployment tab check the CheckBox for the fields:
Container Properties - privileged containers - SET TO BLOCK
Container Properties - containers with privilege escalation rights - SET TO LOG
Container Properties - containers that can write to the root filesystem - SET TO LOG
Click on the blue button Save
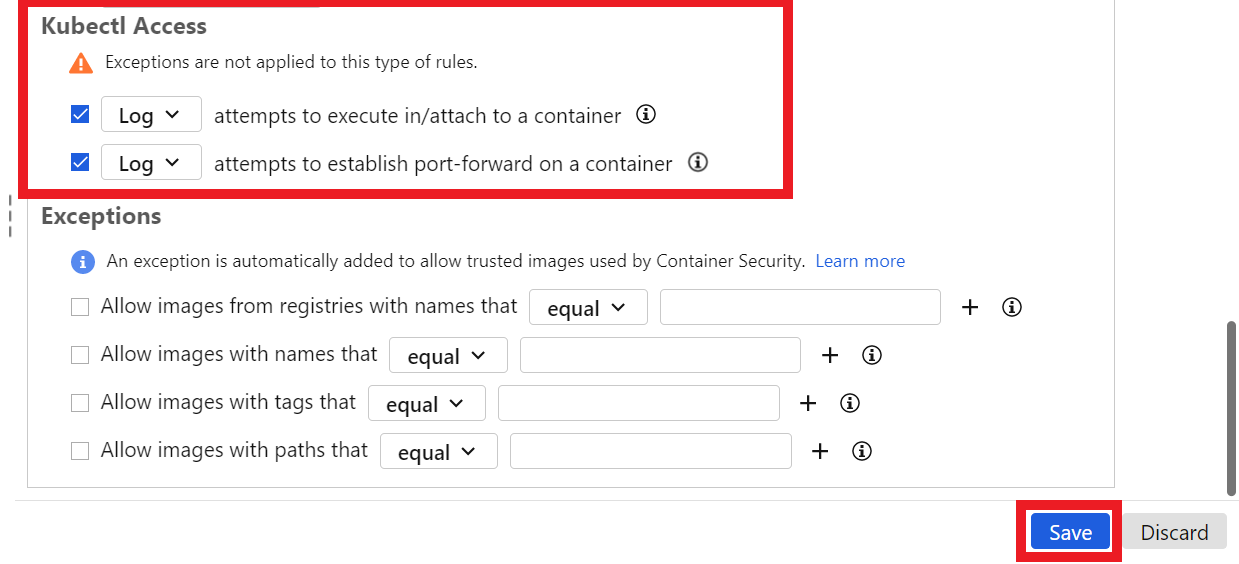
Continuing in the Deployment tab check the CheckBox for the fields:
Kubectl Access - attempts to execute in/attach to a container - SET TO LOG
Kubectl Access - attempts to establish port-forward on a container - SET TO LOG
Click on the blue button Save
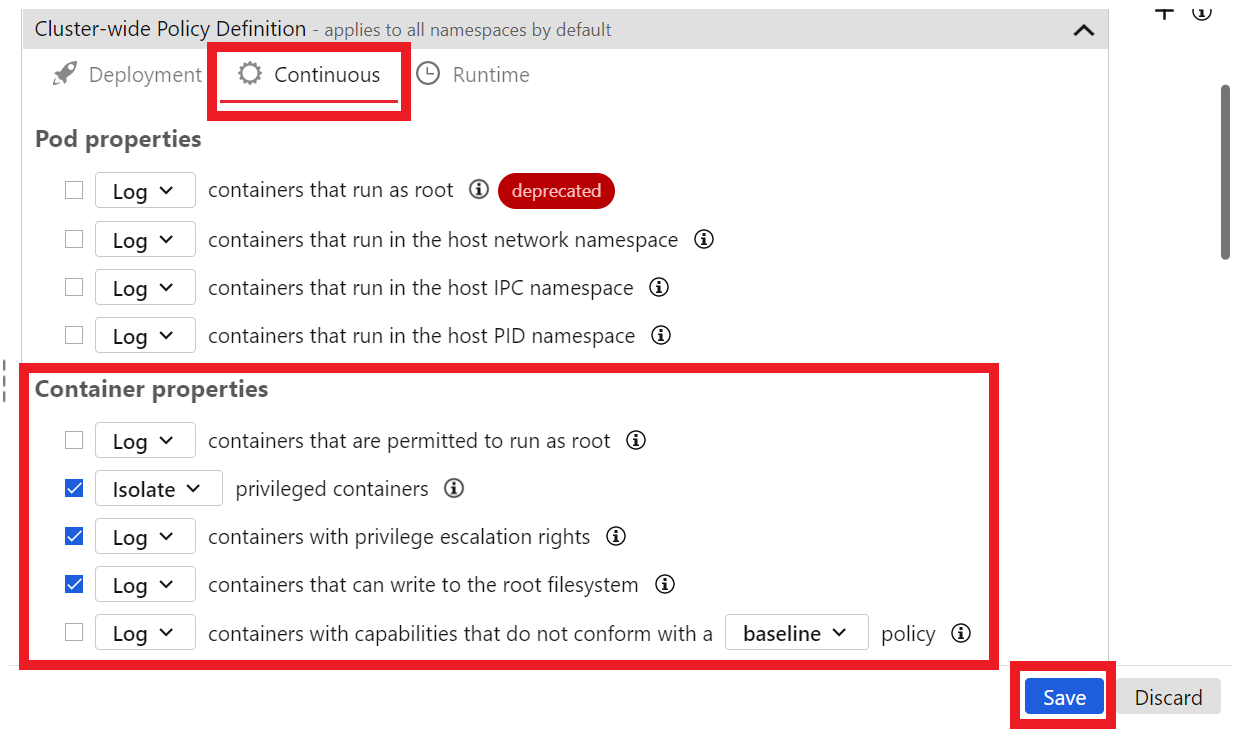
In the Continuous tab check the CheckBox for the fields:
Container properties - privileged containers - SET TO ISOLATE
Click on the blue button Save
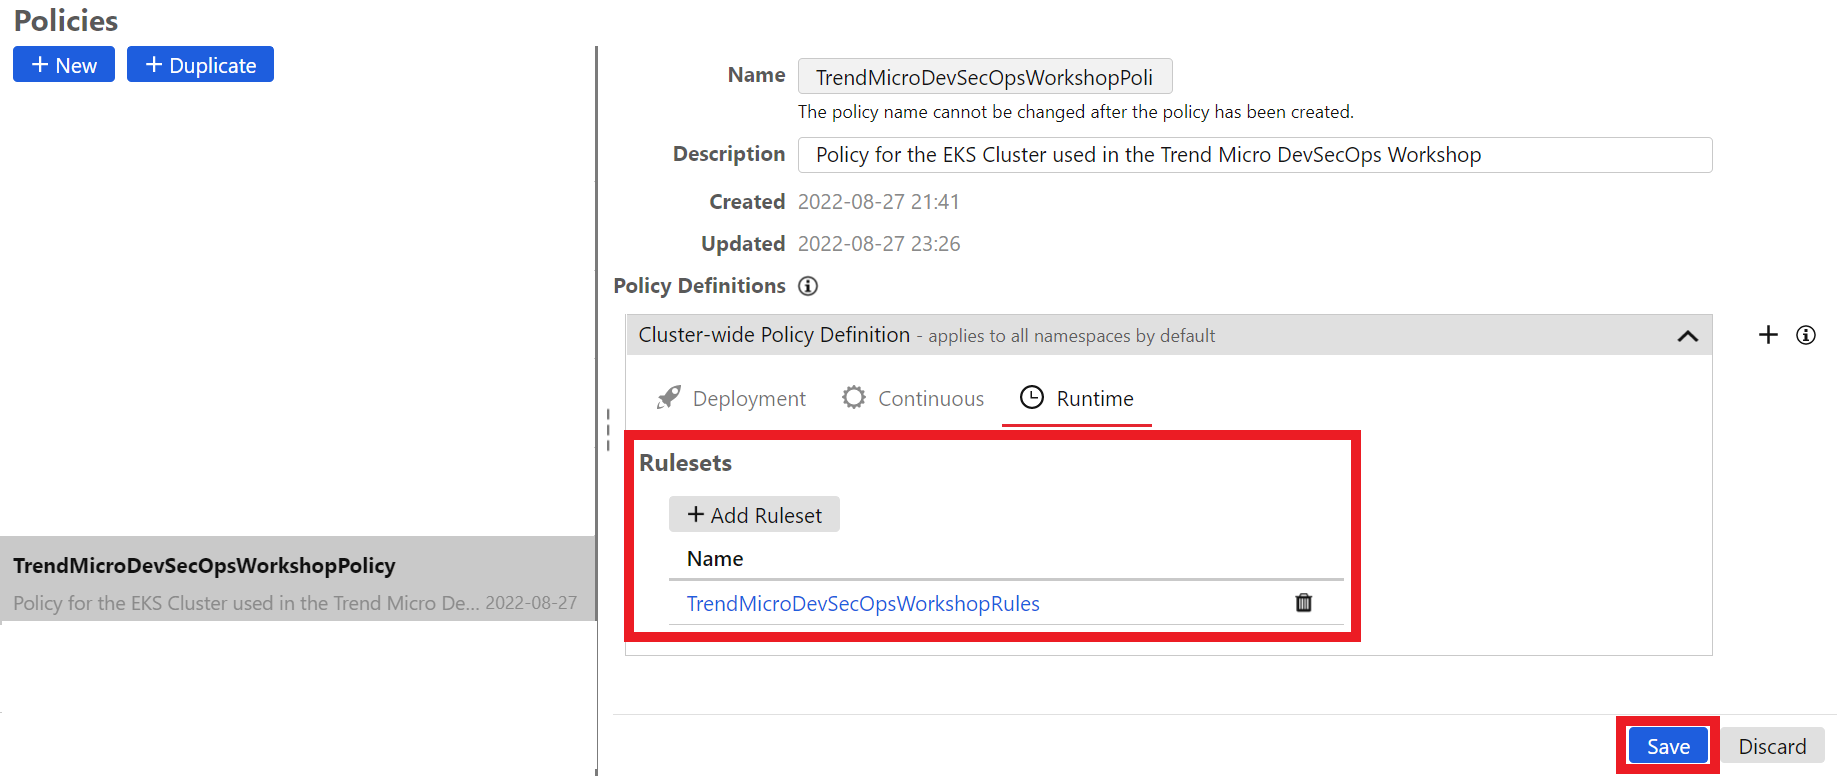
Click on the Runtime tab:
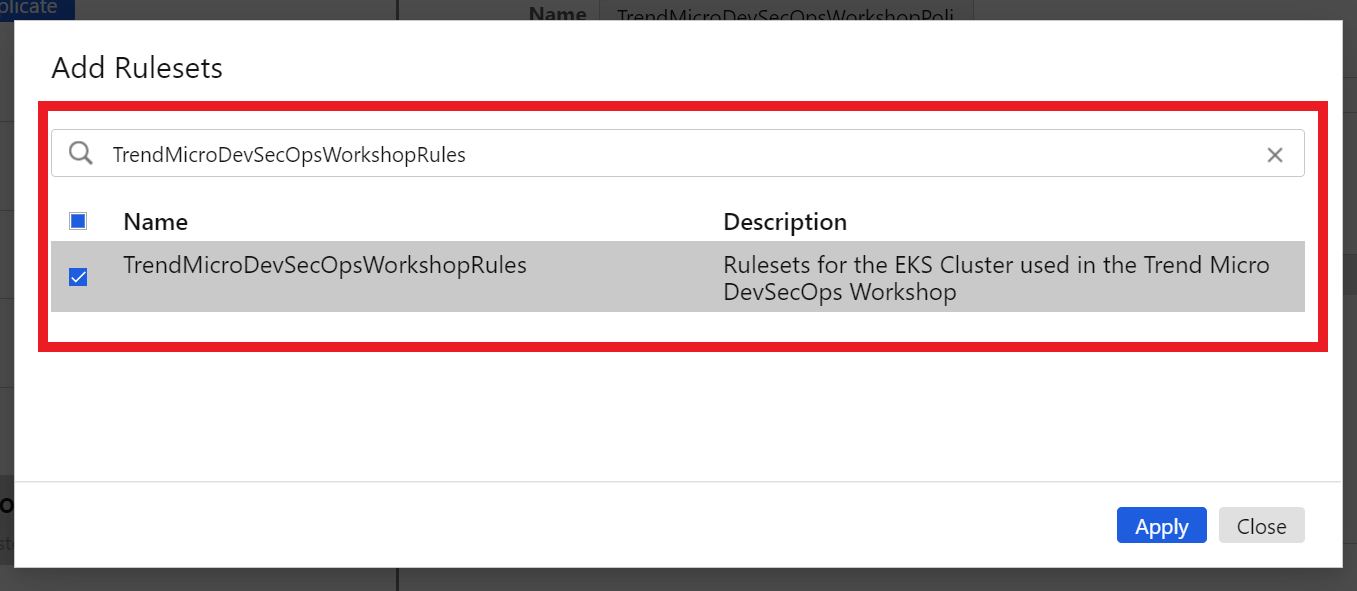
Click on the blue button +Add Ruleset
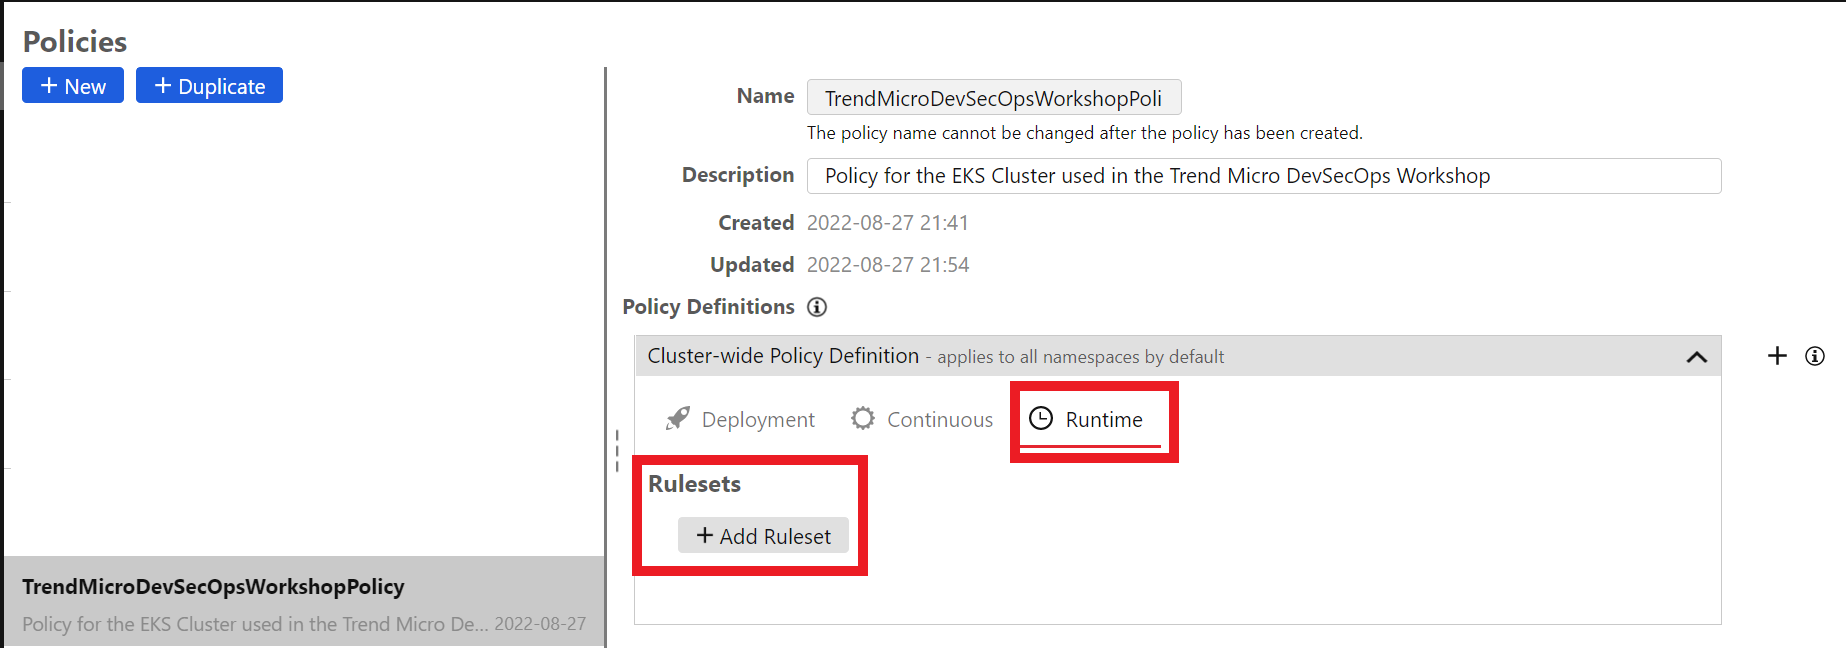
In the search box, search for and select the Ruleset we created earlier TrendMicroDevSecOpsWorkshopRules
Click on the blue button Apply
Click on the button Save
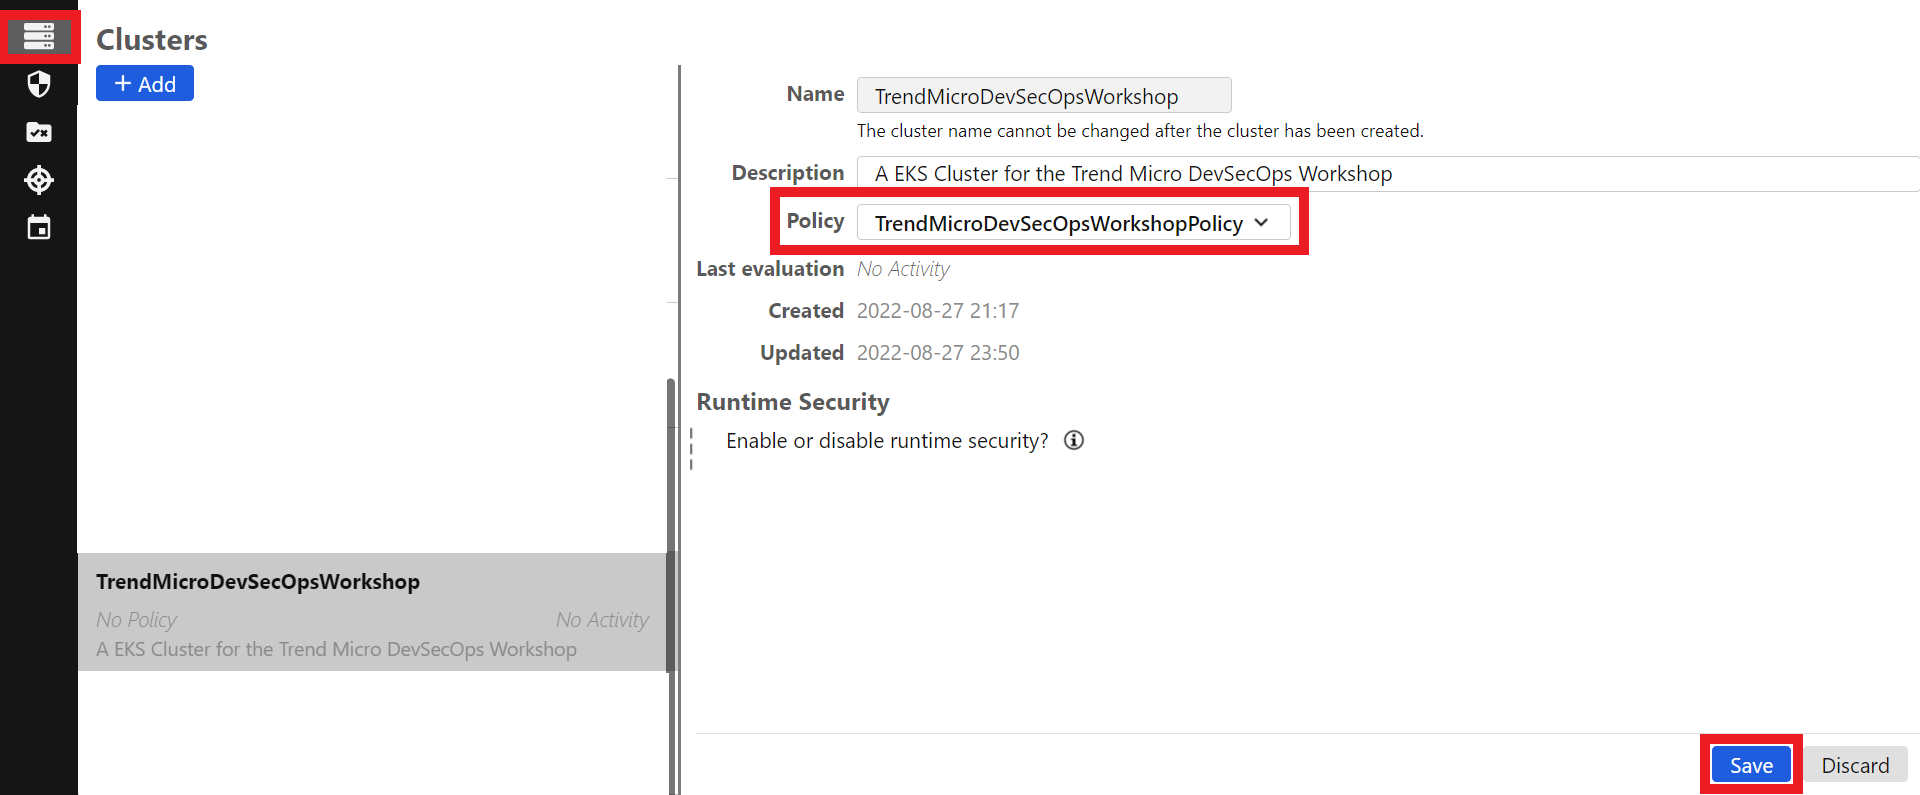
1.8. Let’s associate the policy we created earlier with our Cluster in Container Security
- In the Cloud One Container Security console
- In the left column, click on the first icon
- In your cluster TrendMicroDevSecOpsWorkshop
- Click on Select a policy
- Search for and click on the policy TrendMicroDevSecOpsWorkshopPolicy
- Click on blue button Save
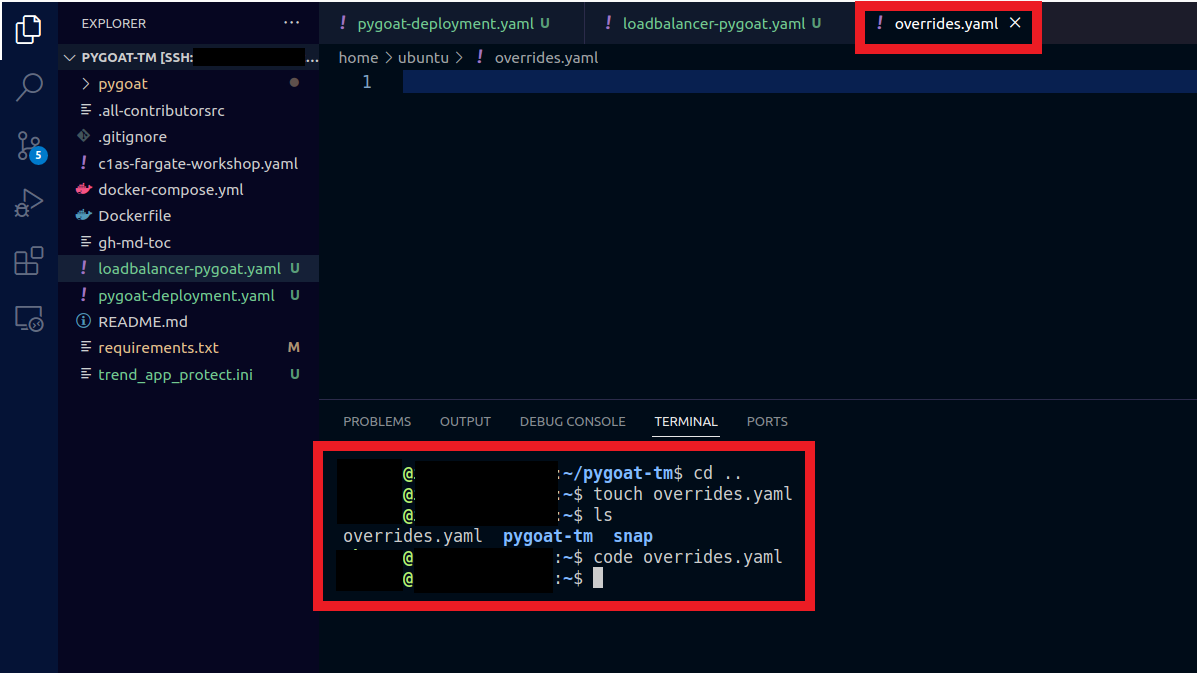
1.9. Back to VS Code
- In the directory that your overrides.yaml file is
- Or in case you want to copy the content into the the EC2 machine
- Outside of your application directory pygoat-tm, to do this type the command
cd .. - In the terminal, type the command
touch overrides.yaml - Type the command
code overrides.yamlto open the file
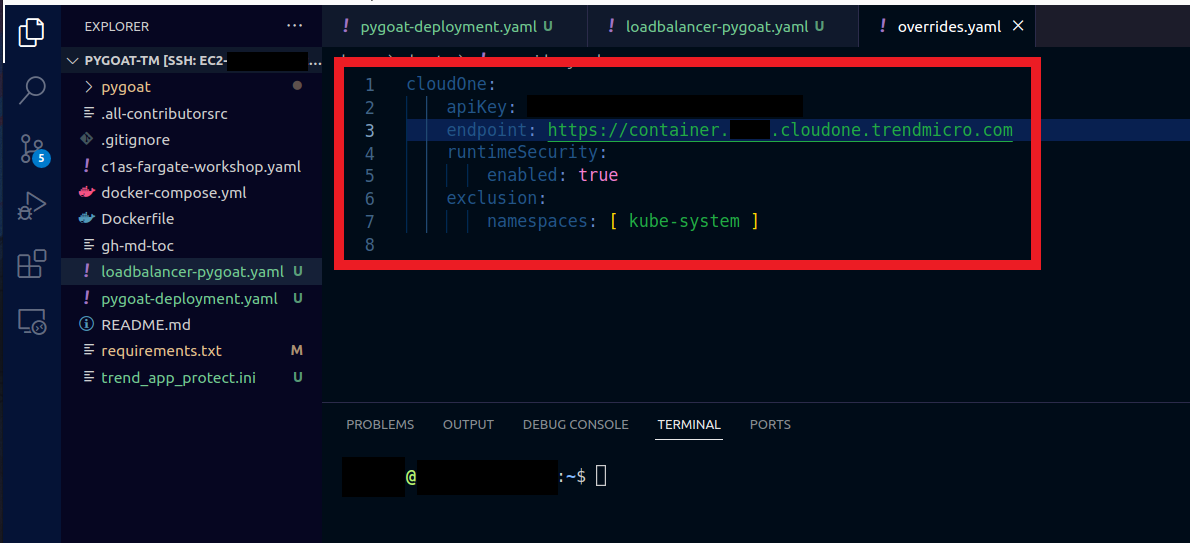
1.10. Now let’s install the Container Security policy-based deployment controller and enable runtime security
- Copy and paste the following in the overrides.yaml file
Don't forget to put your ApiKey on the line with the name apiKey: your_api_key_here. And replace {cloud_one_region} bellow with the region of your Cloud One Account.
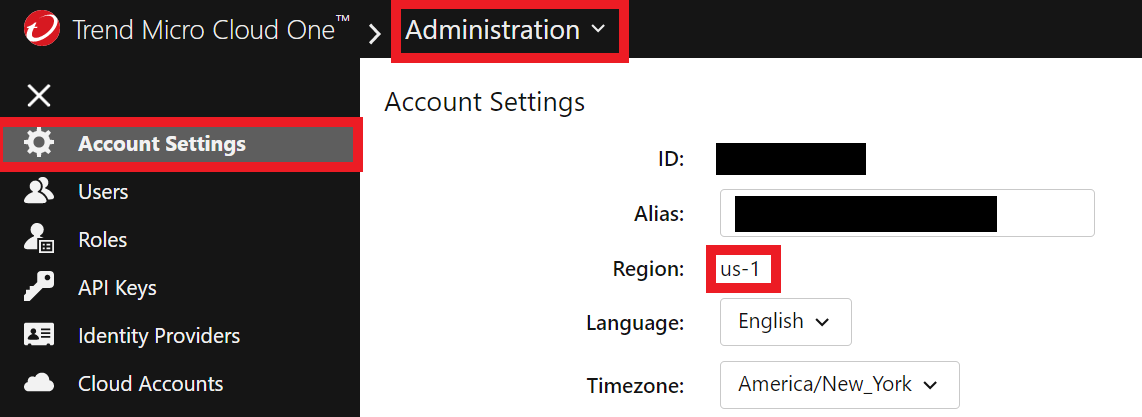
-> CLICK HERE to check the region of your Trend Micro Cloud One
Login into your Trend Micro Cloud One Account-> User Management -> Account Settings -> Region
cloudOne:
    apiKey: your_api_key_here
    endpoint: https://container.cloud_one_region_here.cloudone.trendmicro.com
    runtimeSecurity:
        enabled: true
    exclusion:
        namespaces: [ kube-system, calico-system ]
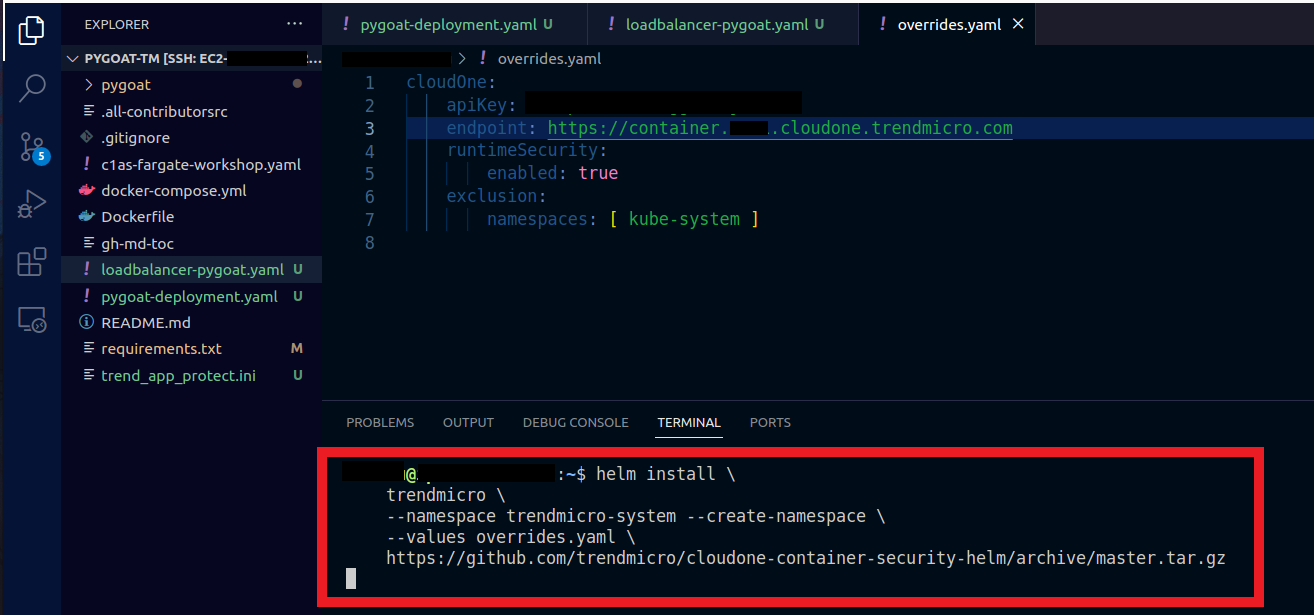
1.11. We’ll use Helm to enroll our EKS Cluster in Container Security
Paste the following in the terminal
helm install \
    trendmicro \
    --namespace trendmicro-system --create-namespace \
    --values overrides.yaml \
    https://github.com/trendmicro/cloudone-container-security-helm/archive/master.tar.gz
If you see an error " helm: command not found " please install helm by using the commands below, then Re-Run the command above.
curl -fsSL -o get_helm.sh https://raw.githubusercontent.com/helm/helm/main/scripts/get-helm-3
chmod 700 get_helm.sh
./get_helm.sh
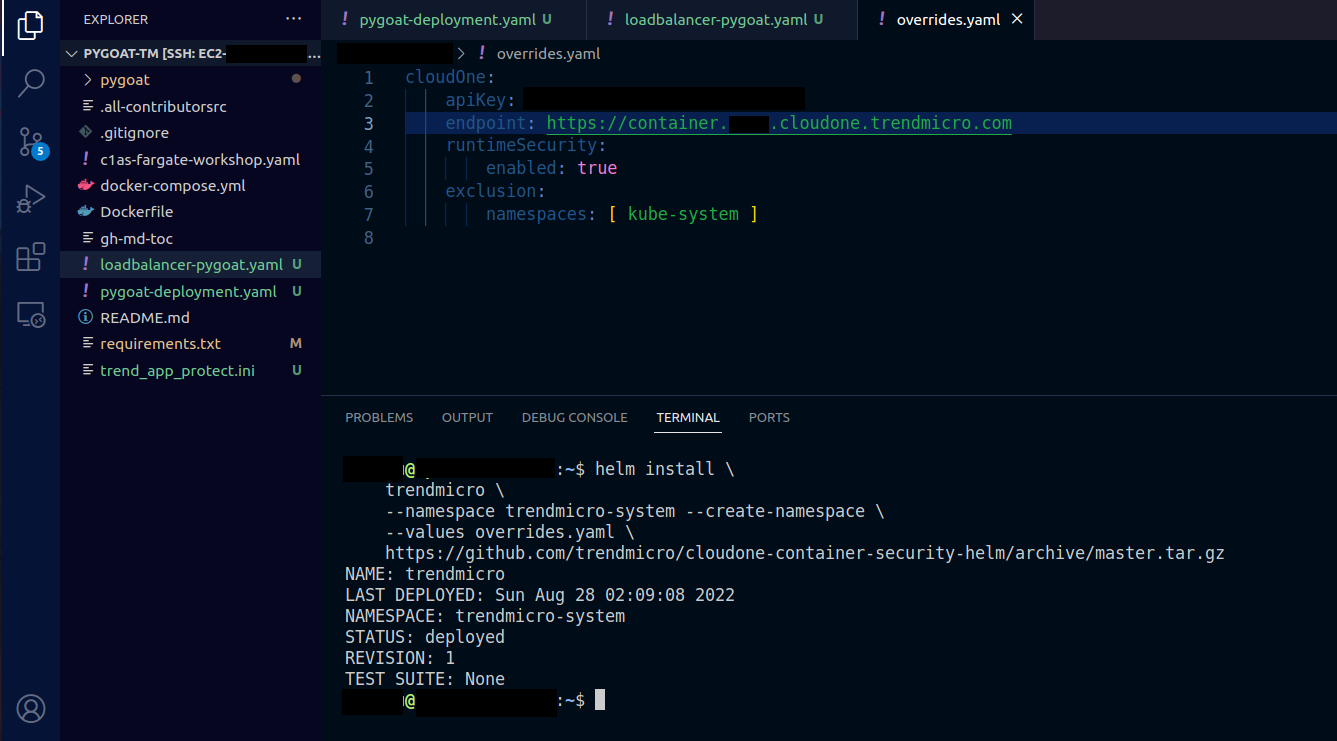
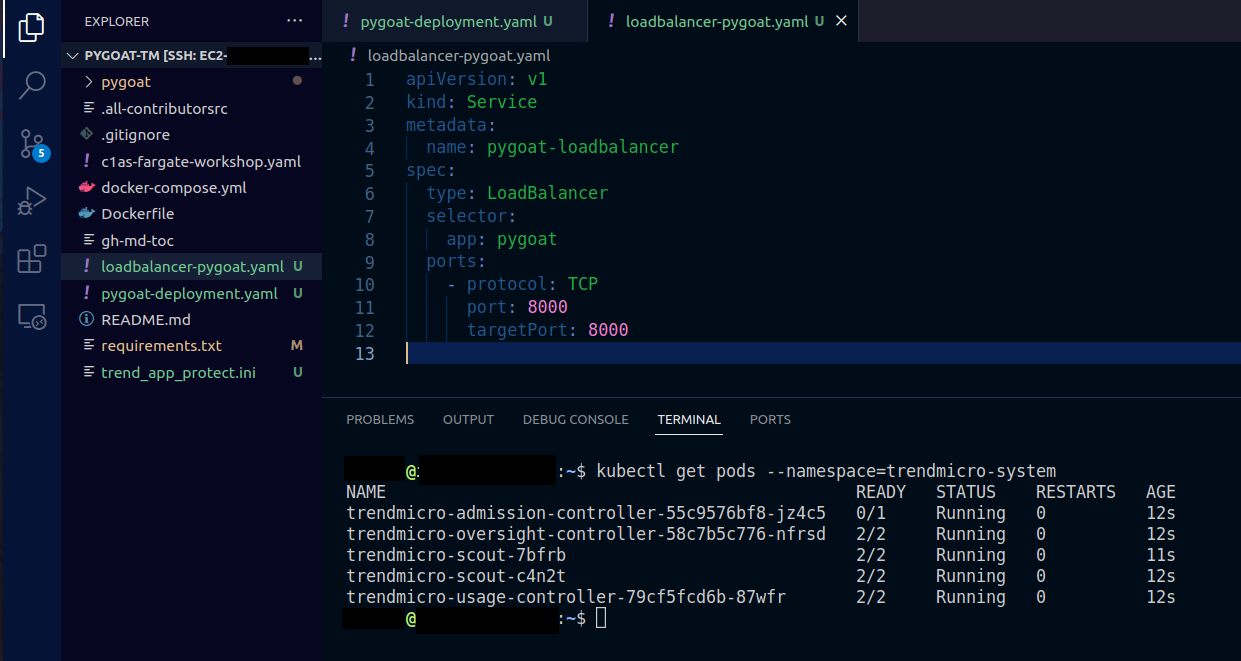
1.12. Let’s see if the Container Security Pods are running already
- Type the command
kubectl get pods --namespace=trendmicro-system - Wait for all the pods to be running and ready
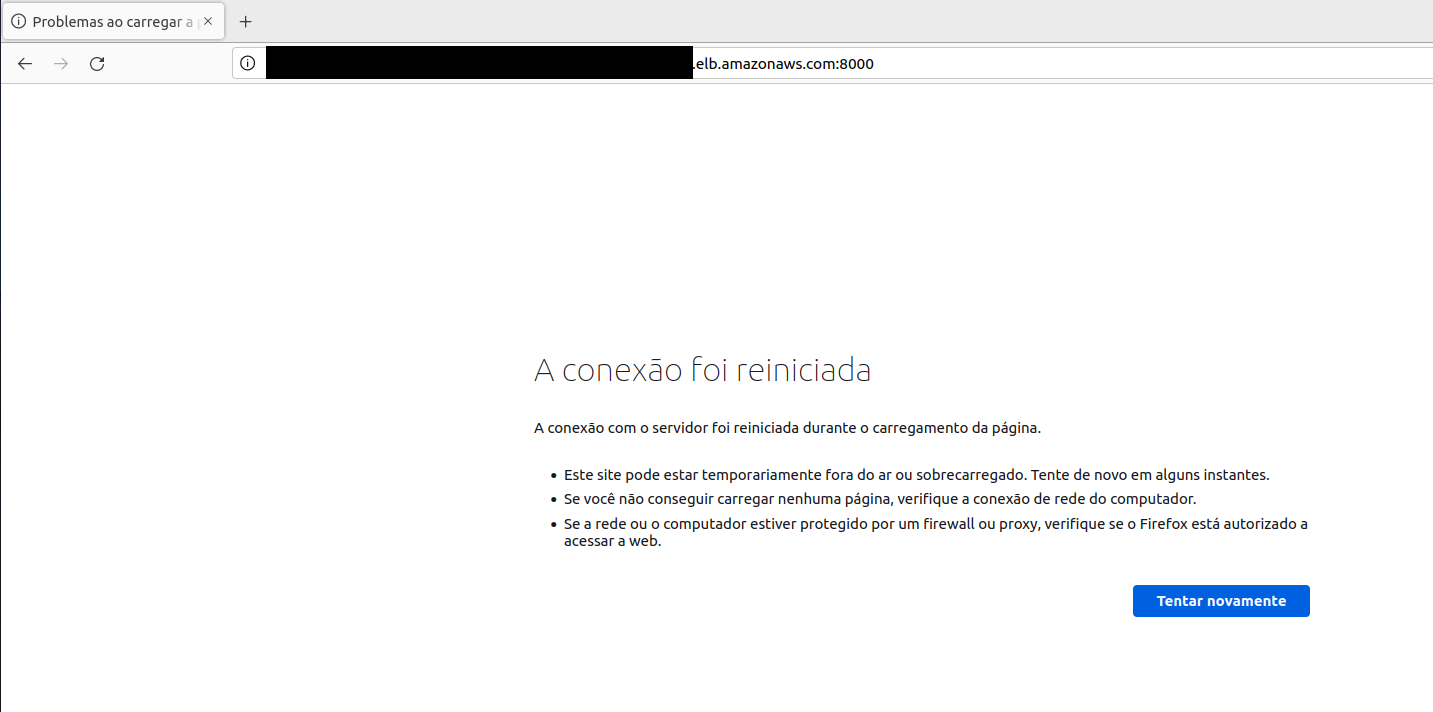
1.13. Go back to your Pygoat application
- Access the application again or refresh the page
- Now we can’t access our web application anymore
- That’s because our containers were isolated by Container Security
- All of that was defined in our policy with the option to isolate privileged containers
1.14. Try to deploy the application again
- In the terminal, type the command
cd pygoat-tm/enter the pygoat directory again - Let’s delete those isolated pods
- Type the command
kubectl delete deployment pygoat-deployto delete the privileged containers - Type the command
kubectl get podsto check if the pods were deleted - Try deploy the pod again
- Type the comand
kubectl apply -f pygoat-deployment.yaml
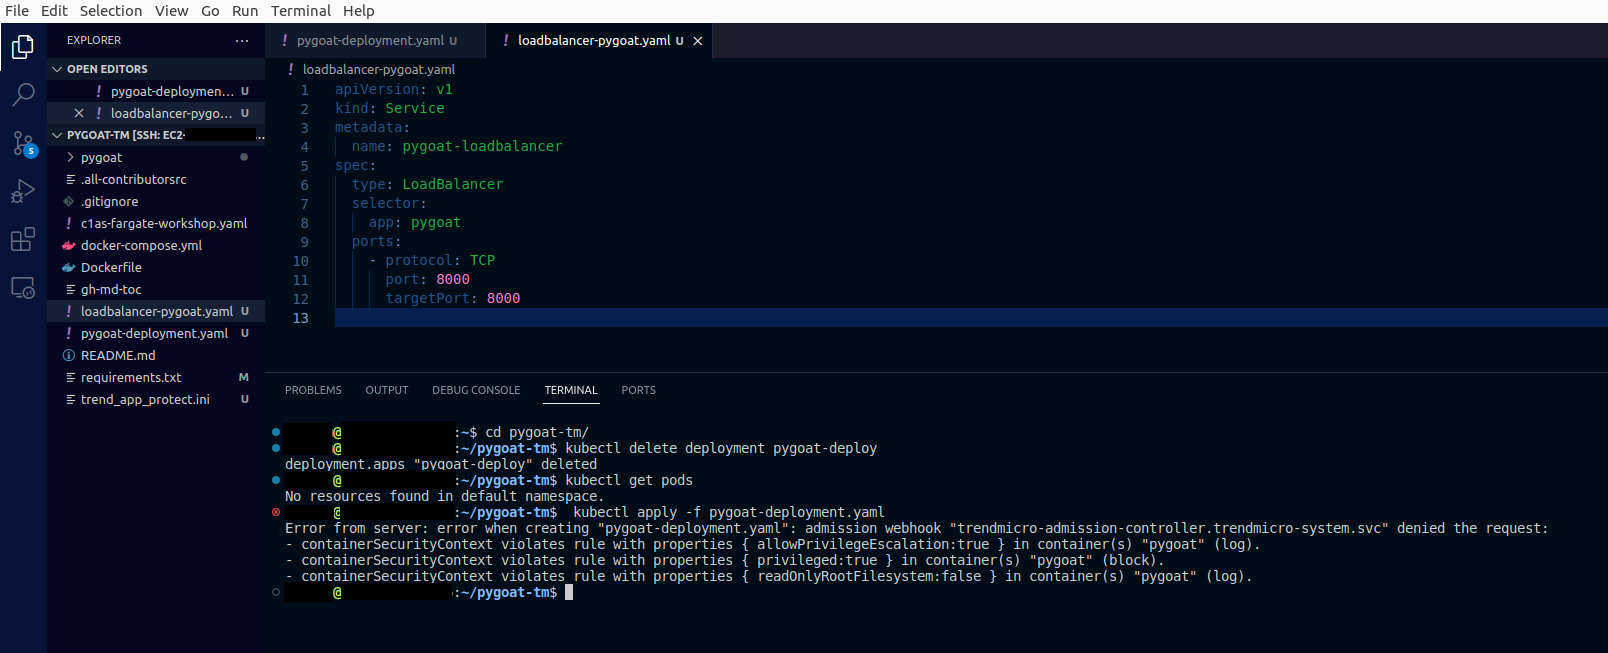
- Our deployment was blocked because how we configured our policy to block any deploy of privileged containers
- So not only privileged containers cannot run in our Cluster but any new other containers cannot be deployed as privileged
1.15. Let’s fix our deployment by not allowing our app’s container to be privileged
- In the pygoat-deployment.yaml file
- Set the securityContext to false instead of true
- Type the command
kubectl apply -f pygoat-deployment.yamlto deploy again the app to EKS
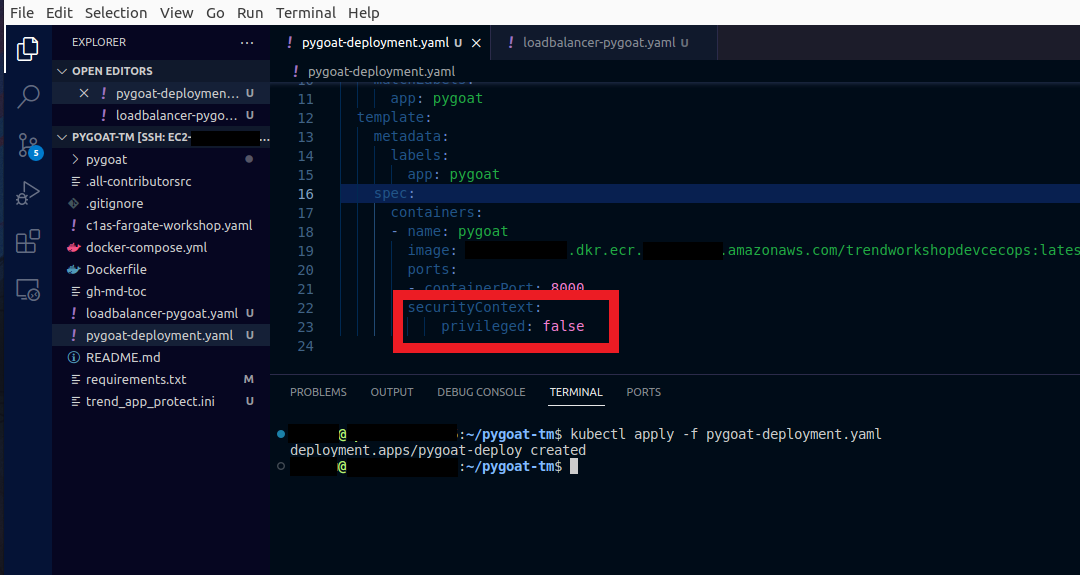
- Now our deployment has not been blocked as we are not trying to deploy a privileged container
In this pod definition, we do not have the securityContext set to privileged = true anymore. So, this policy that we'll create now will not be blocked because we are not deploying privileged containers.
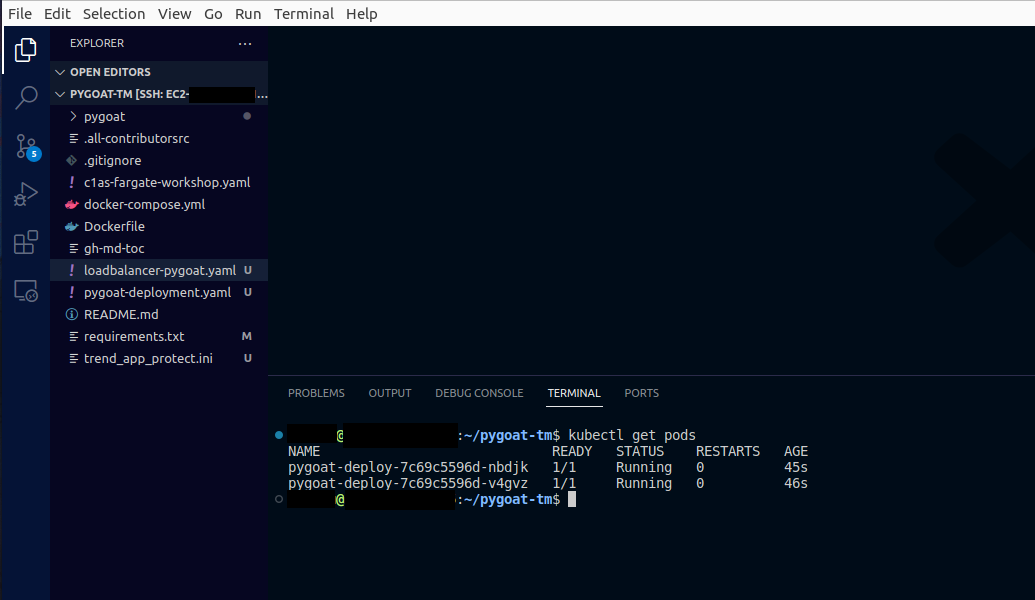
1.16. Now our application will be online again and without the container as privileged
- Type the command
kubectl get pods - Wait until running is showing
- Access the application again
- Type the command
kubectl get svc - In your browser paste the URL
http://###:8000/ - Replace the ### with the value you got from your EXTERNAL-IP

- We can now access our application normally again!
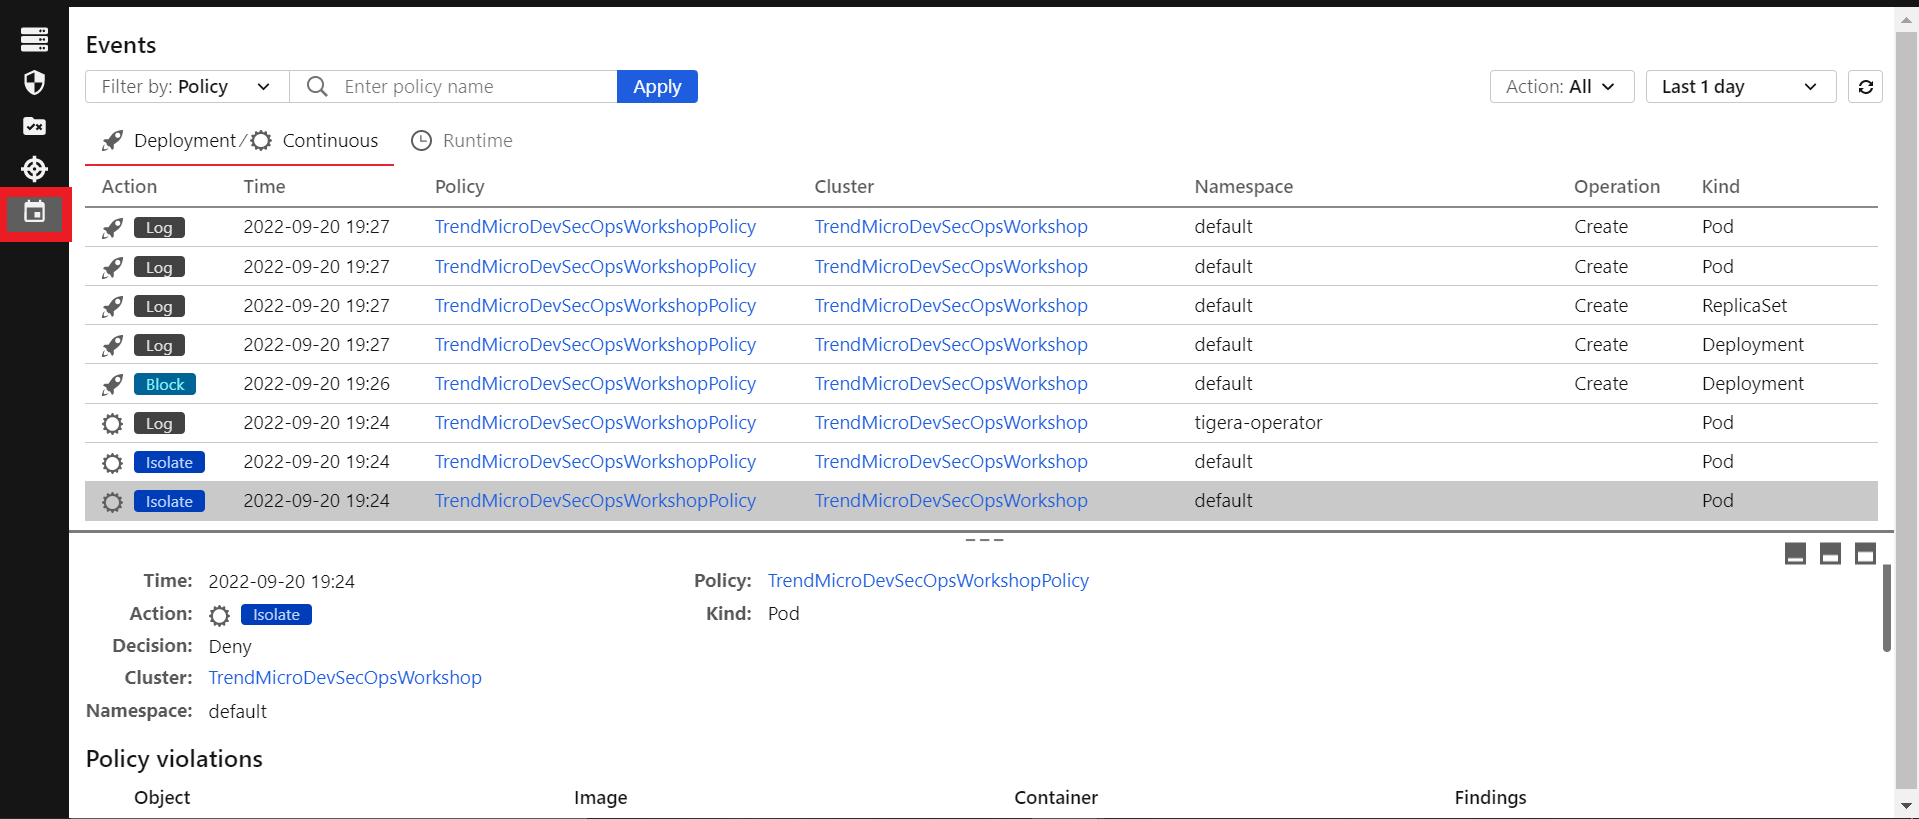
We can also check the events that happened in the Container Security console
- Go to your Cloud One account > Container Security
- Click on the last icon