Security Tools
Finally we will start installing and using our tools to secure and protect our application and cloud infrastructure.
Introducing Trend Micro Cloud One™ – Network Security
Network Security provides a powerful network security layer that deploys seamlessly into existing architecture, inspecting inbound and outbound traffic, detecting and preventing attacks, and enabling organizations to securely achieve their business goals.
-
Advanced security and network traffic protection
-
Automatically enabled threat intelligence to protect your environment against the latest vulnerabilities
-
Further protect and restrict inbound and outbound traffic using Geolocation and Domain filtering.
Network Security - Hosted infrastructure deployment
Trend Micro creates and controls all of your security infrastructure, minimizing operational overhead and complex configuration changes. Securing your cloud assets with Network Security also provides best-in-class protection, with virtual patching and geolocation filtering. Additionally, there are no latency concerns for hosted infrastructure deployments in AWS.
You can deploy Network Security with hosted infrastructure as a part of the free 30-day trail. The trial license allows you to create Network Security endpoints in a single VPC
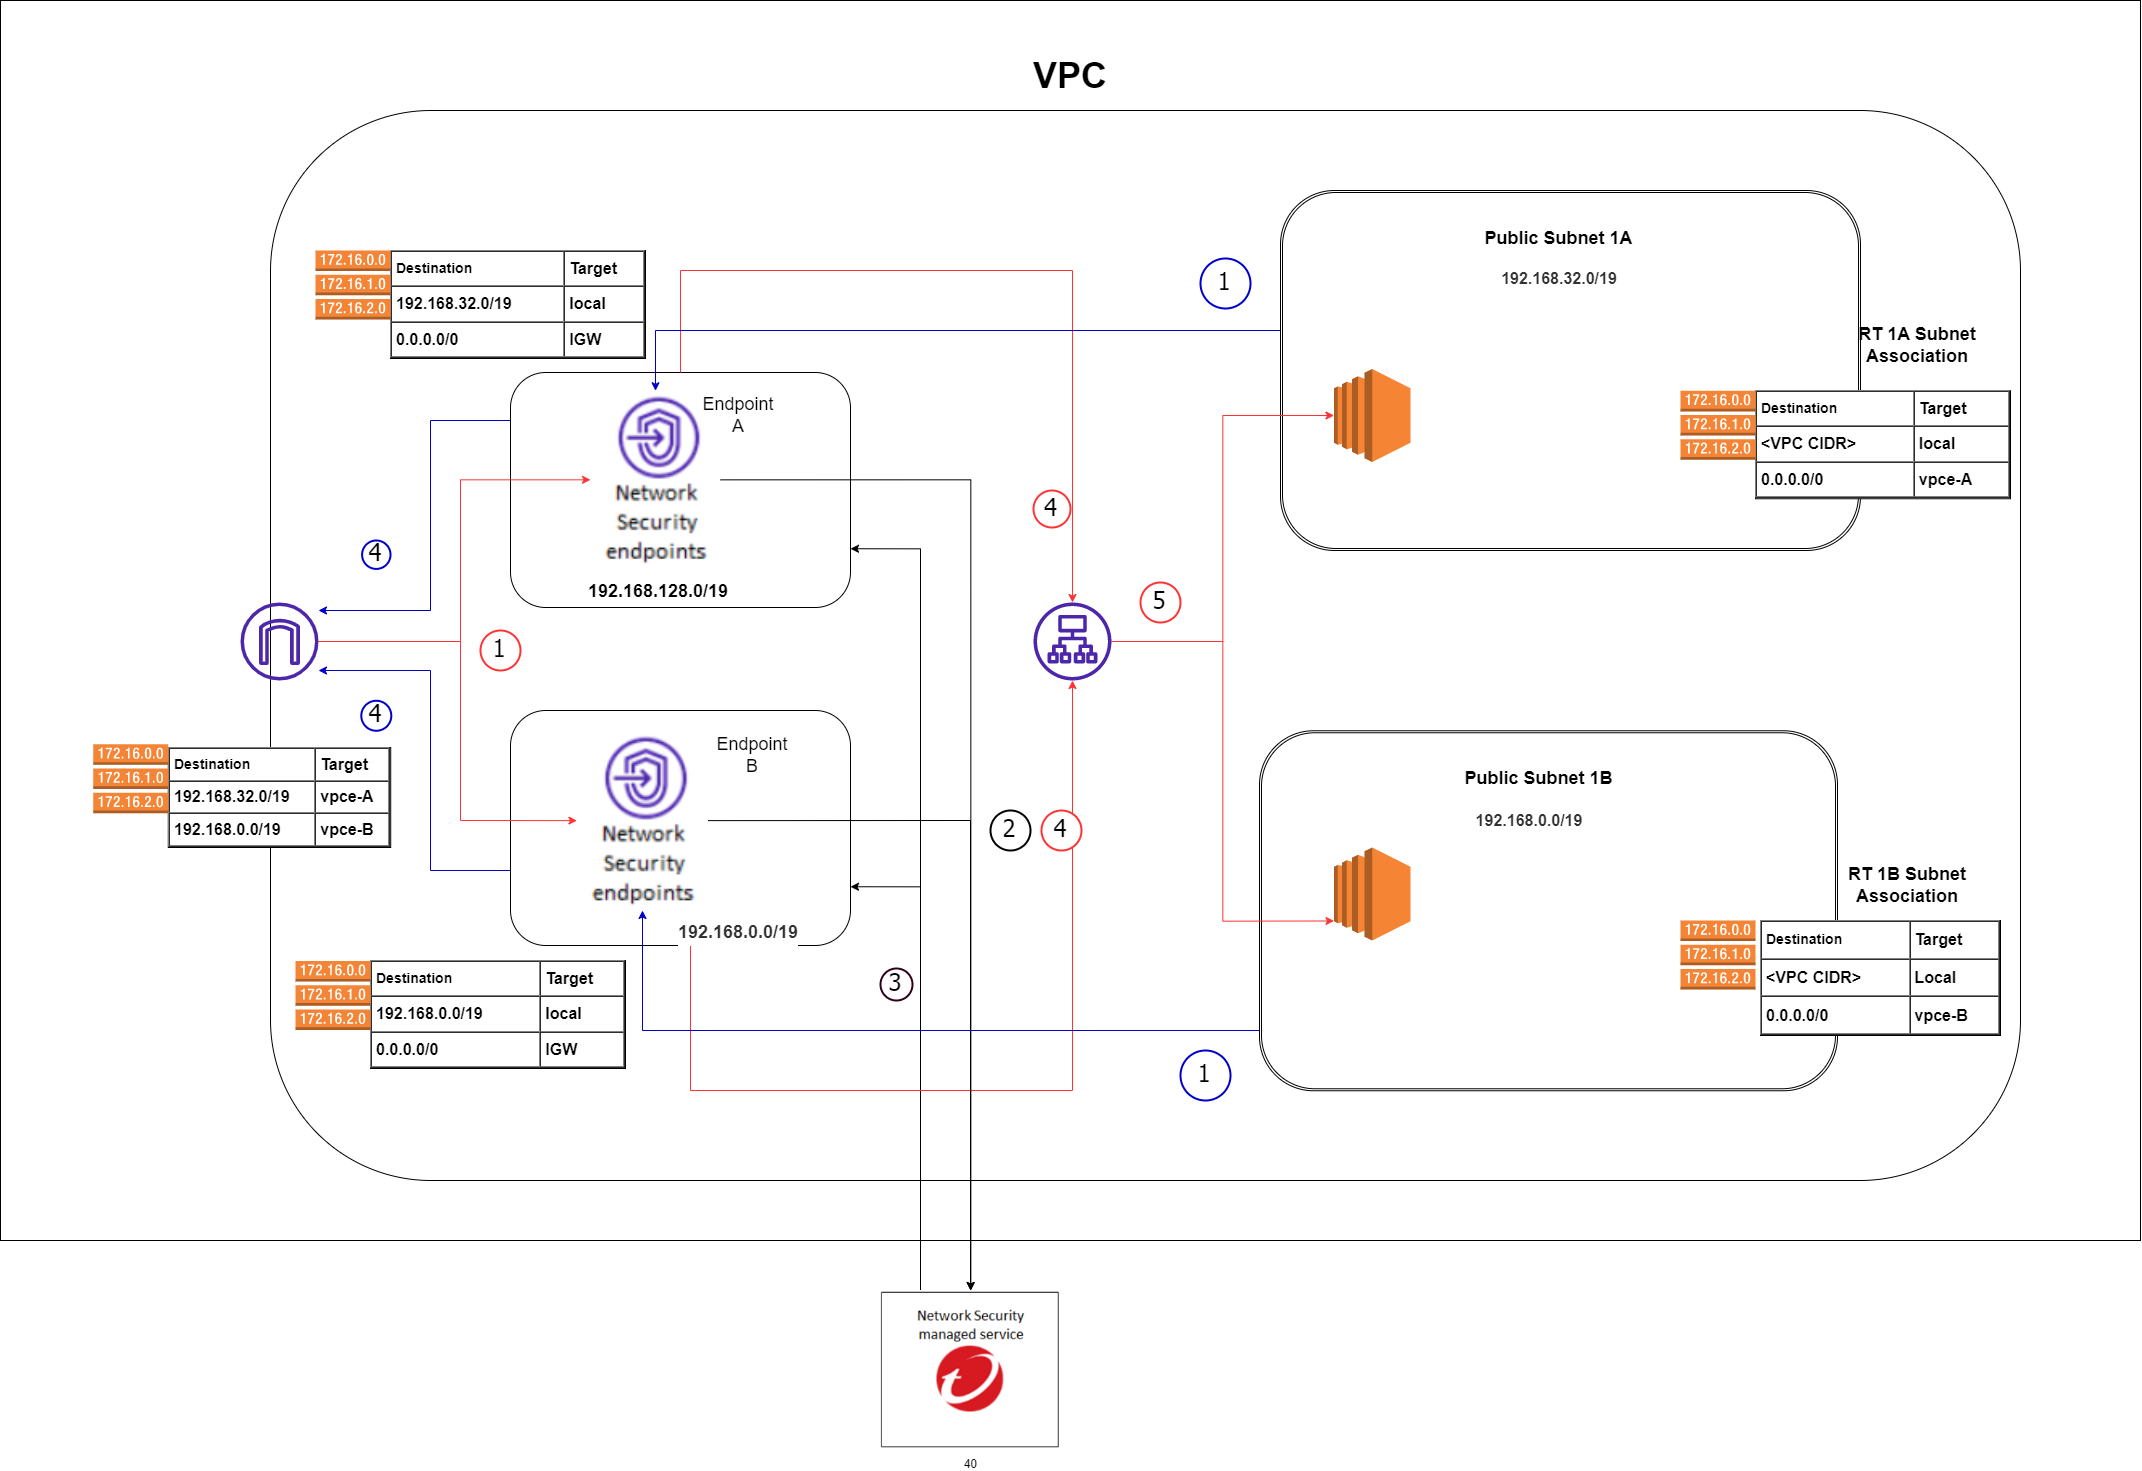
Deployment overview
Deploying Network Security with hosted infrastructure requires only a few steps and has no overhead management during or after deployment. With this service, the traffic in your environment is routed through Network Security endpoints to be inspected. The only items you manage are the Network Security endpoints in your cloud environment; the virtual appliances, as well as any additional infrastructure requirements, are managed by Network Security.
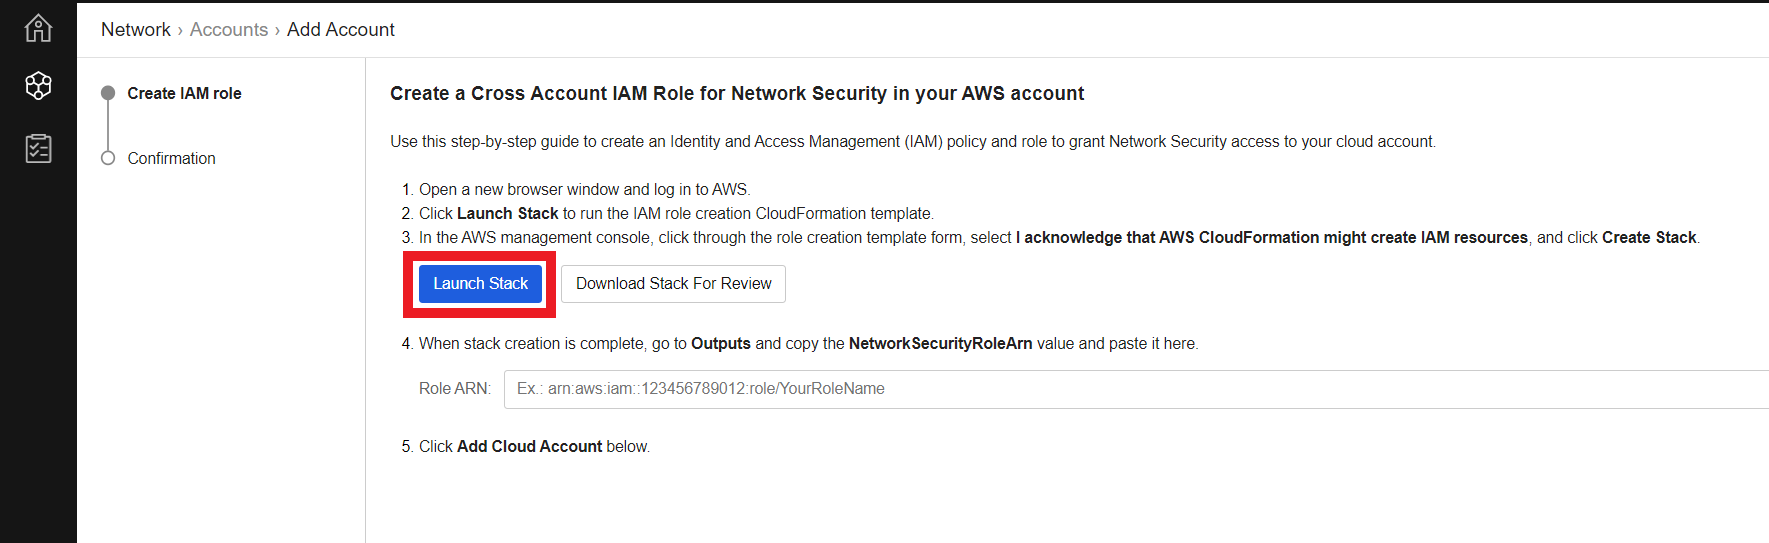
1. Let’s add our AWS account to our Cloud One Network Security account
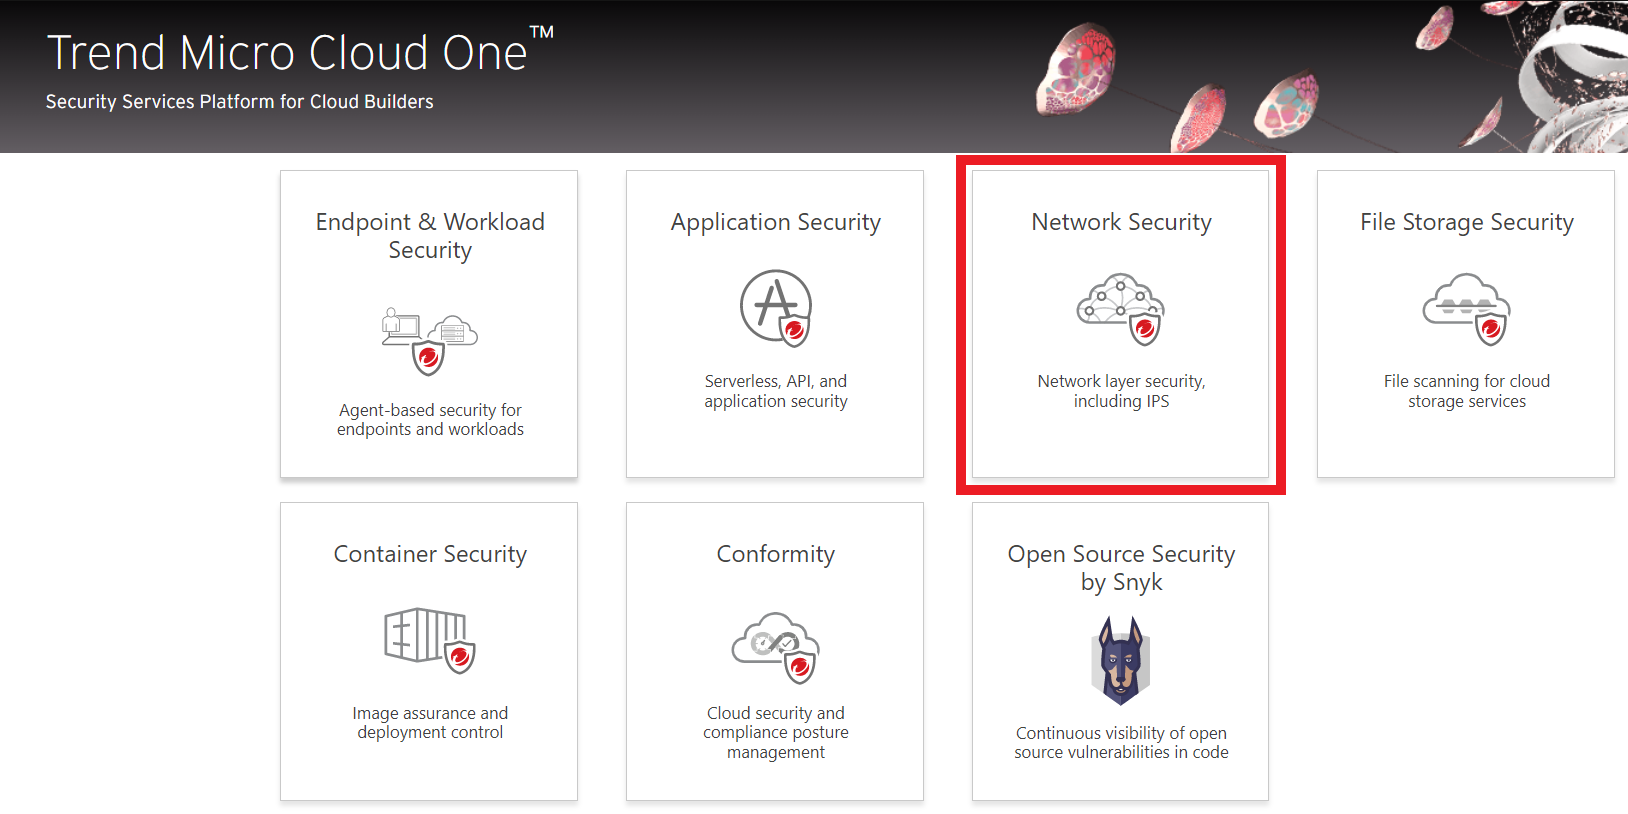
- On the Trend Micro Cloud One console
- Click on the Network Security box
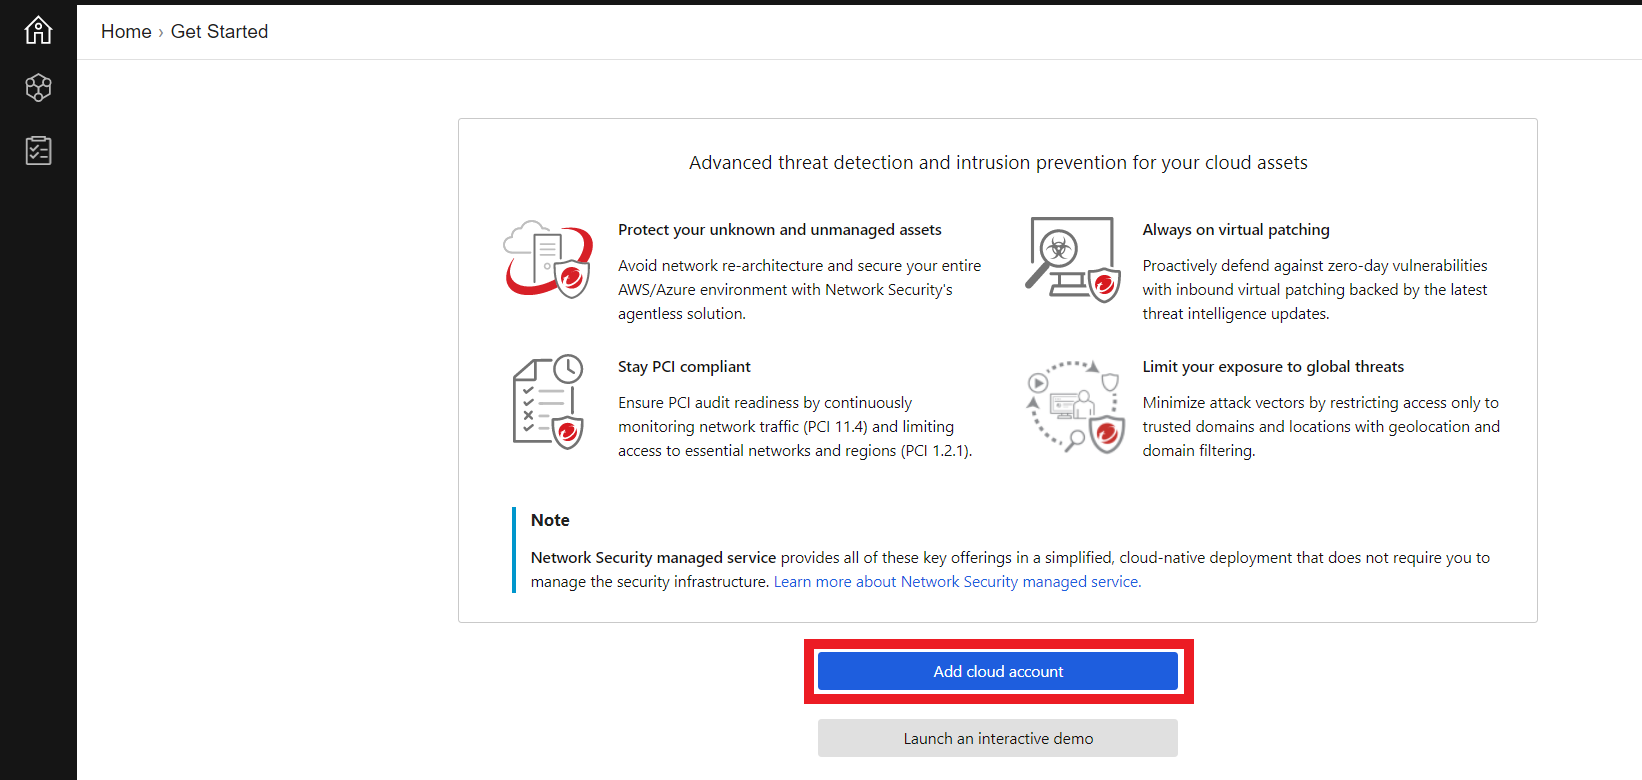
1.2. Click on Add Cloud Account
1.3. Create an IAM role and policy for Network Security in your AWS account using the generated CloudFormation template
- Click on Launch Stack
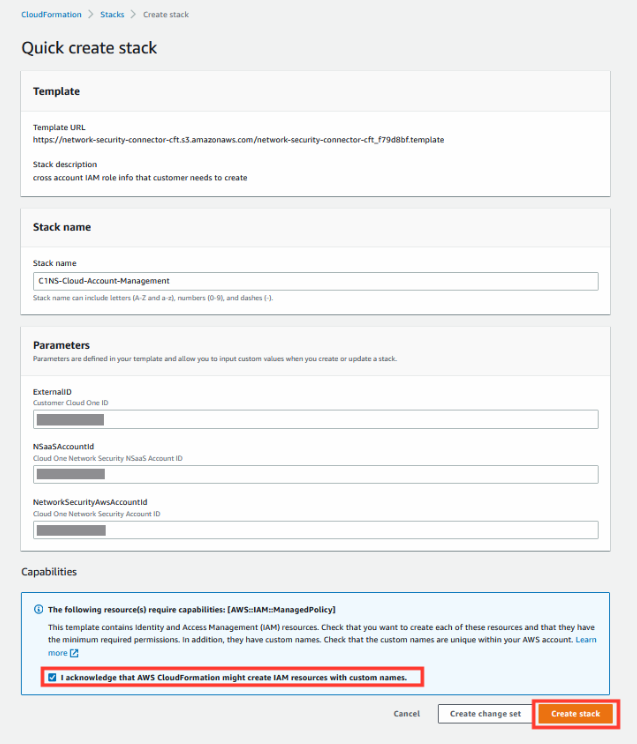
1.4. Clicking Launch Stack will navigate you to AWS CloudFormation
- Do NOT edit any of the stack parameters.
- Check the box to acknowledge resources.
- Click on Create Stack
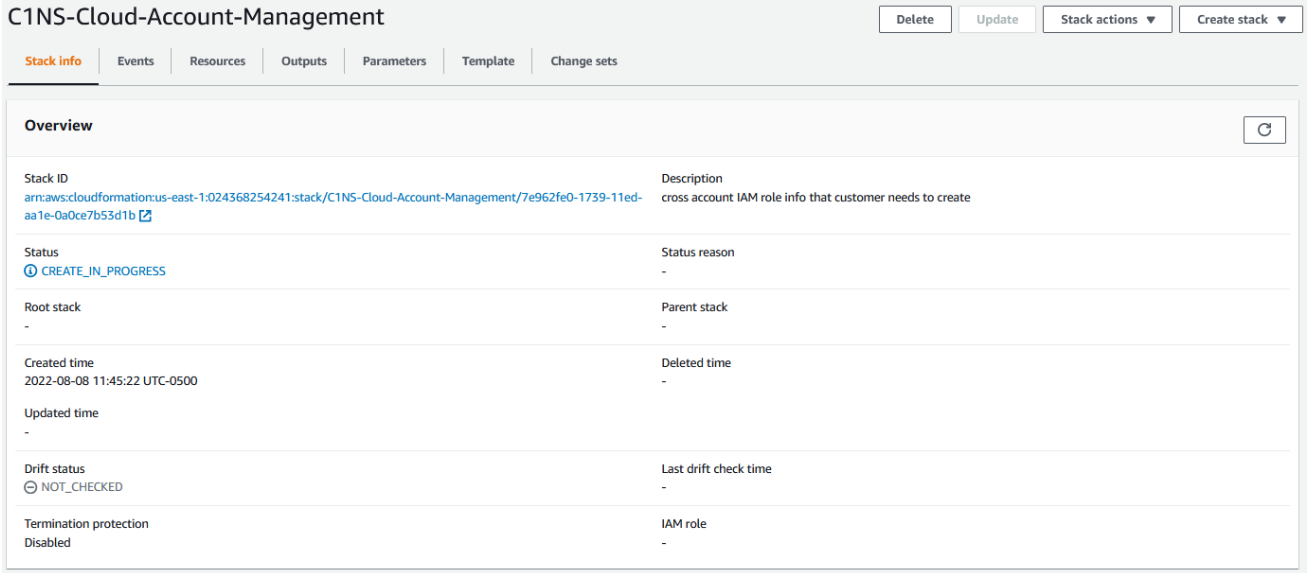
1.5. Once the Stack has completed successfully
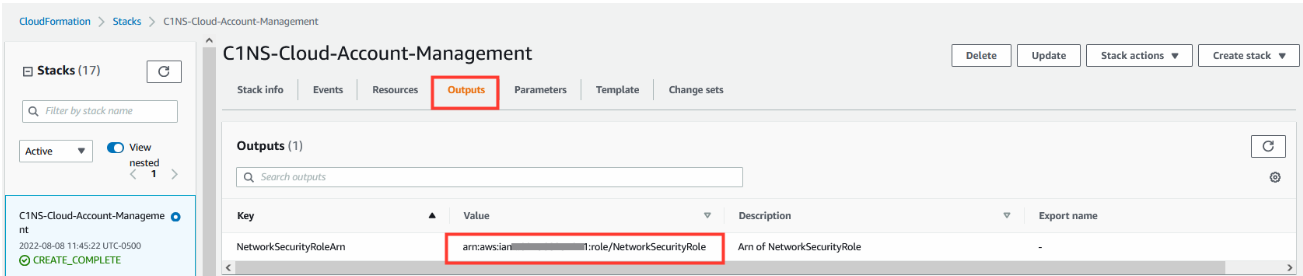
- Select the tab Outputs
- Copy the ARN value for the IAM role created.
1.6. Navigate back to Cloud One - Network Security
- Paste in the ARN value copied from the CloudFormation Outputs.
- Click on + Add Cloud Account
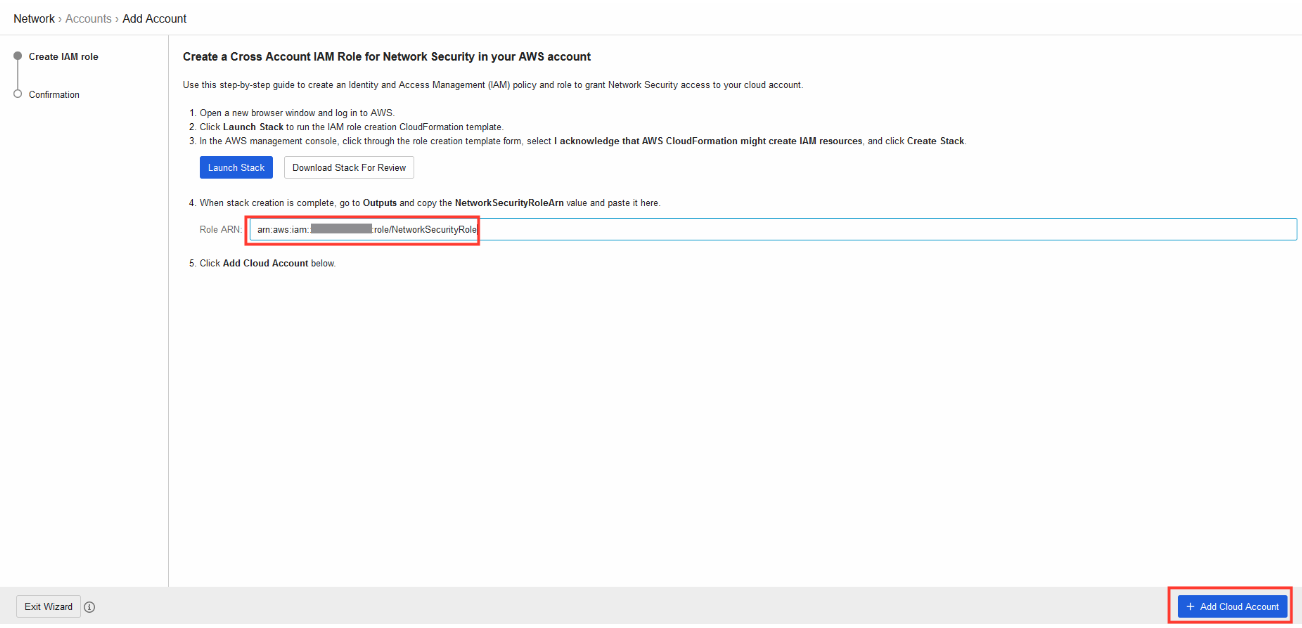
1.7. Confirm the account has been created successfully
- Once confirmed, click on Exit Wizard

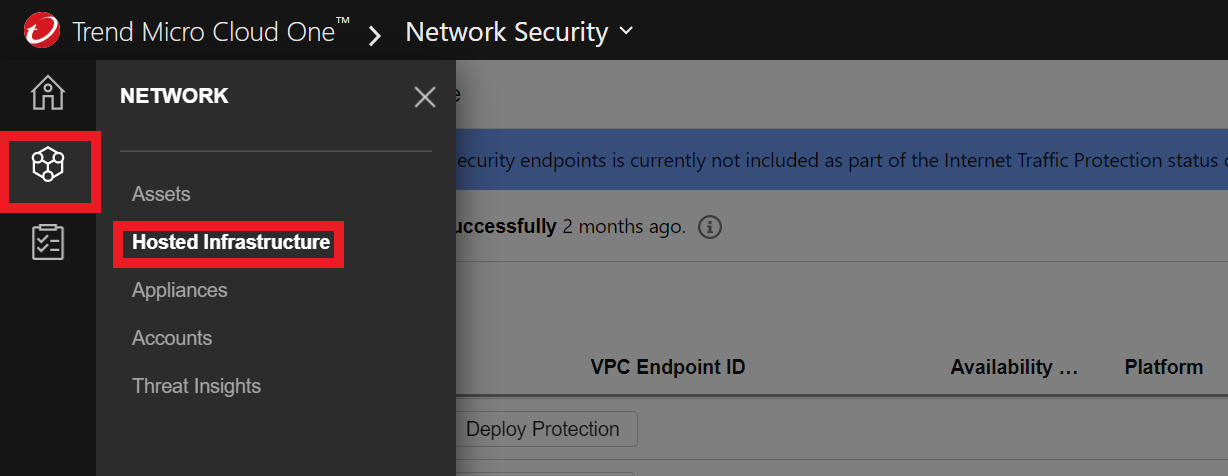
2. Let’s deploy the Network Security Endpoint in our VPC
- In the column on the left, click on the second icon
- Click on Hosted Infrastructure
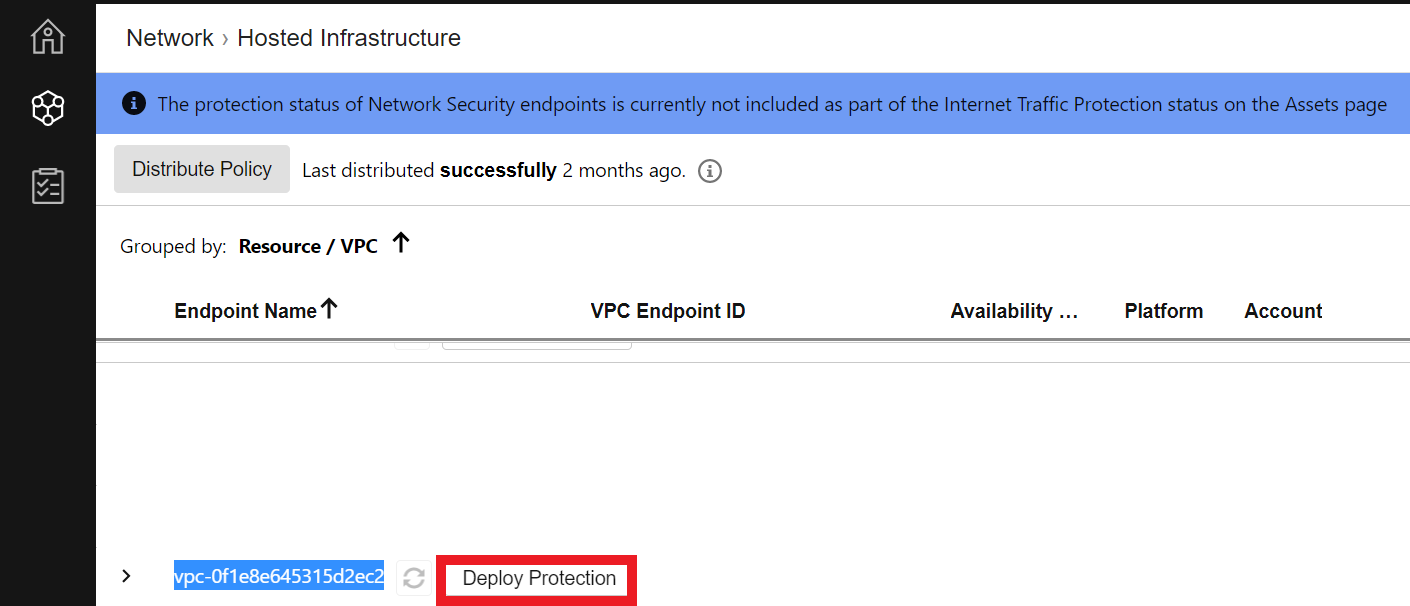
2.1. Select the VPC that you will deploy the Network Security Hosted Infrastructure
- The ID of the VPC can be found in the Outputs tab of the eksctl-EKS-DevSecOps-TrendMicroWorkshop-cluster CloudFormation template
- Once you have located the VPC. Click on Deploy Protection
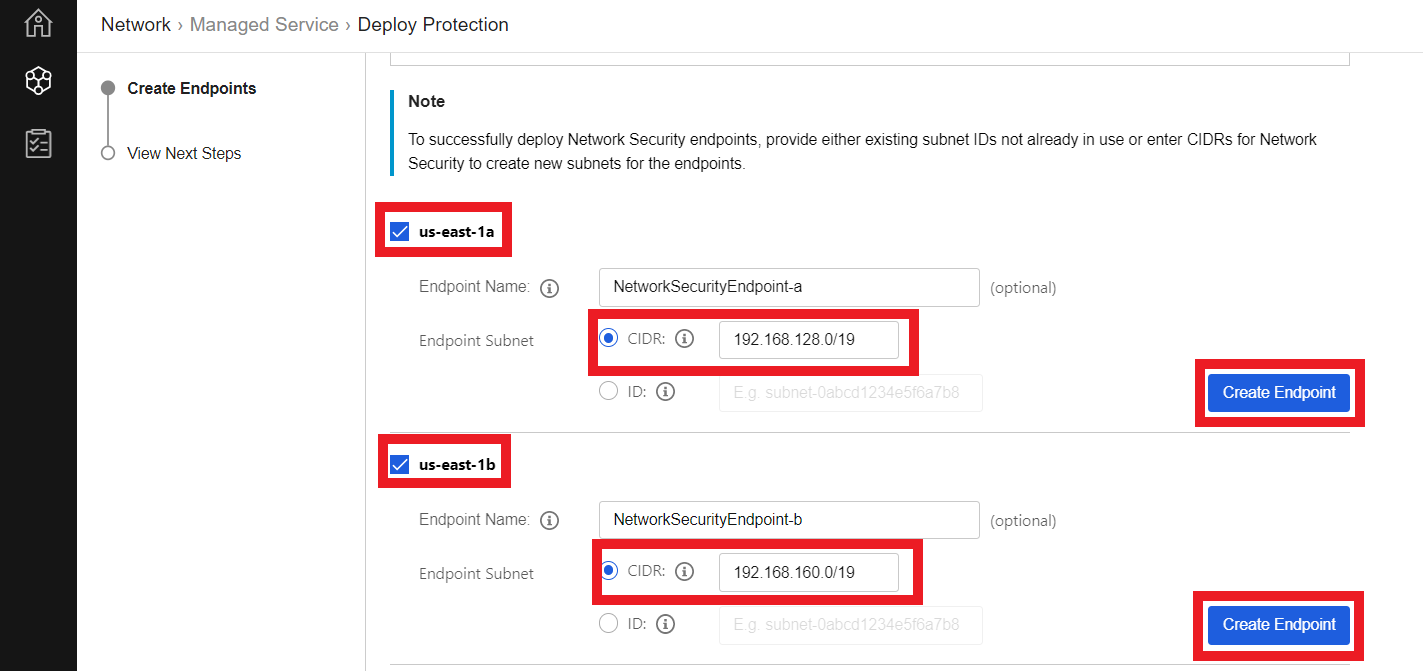
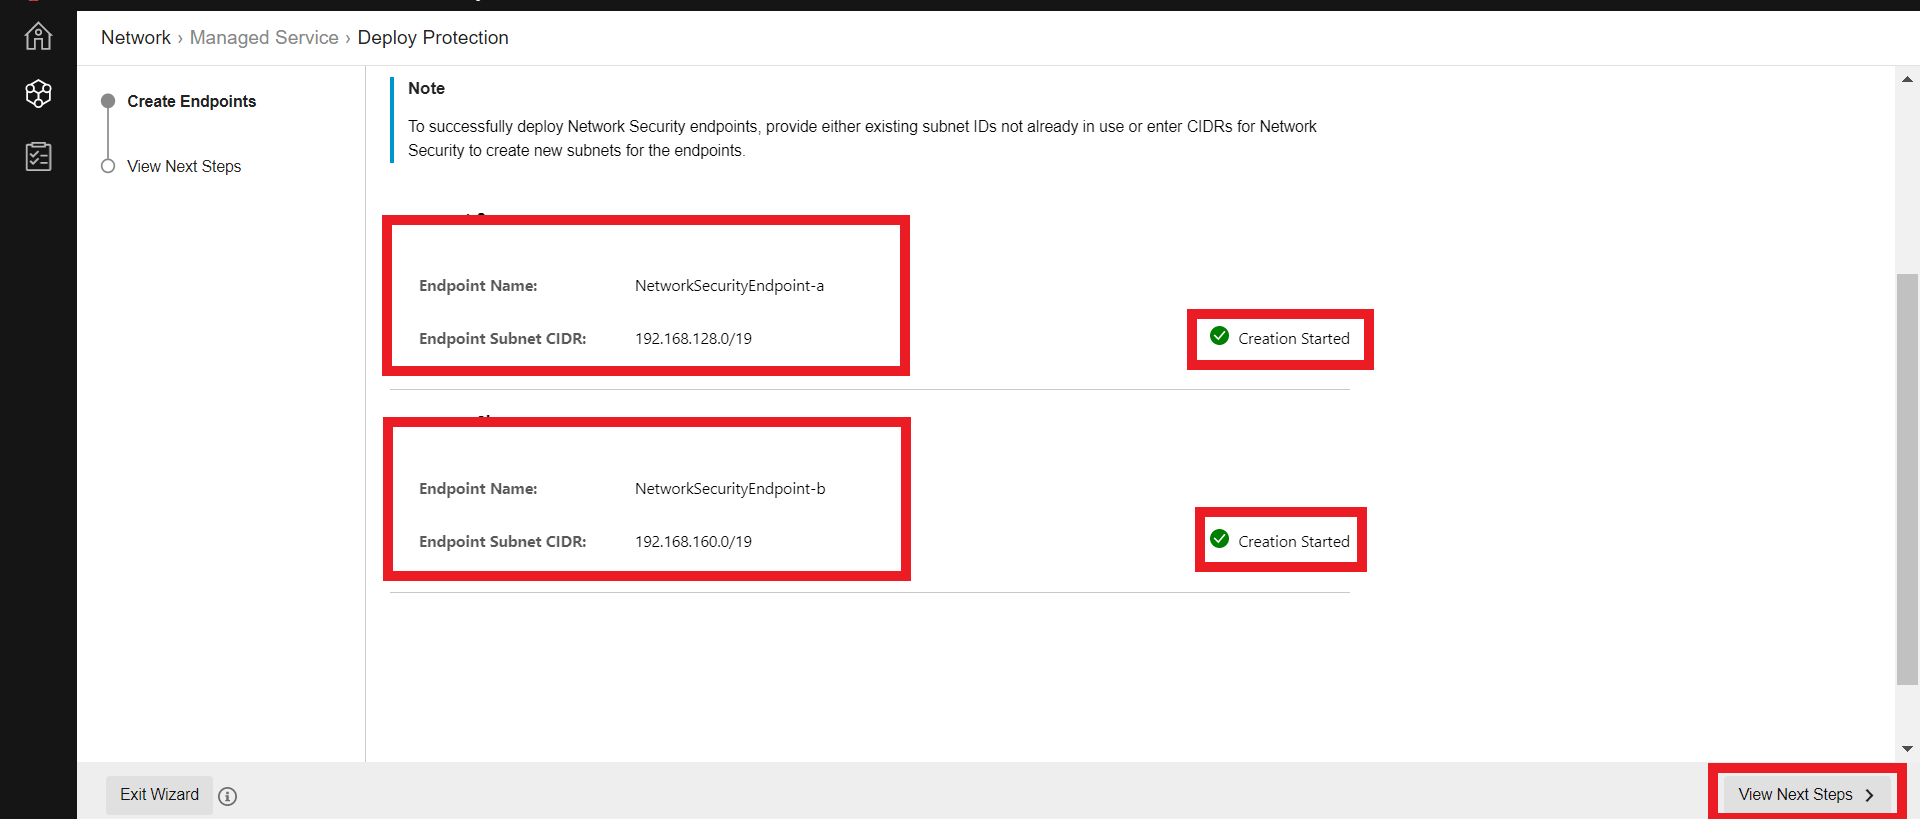
2.2. Choose the Availability Zones in your VPC and provide a specific subnet for the inspection endpoint
- Check the box for us-east-1a
- Optional - Define a name for the subnet
- Select CIDR
- Paste
192.168.128.0/19 - Click Create Endpoint
Do the same in us-east-1b
- Check the box for us-east-1b
- Optional - Define a name for the subnet
- Select CIDR
- Paste
192.168.160.0/19 - Click Create Endpoint
2.3. Once the creation has started click on View Next Steps
- Click on Complete Wizard
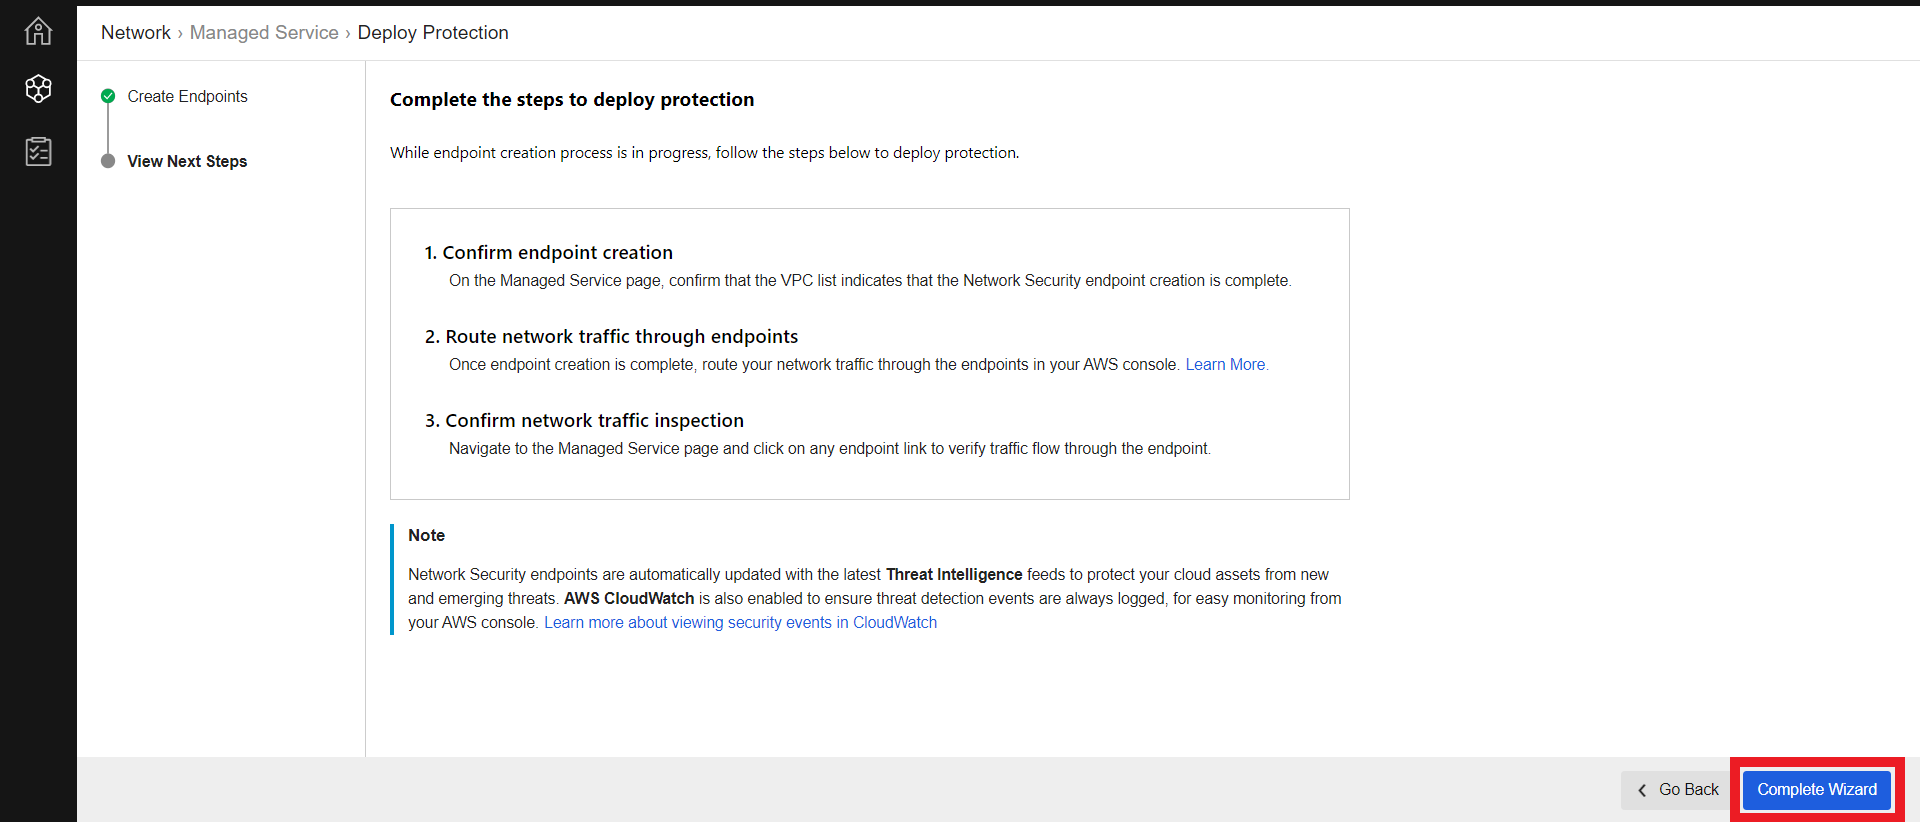
2.4. Confirm endpoint creation
- In Cloud One - Network Security > Network > Hosted Infrastructure
- Expand the VPC to see the status of the enpoint
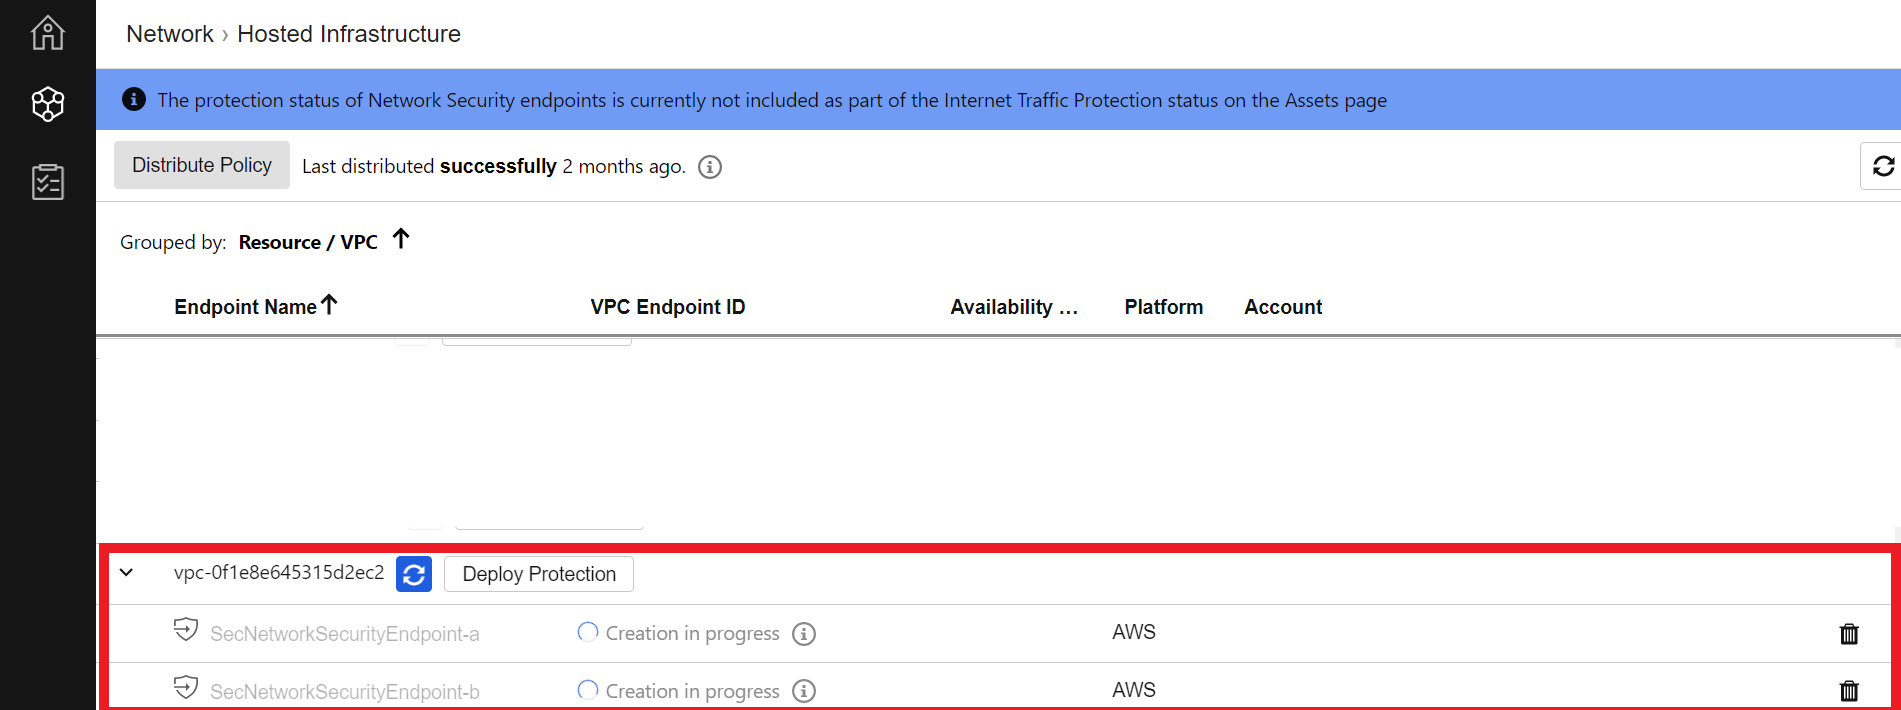
It takes up to 10 minutes to deploy the Endpoint

3. Route network traffic through endpoints
After your Network Security endpoints have successfully deployed, modify the traffic routes in your cloud environment so that traffic is directed to the Network Security endpoints for inspection.
- Navigate to the AWS Console > VPC
- Under Virtual Private Cloud, click Route Tables
- Click Create route table.

3.1. Creation of Edge Route Table
- Name: (optional)
DevSec WorkShop Edge association rtb - Select your VPC ID
- Click on Create Route Table

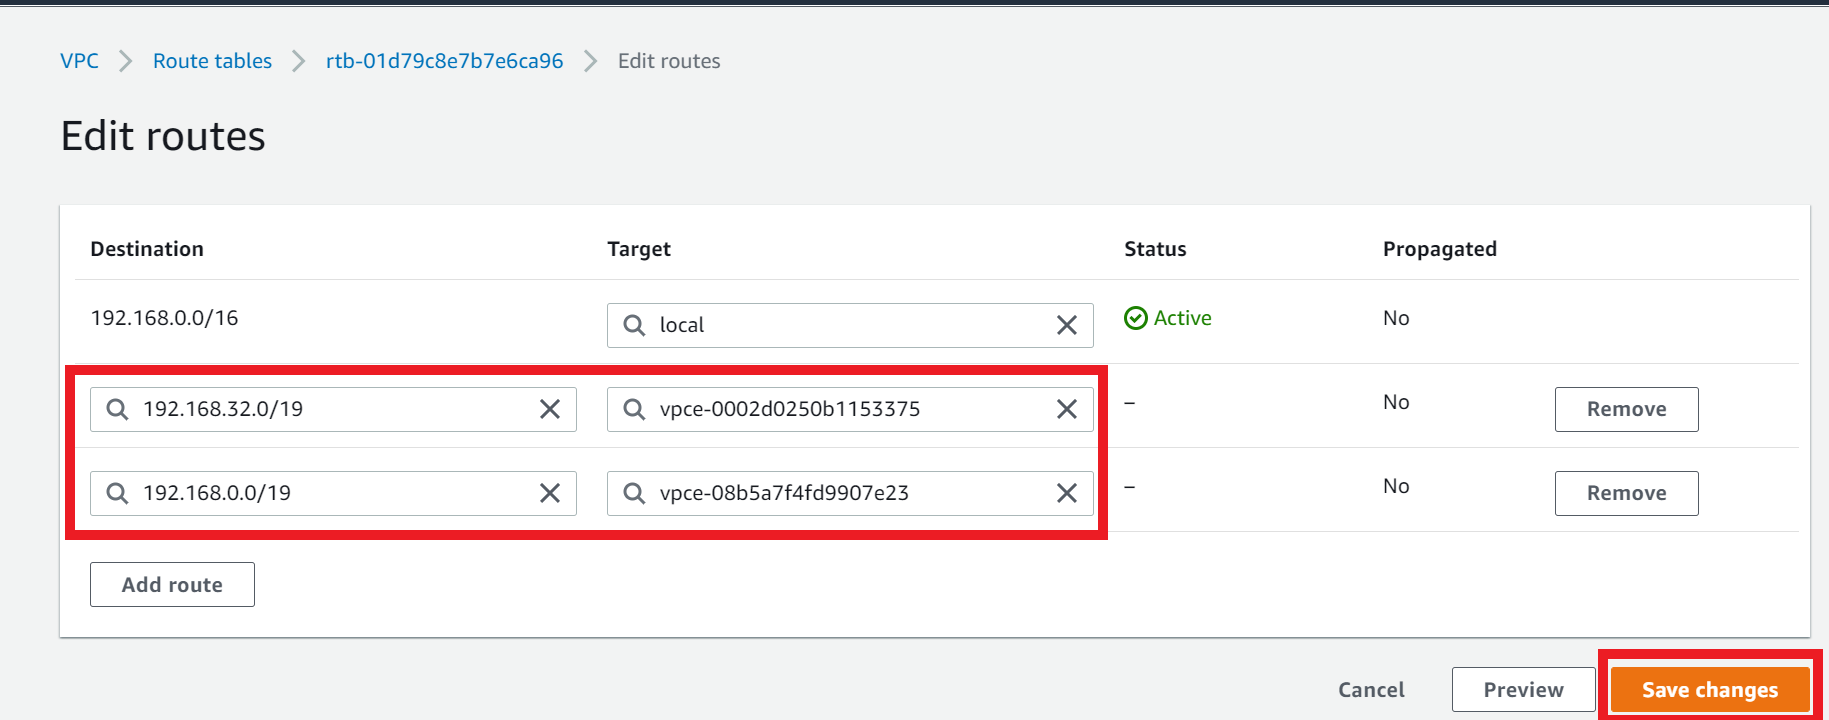
3.2. Edit the Route Table routes
- Add the following route
| Destination | Target |
|---|---|
| 192.168.32.0/19 | VPC Endpoint a |
| 192.168.0.0/19 | VPC Endpoint b |
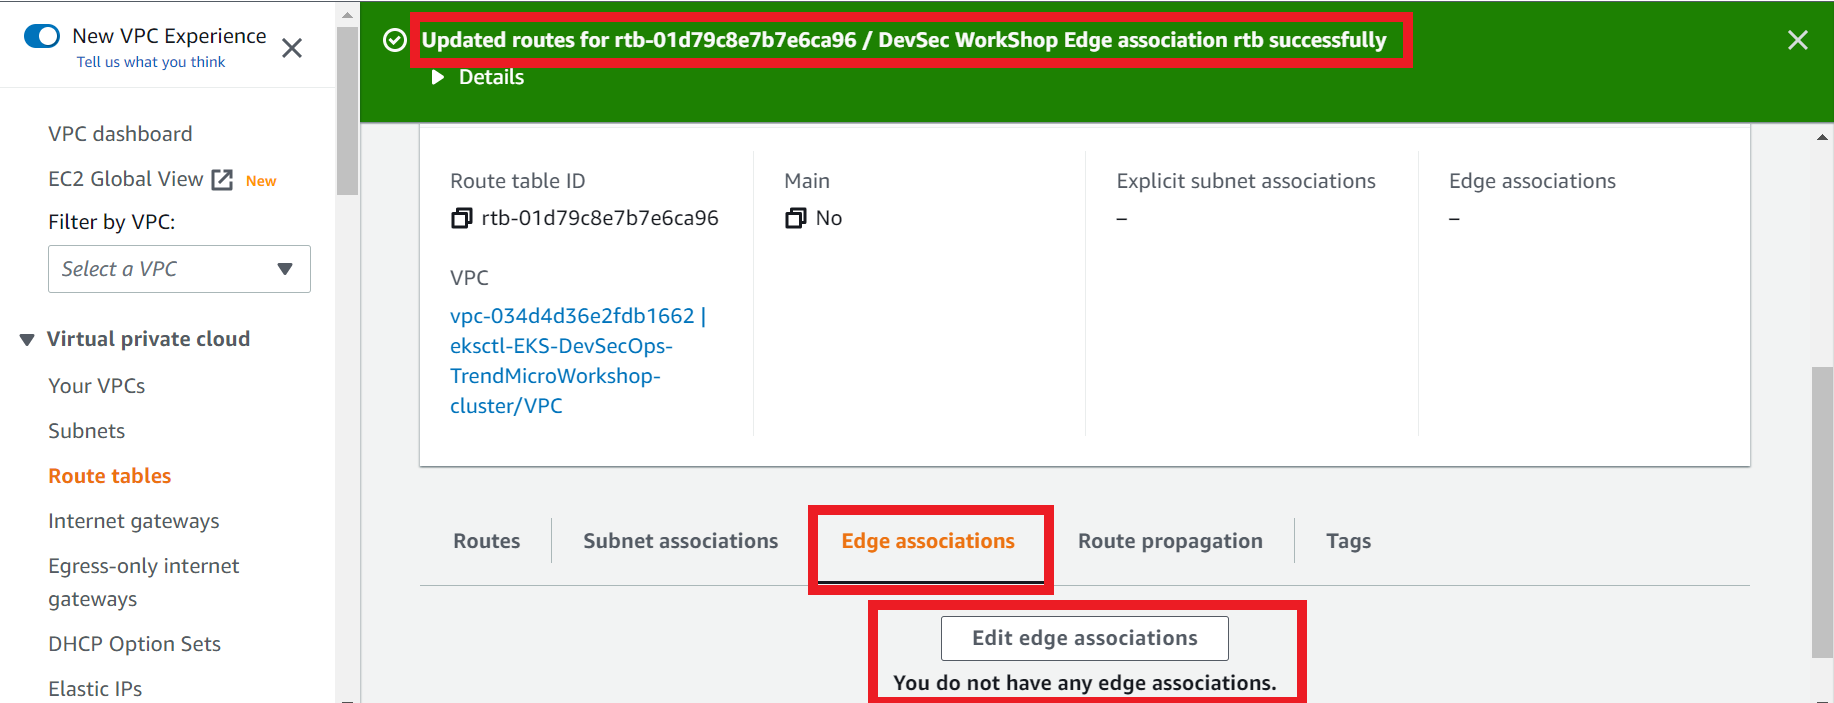
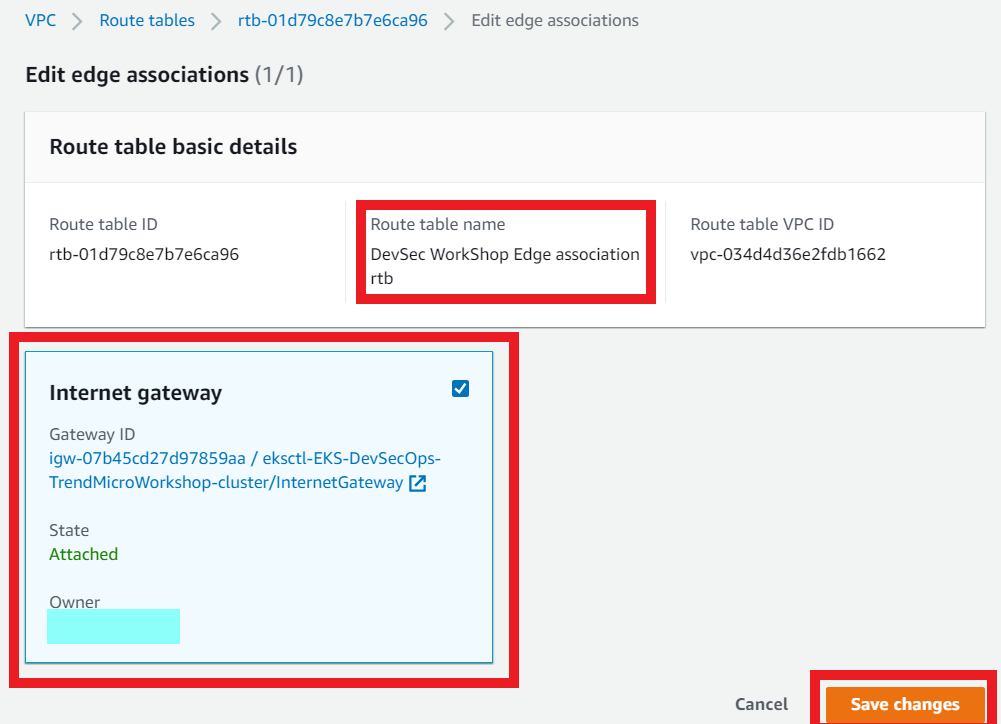
3.3. Create the edge association
- Select the edge association route table
- Click on the Edge Associations tab
- Click Edit edge associations
- Select the Internet Gateway and any Virtual Private Gateways that you want to protect, and then click Save changes
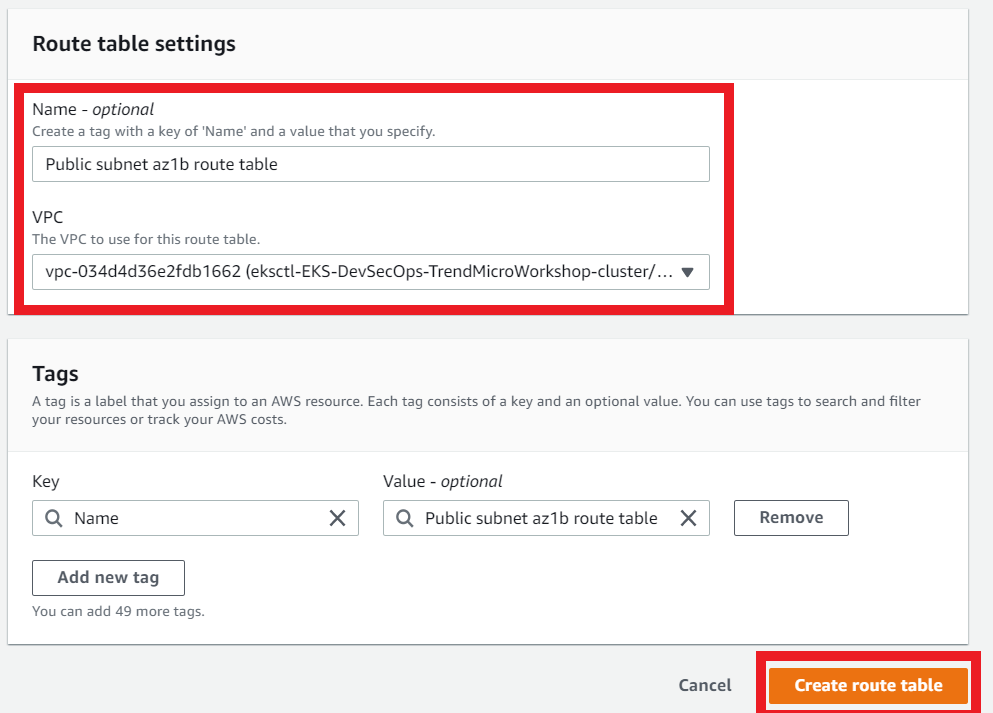
3.4. Create another route table for the public subnet in AZ us-east-1b
This route table is associated with the Public Subnet in AZ us-east-1b that was created for this VPC
- Name: (optional)
Public subnet az1b route table - Select your VPC ID
- Click on Create Route Table
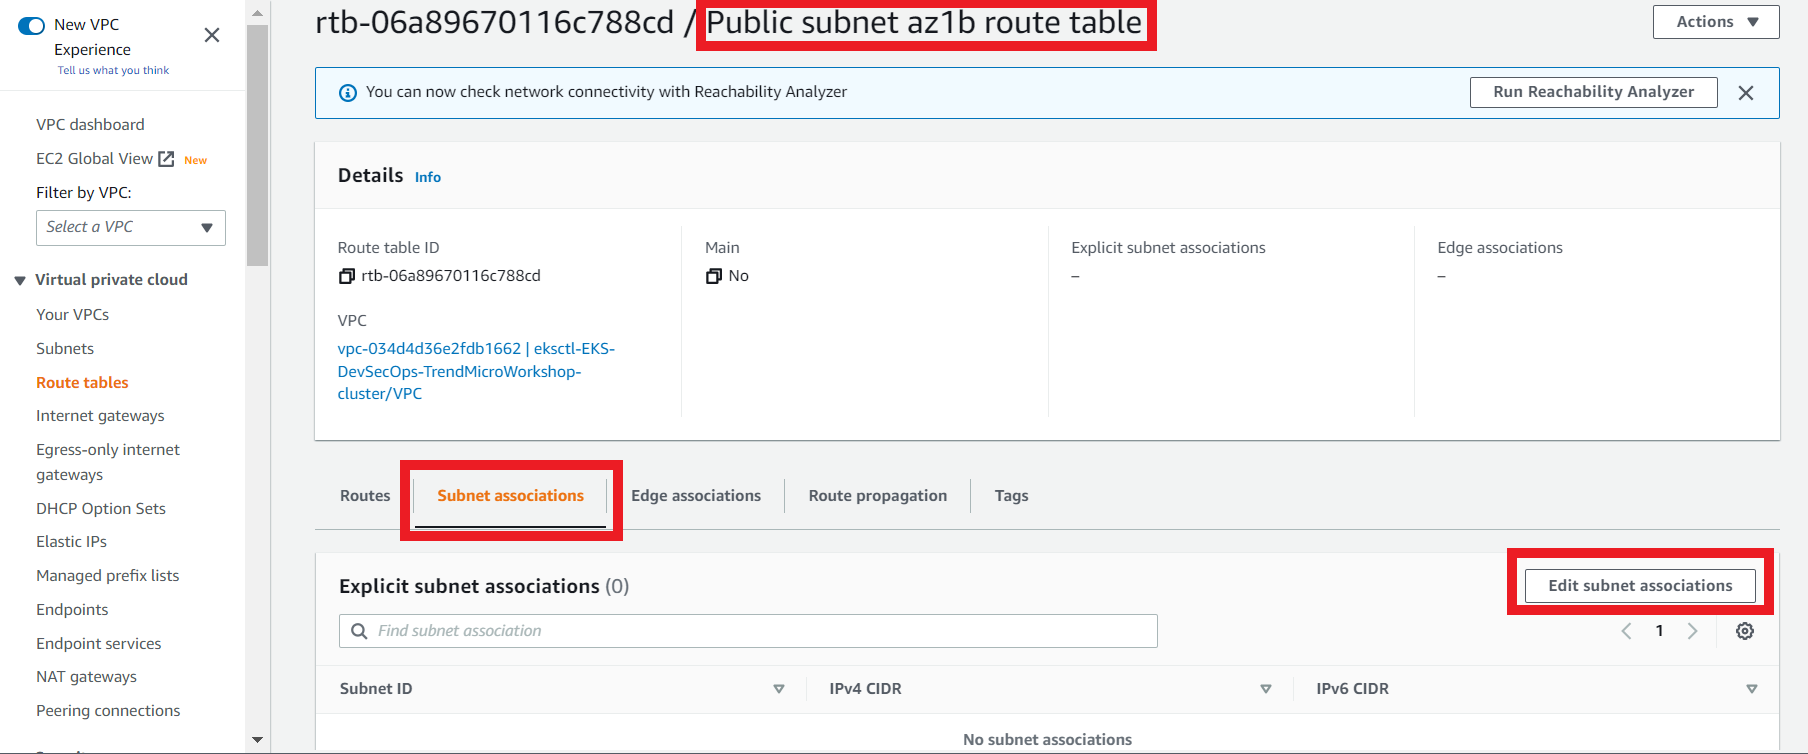
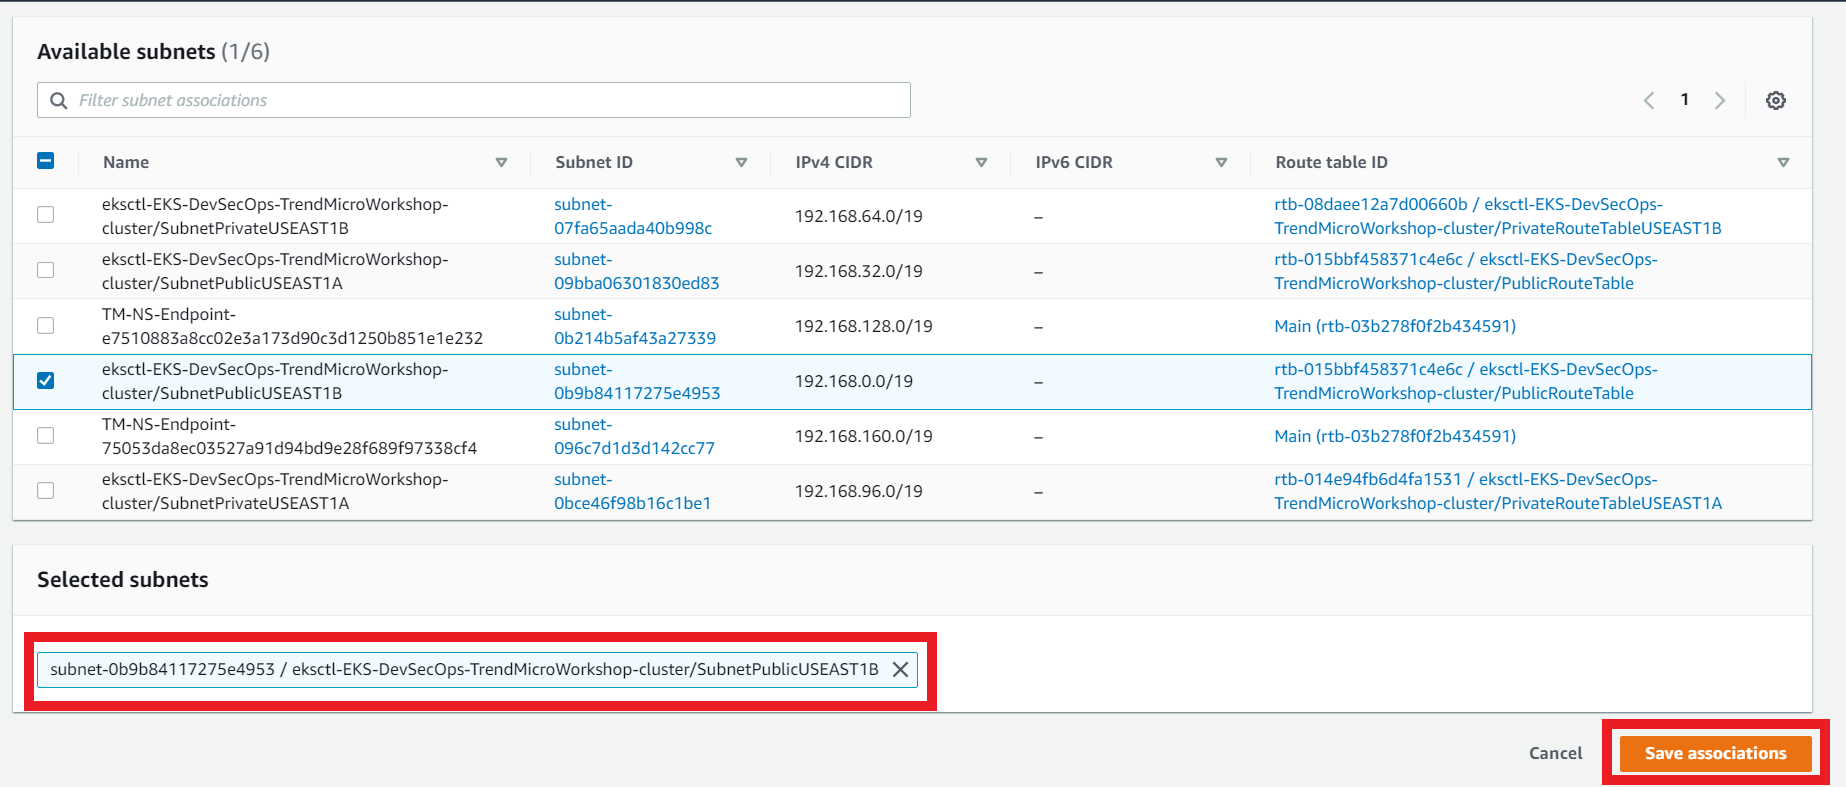
3.5. Create subnet association
- On the Public subnet az1b route table
- Click the Subnet Associations tab
- Click Edit subnet associations
- Select the subnet that contains the eksctl-EKS-DevSecOps-TrendMicroWorkshop-cluster/SubnetPublicUSEAST1B
- Create a subnet association for this route table for the subnet SubnetPublicUSEAST1B
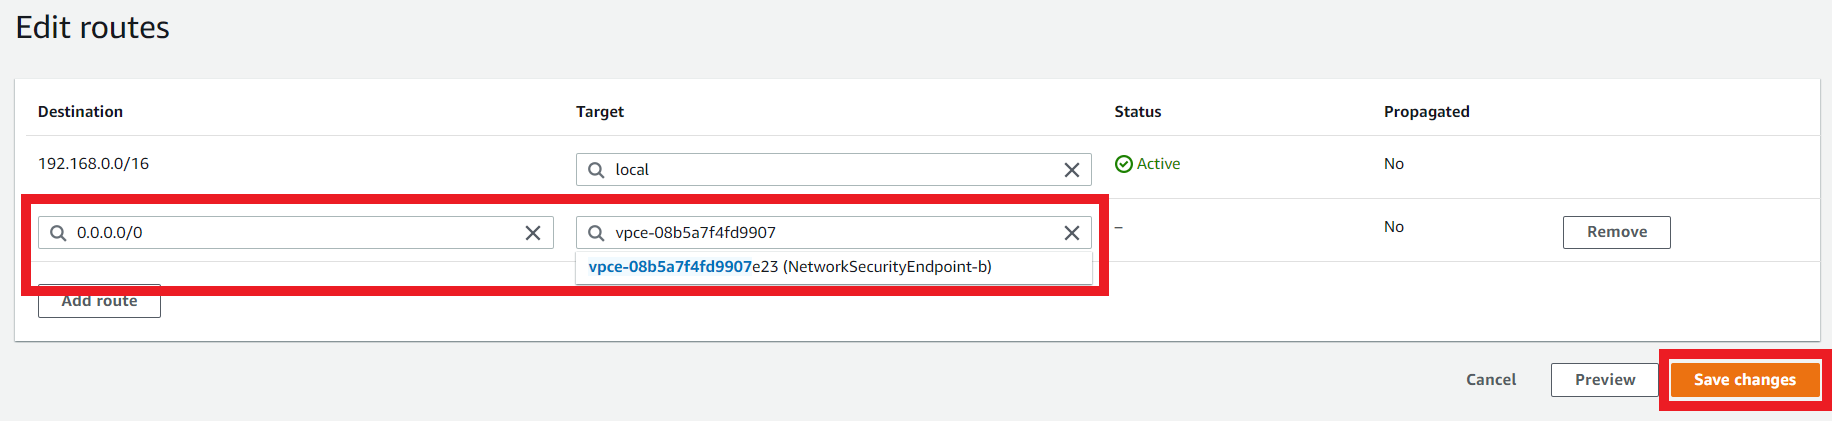
3.6. Edit the Route Table route for the Public subnet az1b route table Route Table
- On the Route Table
Public subnet az1b route table - Click on Routes > Edit Routes
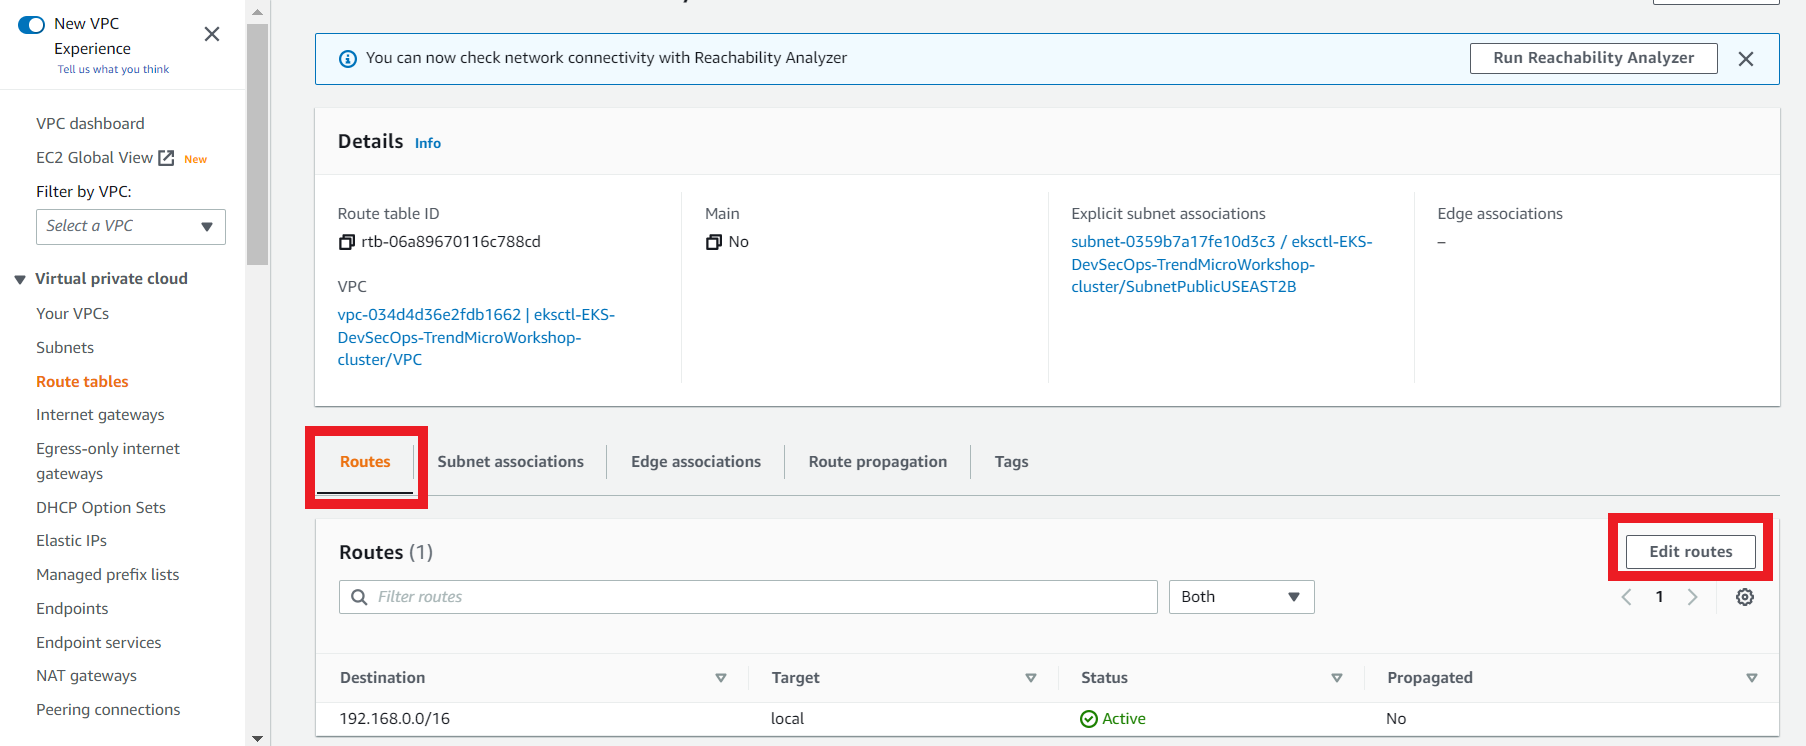
- Modify the route
| Destination | Target |
|---|---|
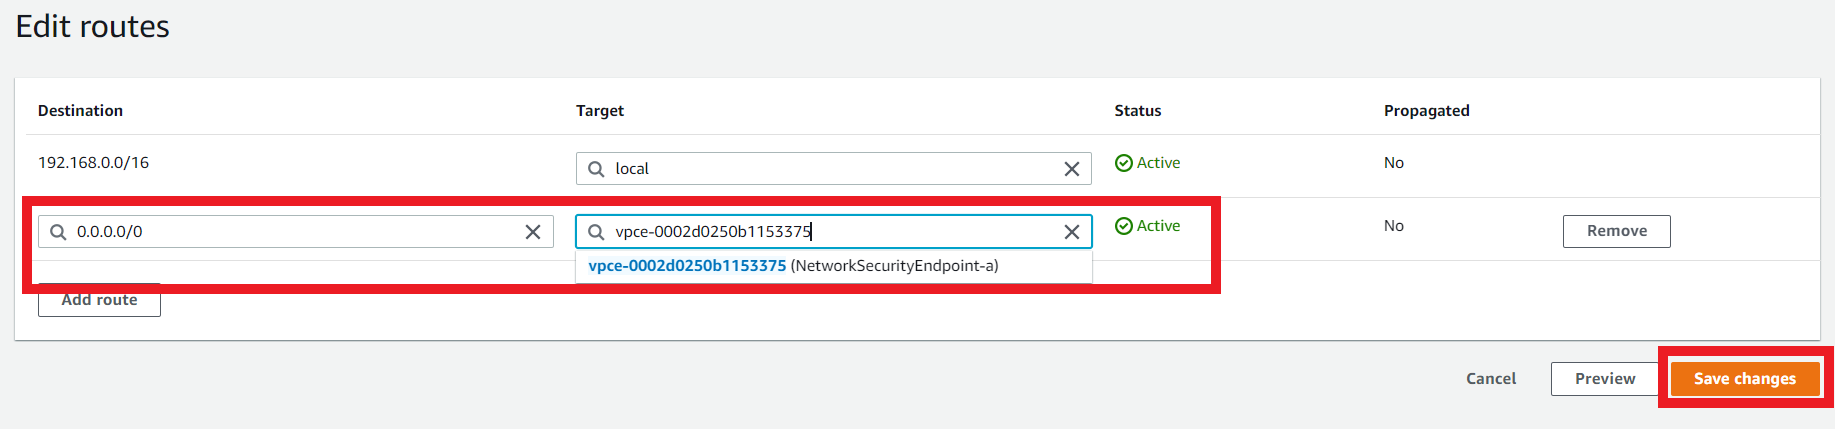
| 0.0.0.0/0 | VPC Endpoint b |
- Click on Save Changes
3.7. Edit the Route Table route for the eksctl-EKS-DevSecOps-TrendMicroWorkshop-cluster/PublicRouteTable Route Table
- Select the Route Table named:
eksctl-EKS-DevSecOps-TrendMicroWorkshop-cluster/PublicRouteTable - Click on Routes > Edit Routes
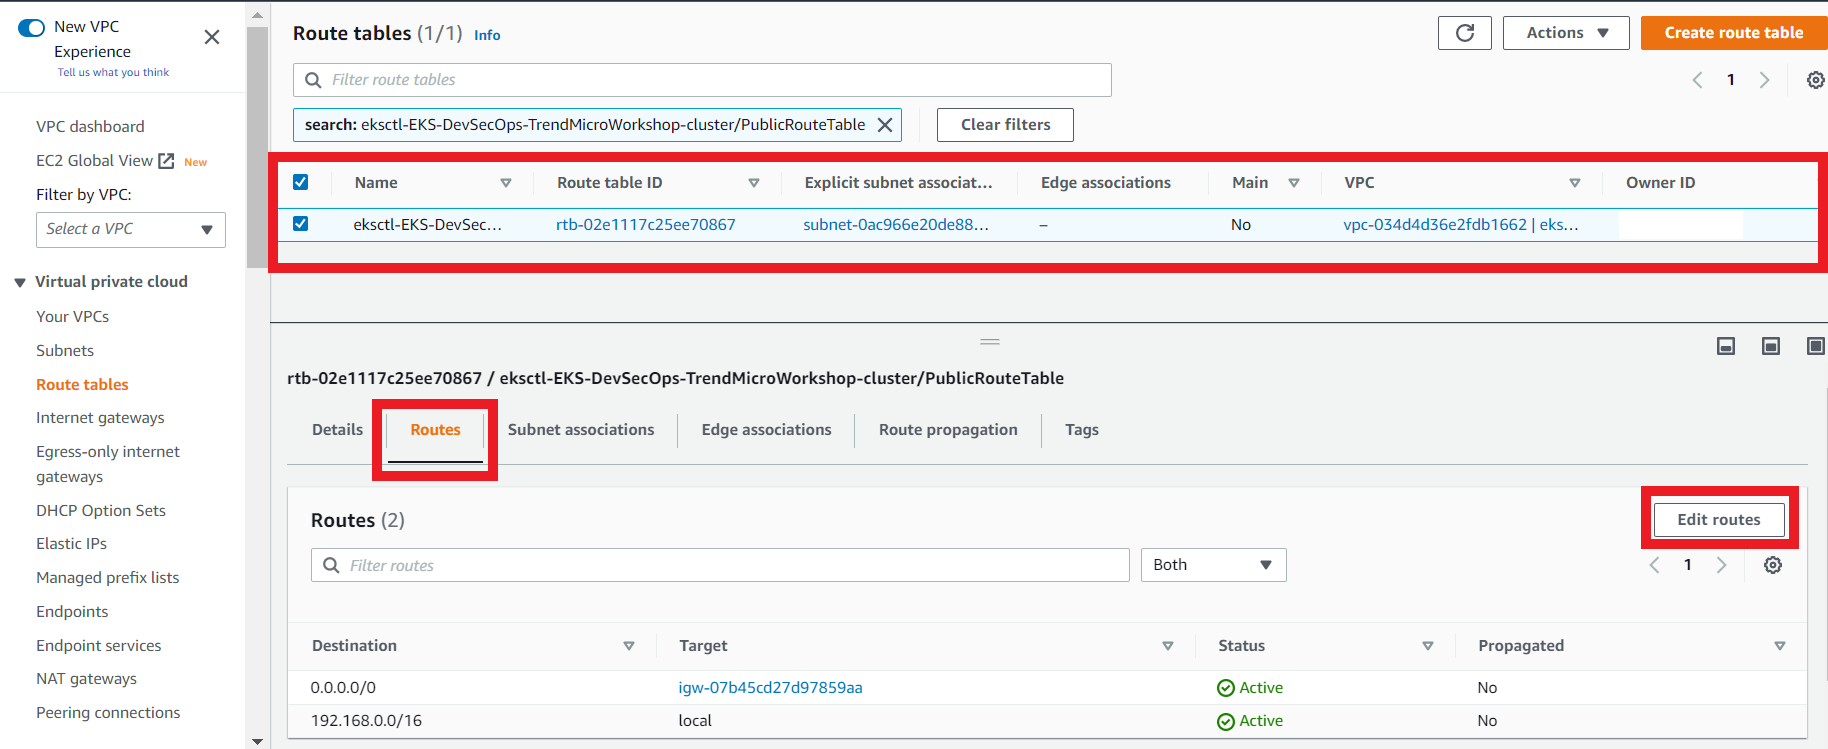
- Modify the route
| Destination | Target |
|---|---|
| 0.0.0.0/0 | VPC Endpoint a |
- Click on Save Changes
3.8. Create another route table for the Network Security endpoint subnet
This route table is associated with the Network Security endpoint that you deployed in the AZ us-east-1b for this VPC
- Name: (optional)
Network Security endpoint subnet route table 1b - Select your VPC ID
- Click on Create Route Table

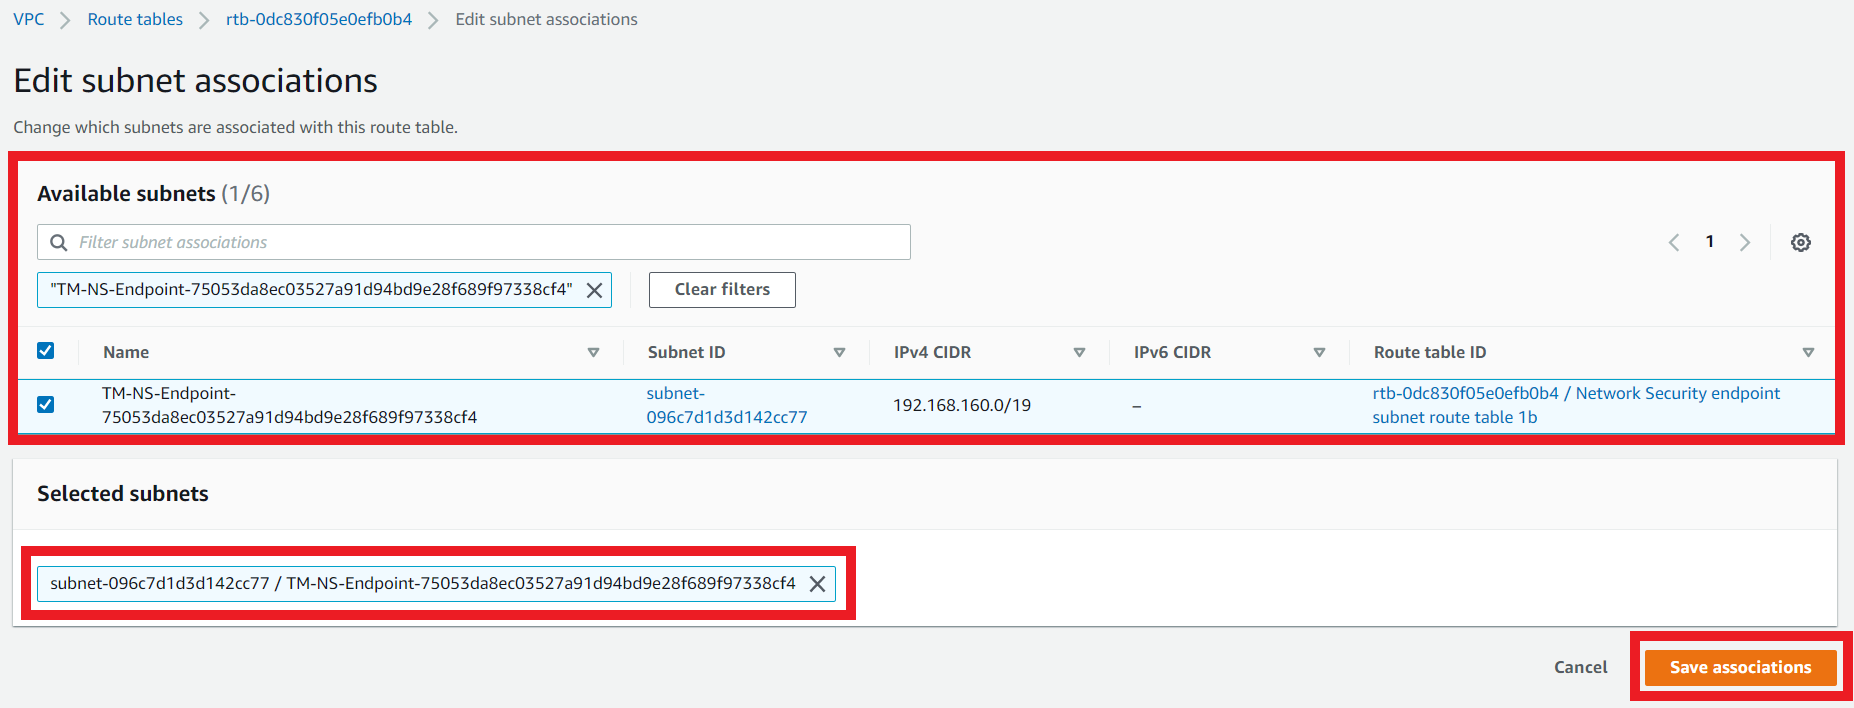
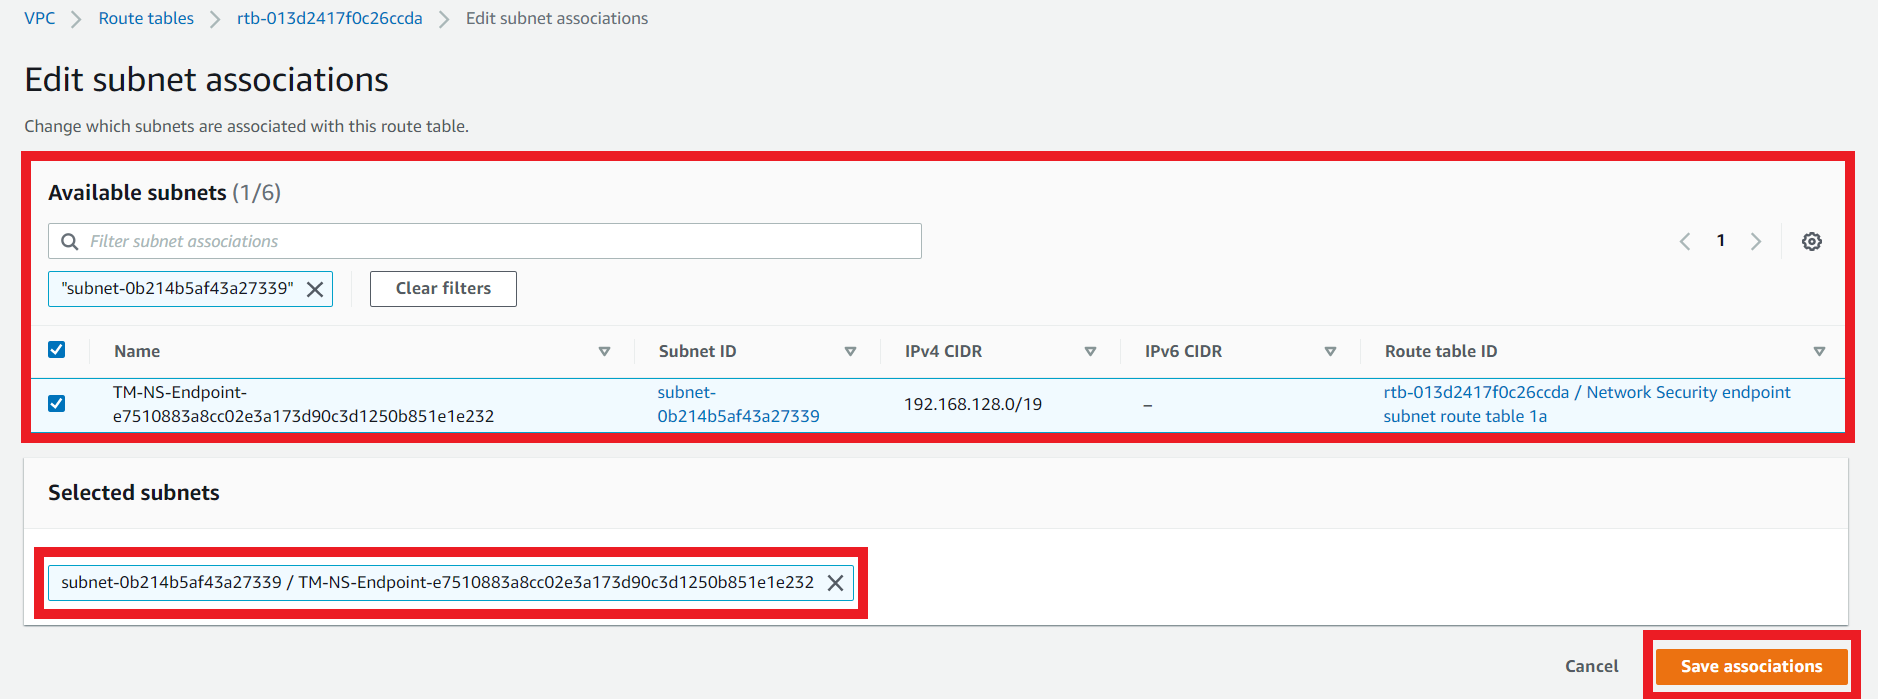
3.9. Create the subnet association
- On the Network Security endpoint subnet route table 1b
- Click the Subnet Associations tab
- Click Edit subnet associations
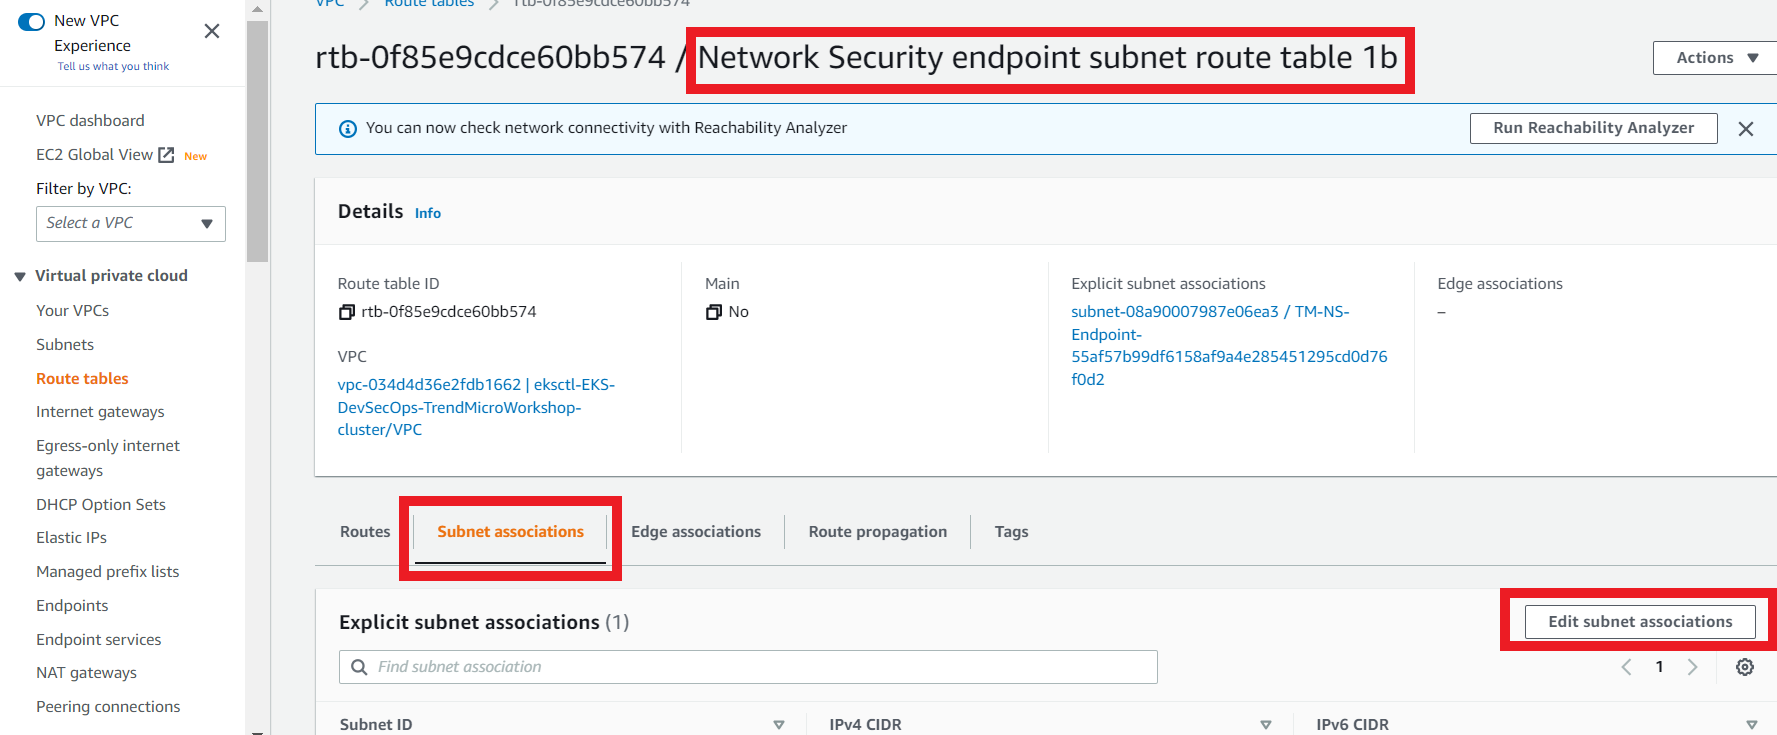
- Select the subnet that contains your Network Security deployed on us-east-1b
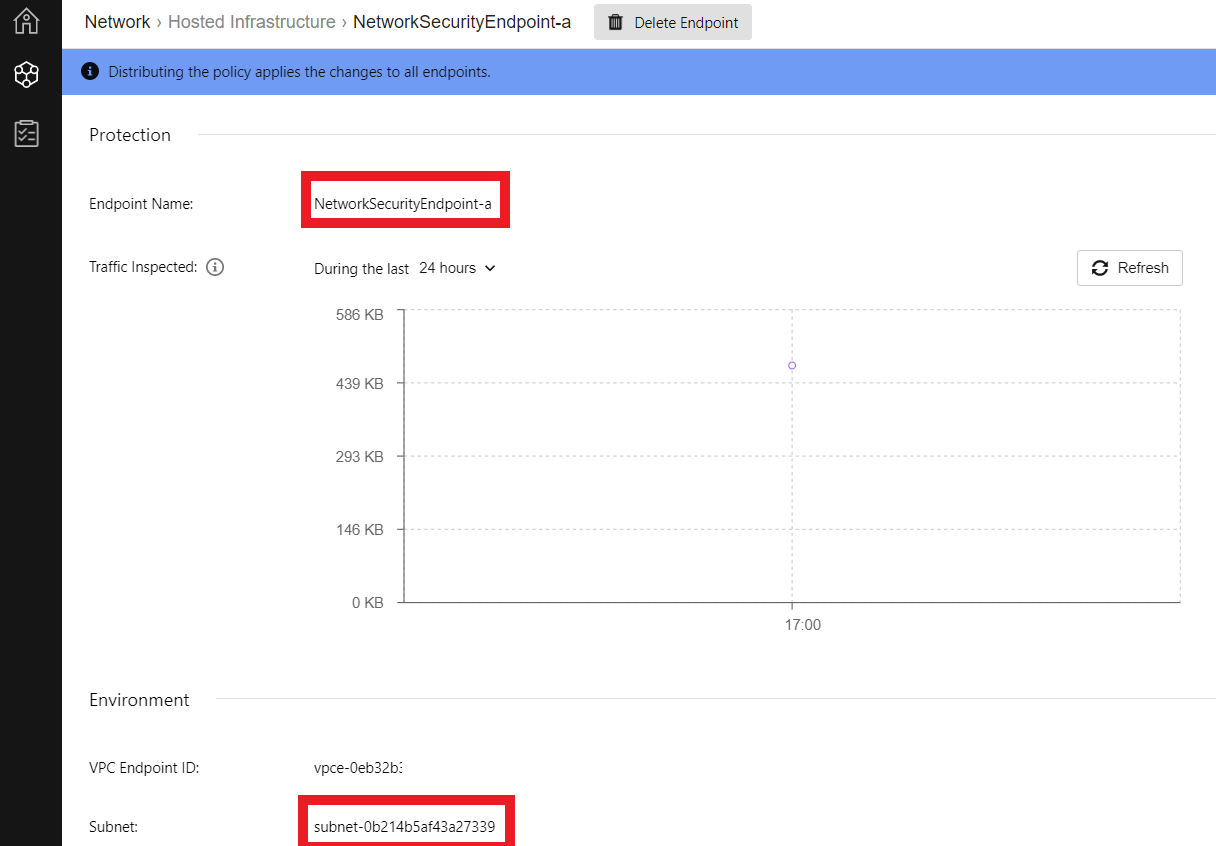
- To find out what this Subnet is, go to Cloud One console > Network Security > Hosted Infrastructure
- Expand the VPC you used to deploy the Network Security Endpoint
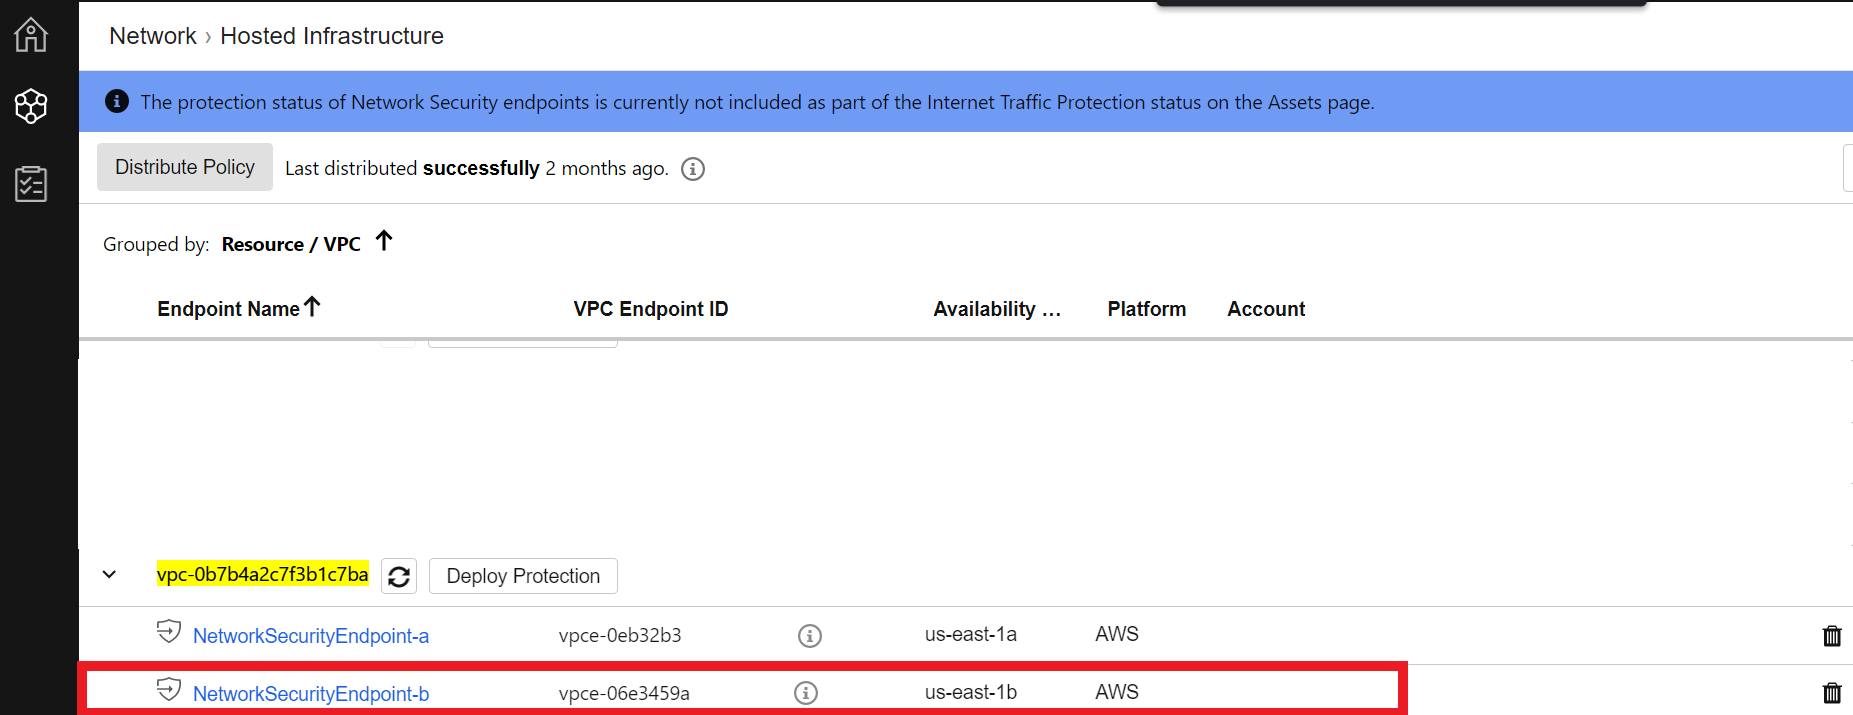
- Click on the option that appears us-east-1b in the Availability Zone column
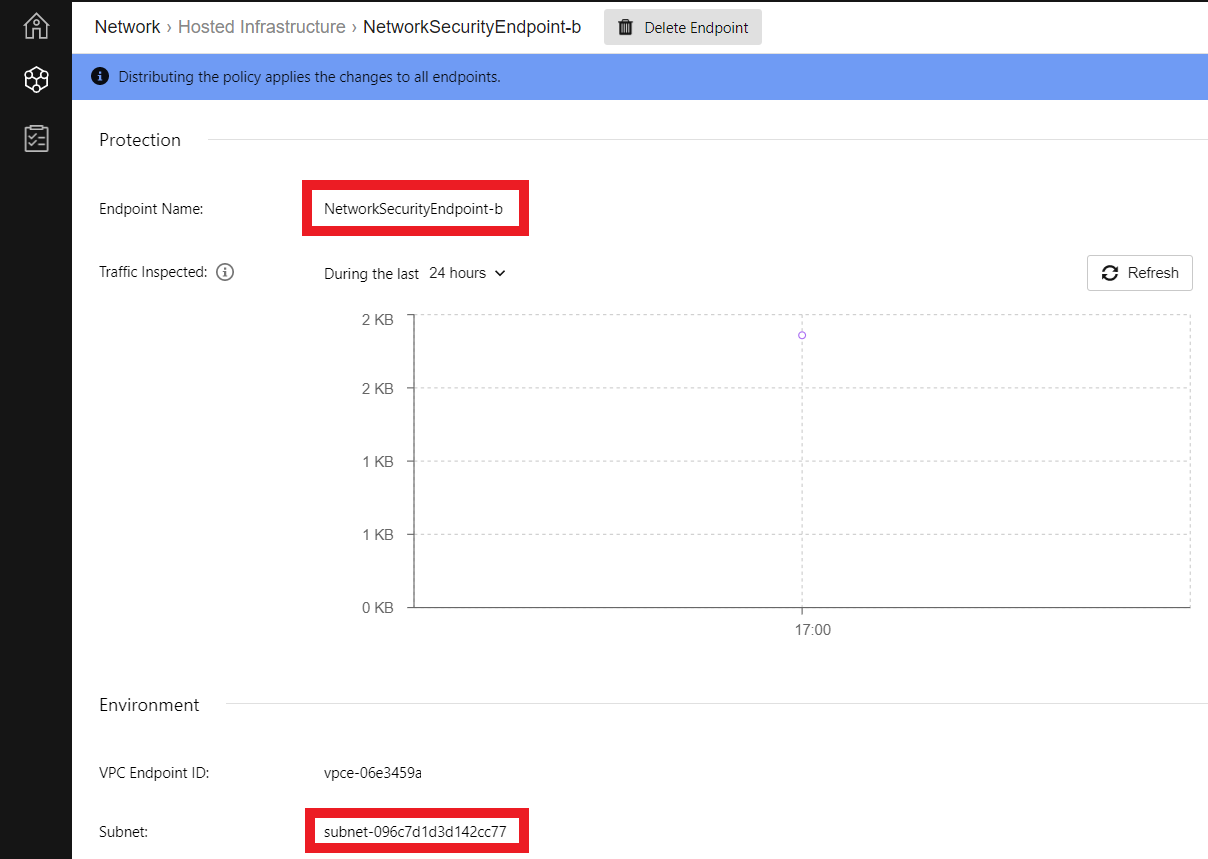
- On that same page at the bottom, you will see the Subnet for this Network Security Endpoint in us-east-1b
- Back to the AWS Console
- Select the respective Network Security Endpoint Subnet in us-east-1b
- Create a subnet association for this route table for the subnet TM-NS-Endpoint-…
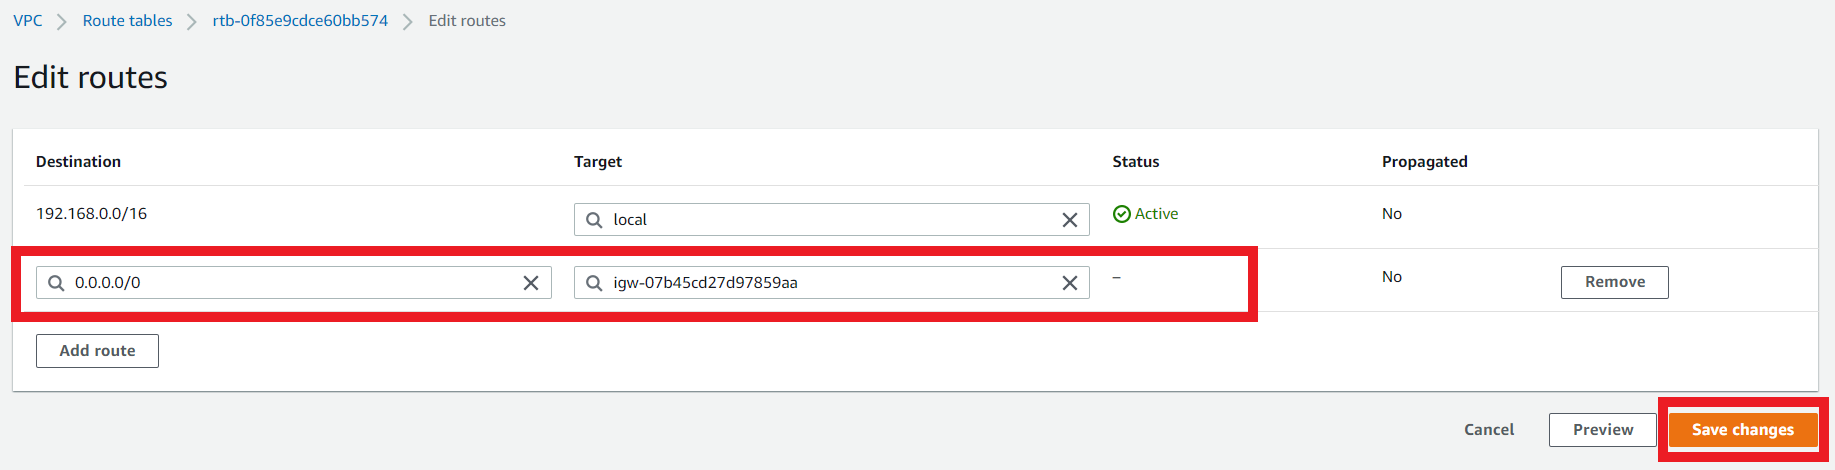
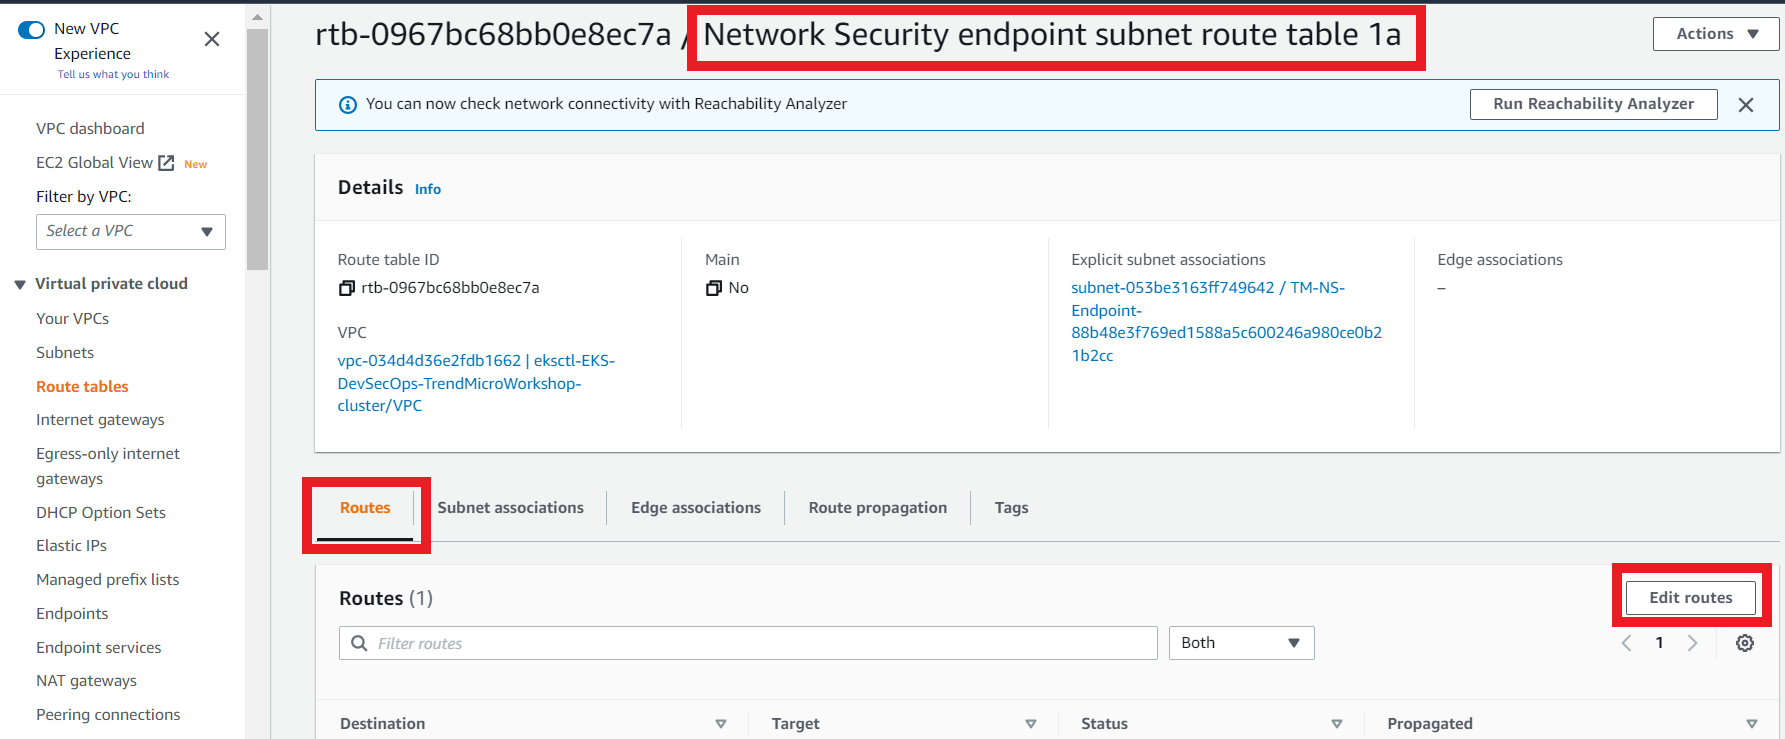
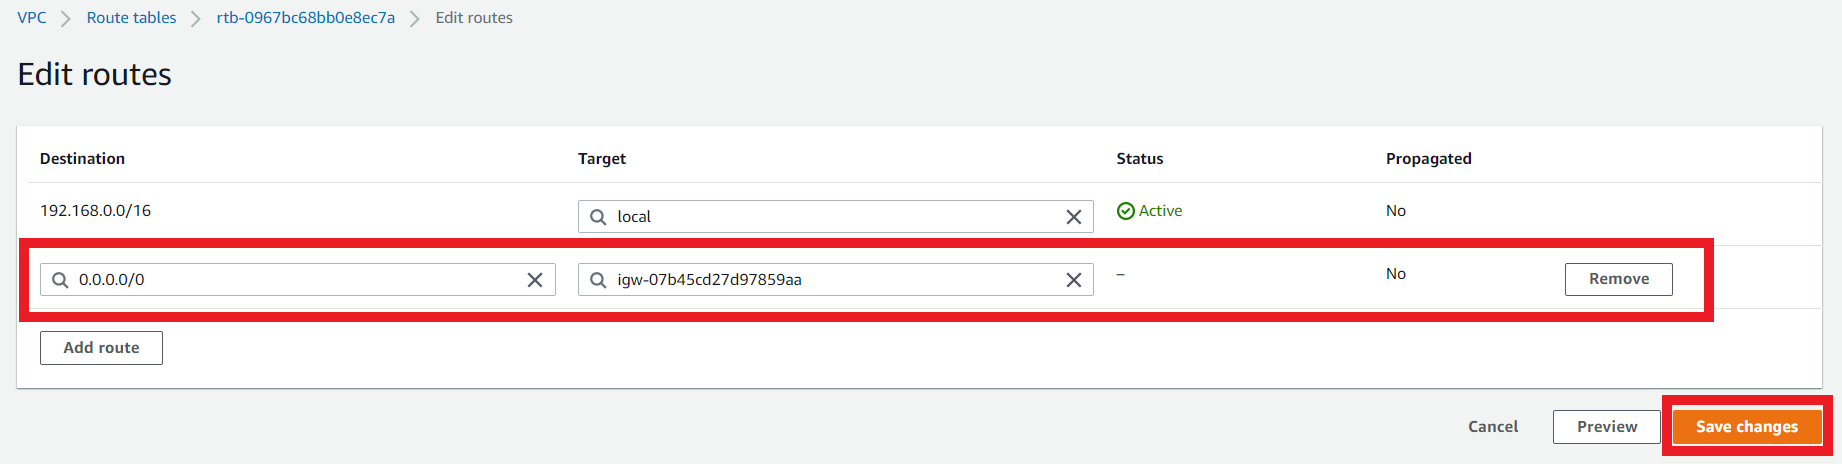
3.10. Edit the Route Table route for the Network Security endpoint subnet route table 1b Route Table
- On the Route Table
Network Security endpoint subnet route table 1b - Click on Routes > Edit Routes
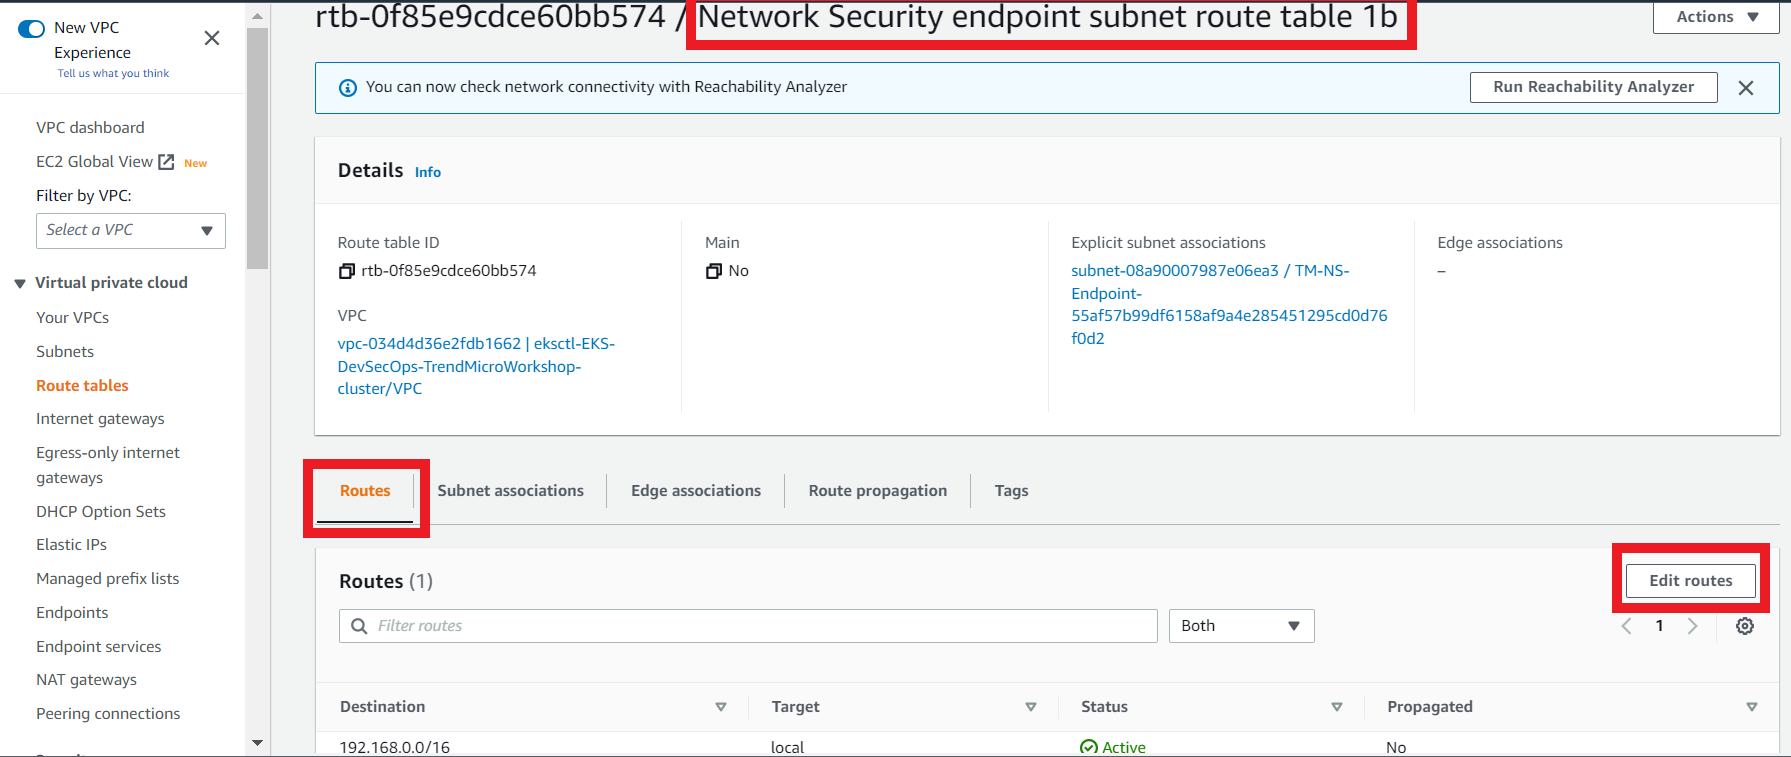
- Modify the route
| Destination | Target |
|---|---|
| 0.0.0.0/0 | igw |
- Click on Save Changes
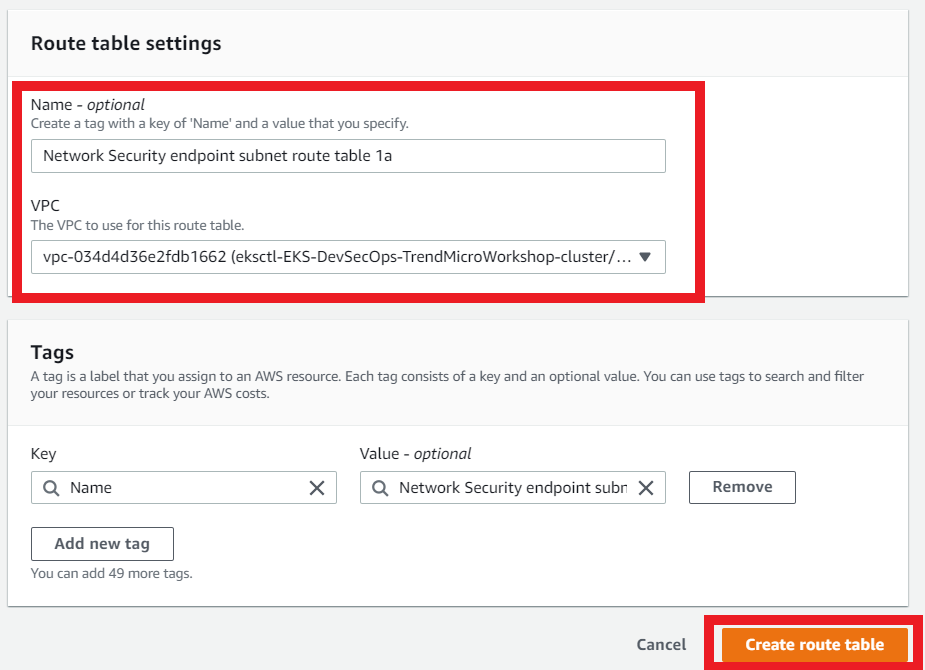
3.11. Create another route table for the Network Security endpoint subnet
This route table is associated with the Network Security endpoint that you deployed in the AZ us-east-1a for this VPC
- Name: (optional)
Network Security endpoint subnet route table 1a - Select your VPC ID
- Click on Create Route Table
3.12. Create the subnet association
- On the Network Security endpoint subnet route table 1a
- Click the Subnet Associations tab
- Click Edit subnet associations
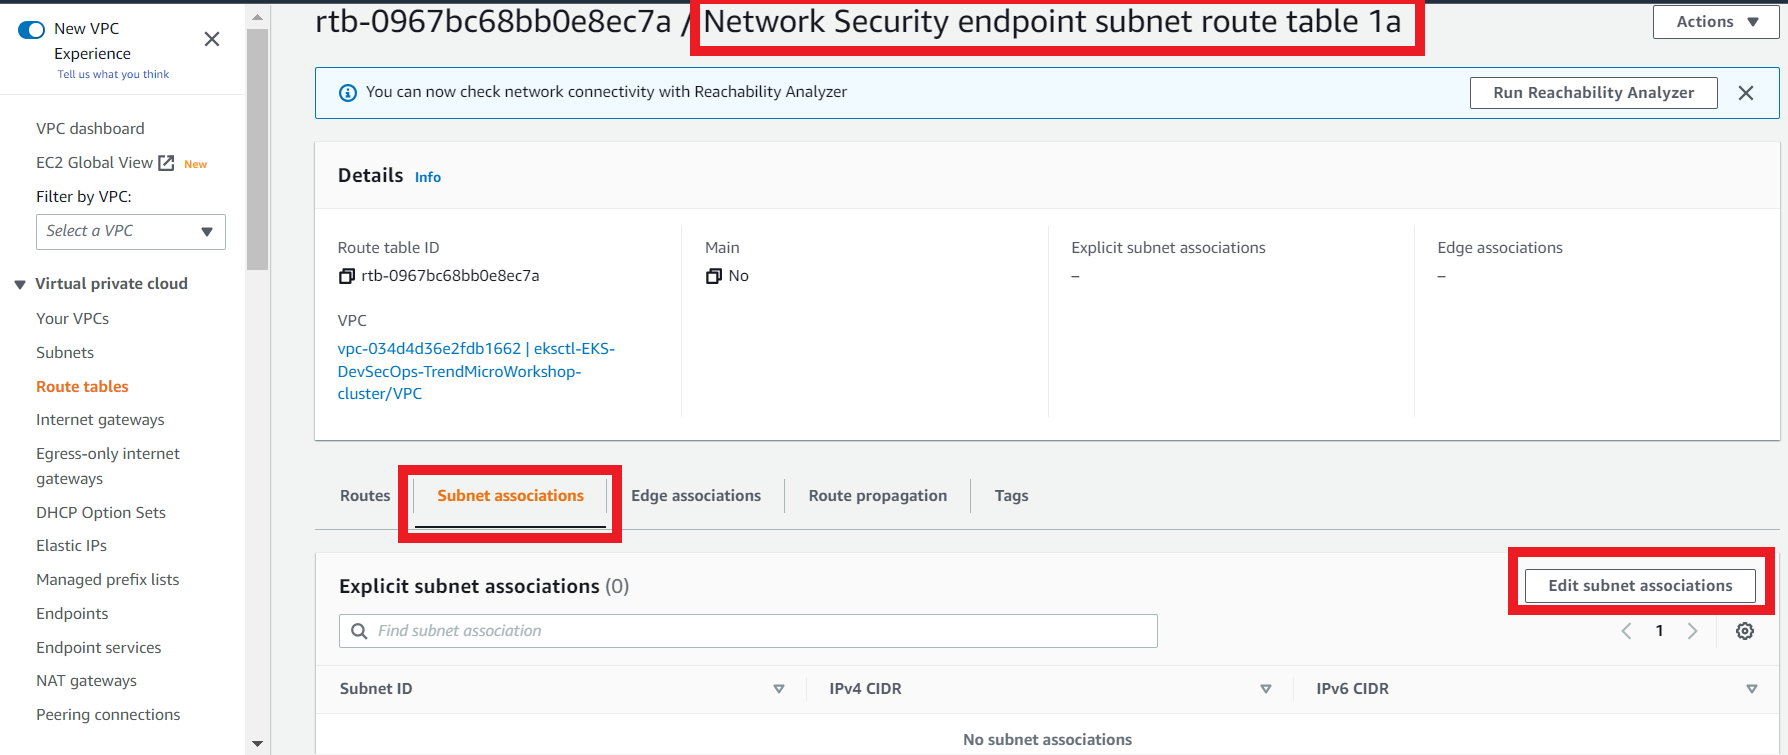
- Select the subnet that contains your Network Security deployed on us-east-1a
- To find out what this Subnet is, go to Cloud One console > Network Security > Hosted Infrastructure
- Expand the VPC you used to deploy the Network Security Endpoint
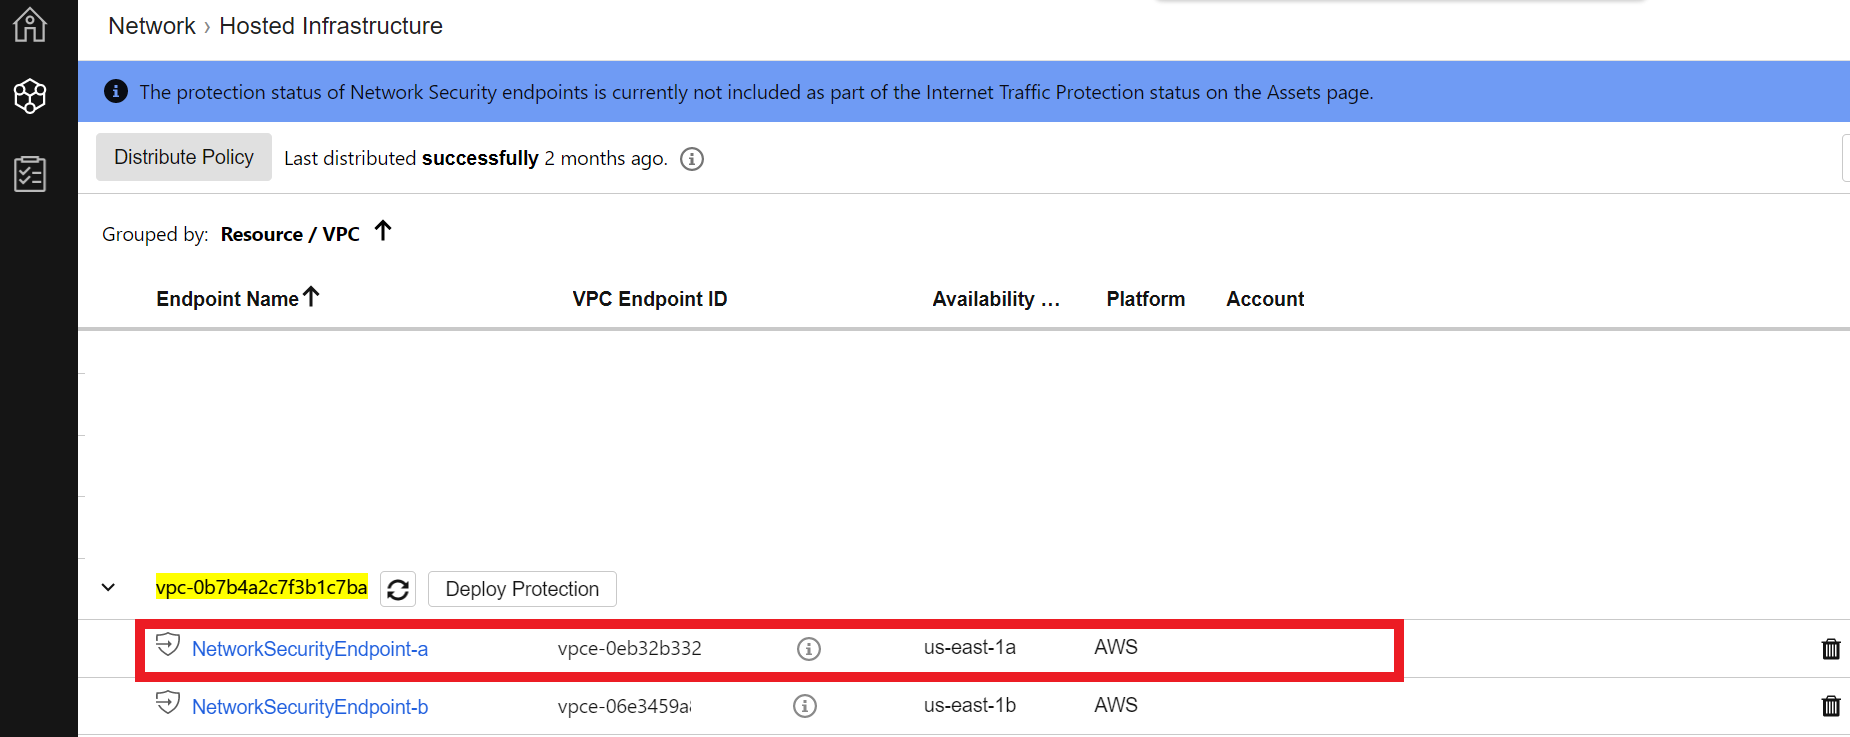
- Click on the option that appears us-east-1a in the Availability Zone column
- On that same page at the bottom, you will see the Subnet for this Network Security Endpoint in us-east-1a
- Back to the AWS Console
- Select the respective Network Security Endpoint Subnet under us-east-1a
- Create a subnet association for this route table for the subnet TM-NS-Endpoint-…
3.13. Edit the Route Table route for the Network Security endpoint subnet route table 1a Route Table
- On the Route Table
Network Security endpoint subnet route table 1a - Click on Routes > Edit Routes
- Modify the route
| Destination | Target |
|---|---|
| 0.0.0.0/0 | igw |
- Click on Save Changes
4. Now let’s test if we are really protected and Network Security is indeed blocking attacks
- Go to your Cloud One Account > Network Security
- In the left column click on the third icon and select Intrusion Prevention Filtering
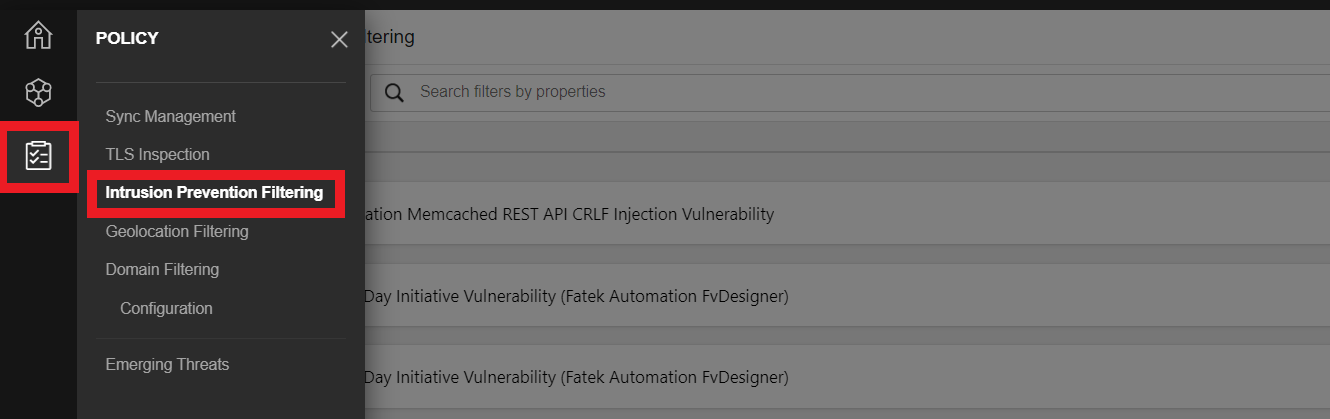
- Search for the filter
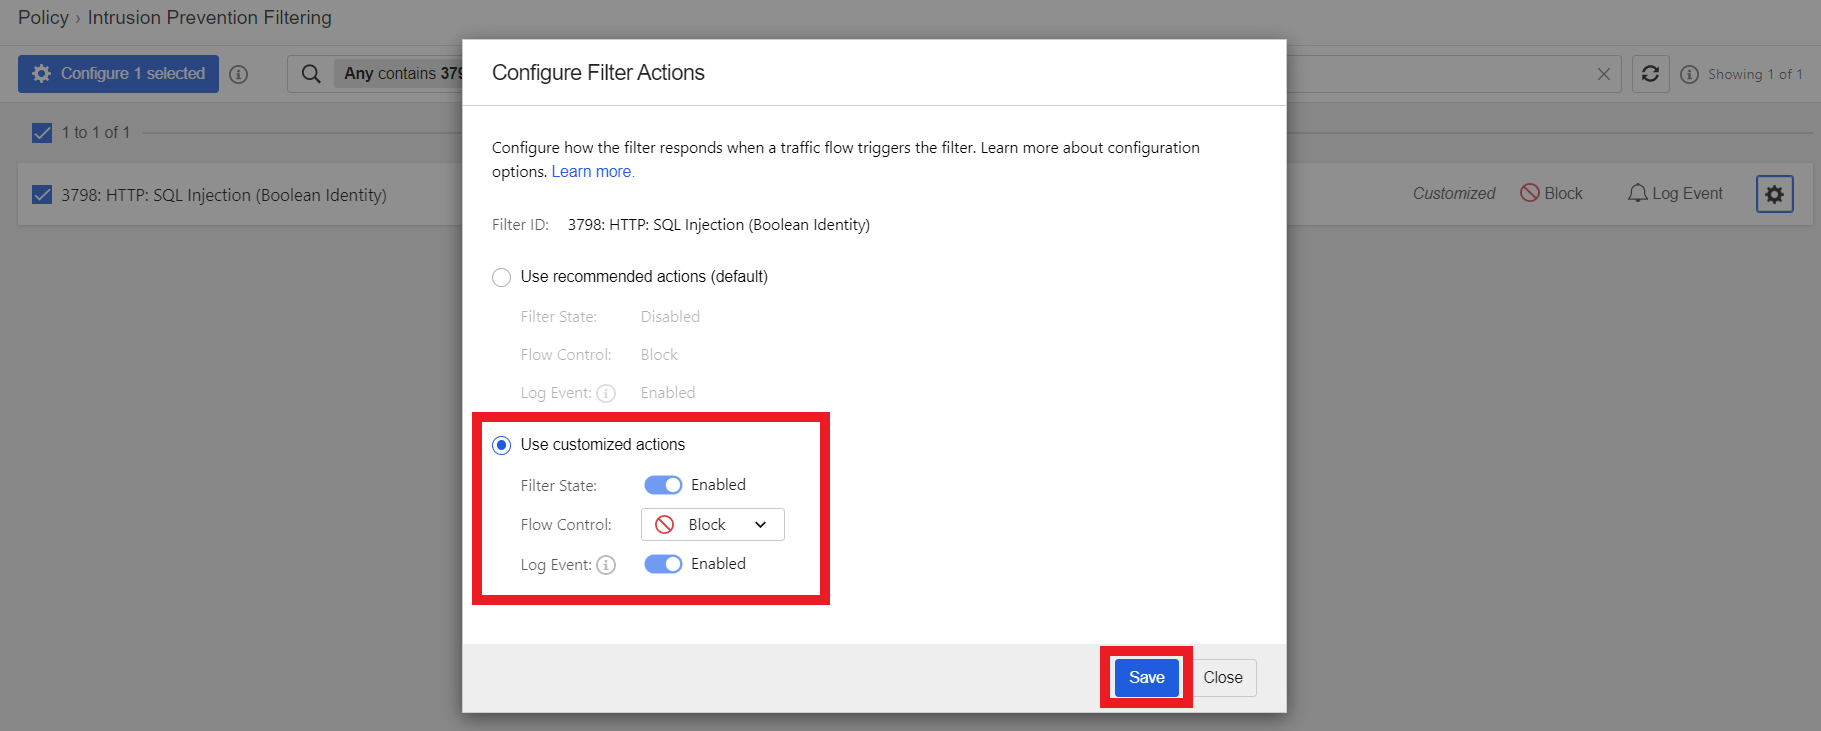
3798 - Select 3798: HTTP: SQL Injection (Boolean Identity)
- Click the Settings Wheel to configure rule

- Make sure that your customized actions are like the following configuration
- Filter State: Enabled
- Flow Control: Block
- Log Event: Enabled
- Click Save
- Search for the filter
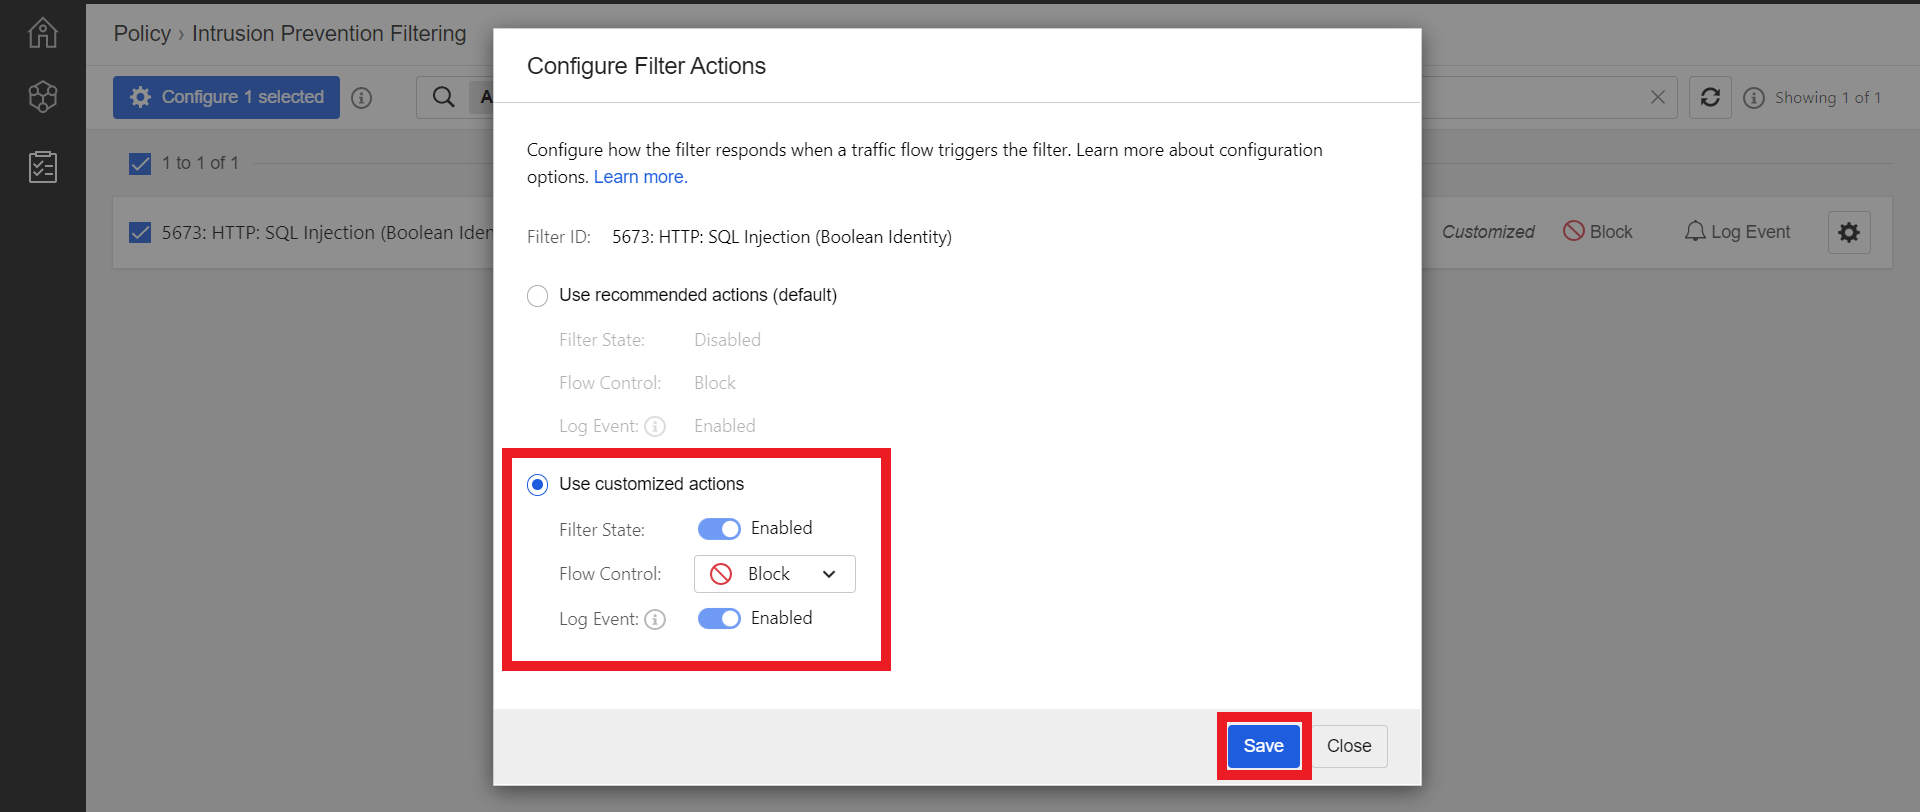
5673 - Select 5673: HTTP: SQL Injection (Boolean Identity)
- Click the Settings Wheel to configure rule

- Make sure that your customized actions are like the following configuration
- Filter State: Enabled
- Flow Control: Block
- Log Event: Enabled
- Click Save
- Search for the filter
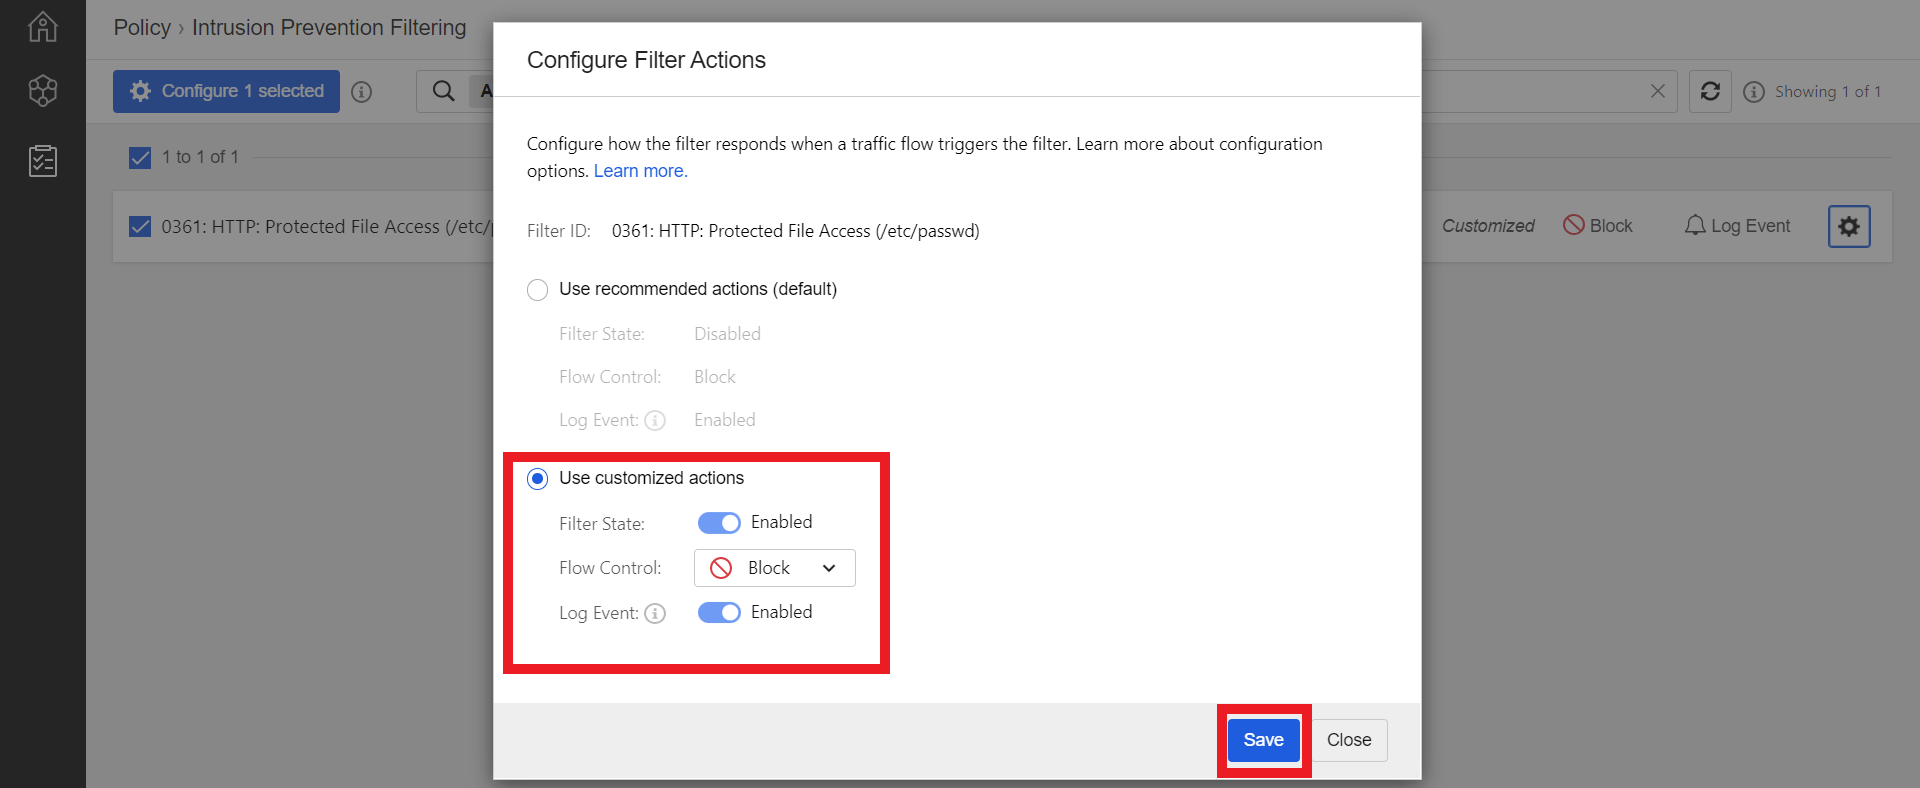
0361 - Select 0361: HTTP: Protected File Access (/etc/passwd)
- Click the Settings Wheel to configure rule

- Make sure that your customized actions are like the following configuration
- Filter State: Enabled
- Flow Control: Block
- Log Event: Enabled
- Click Save
- Go back to Hosted Infrastructure
- Click on the Distribute Policy Button to distribute the policy to your Network Security Endpoint

- Then click again on the Distribute Policy Button
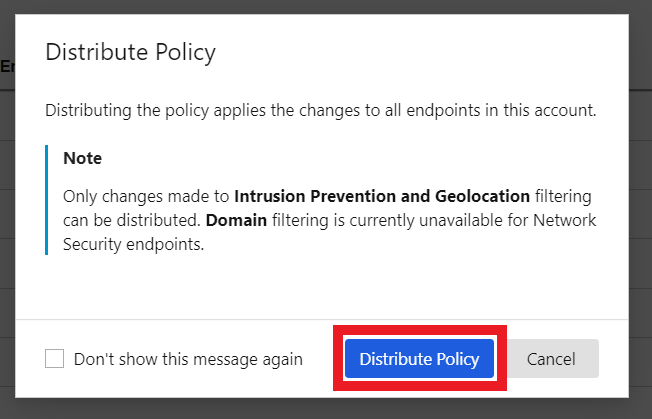
- Wait until it distributes the policy


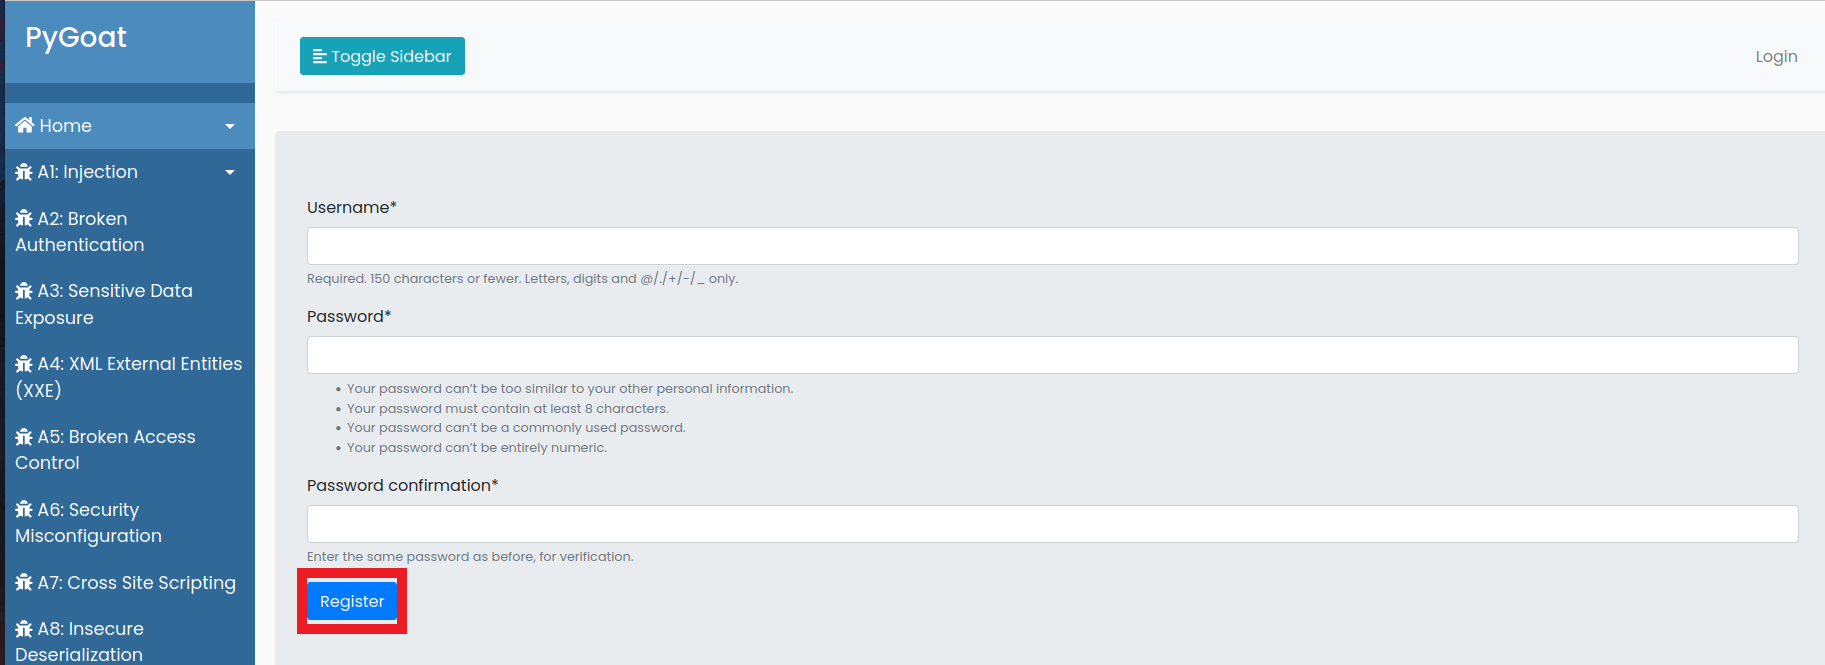
4.1. Go back to the Pygoat Application
- Register an account in the application
- Click on the Here button below password
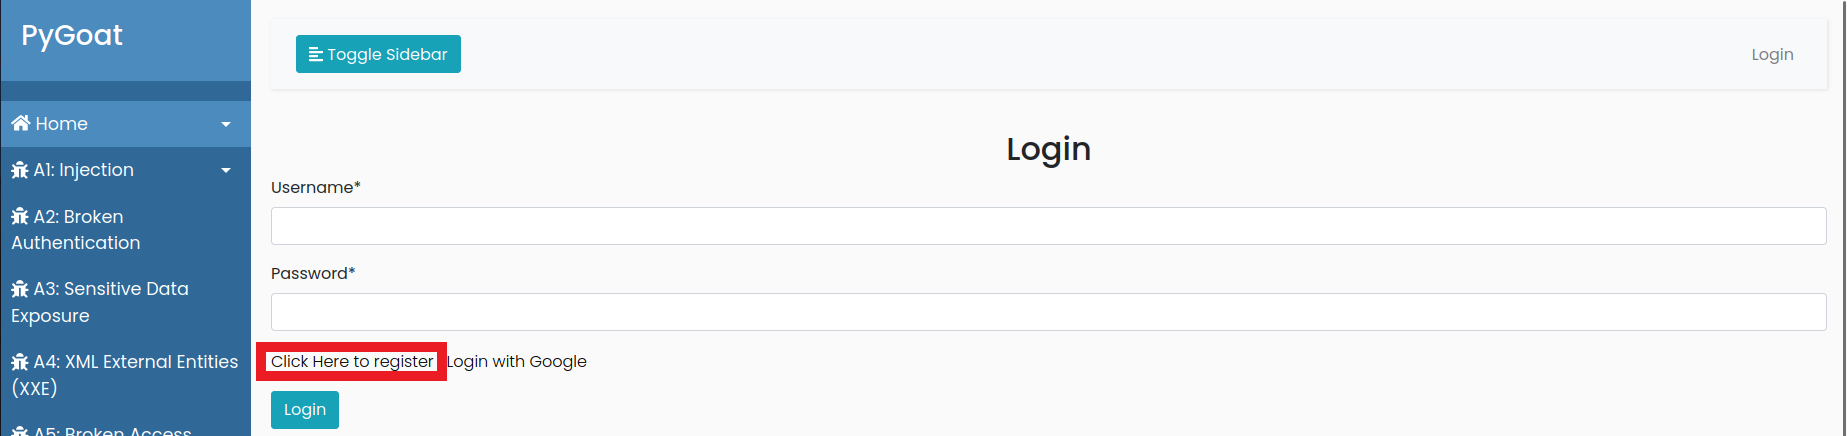
- Create any user for you to use in our examples
- Then click on Register
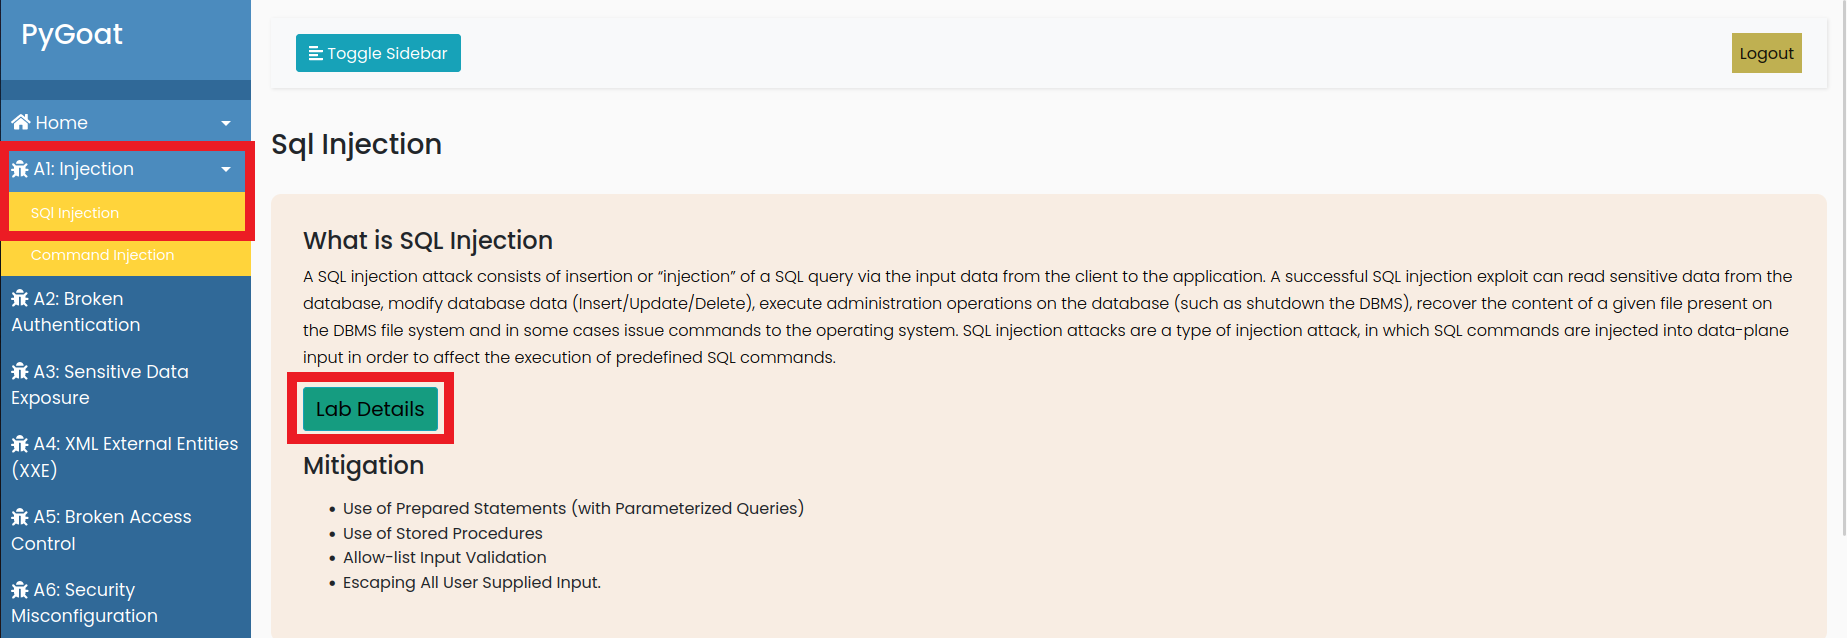
- Login with the user you just created

- In the column on the left, click on A1: Injection > SQL Injection
- Click on the Lab Details Button
- And then click on the Access Lab Button
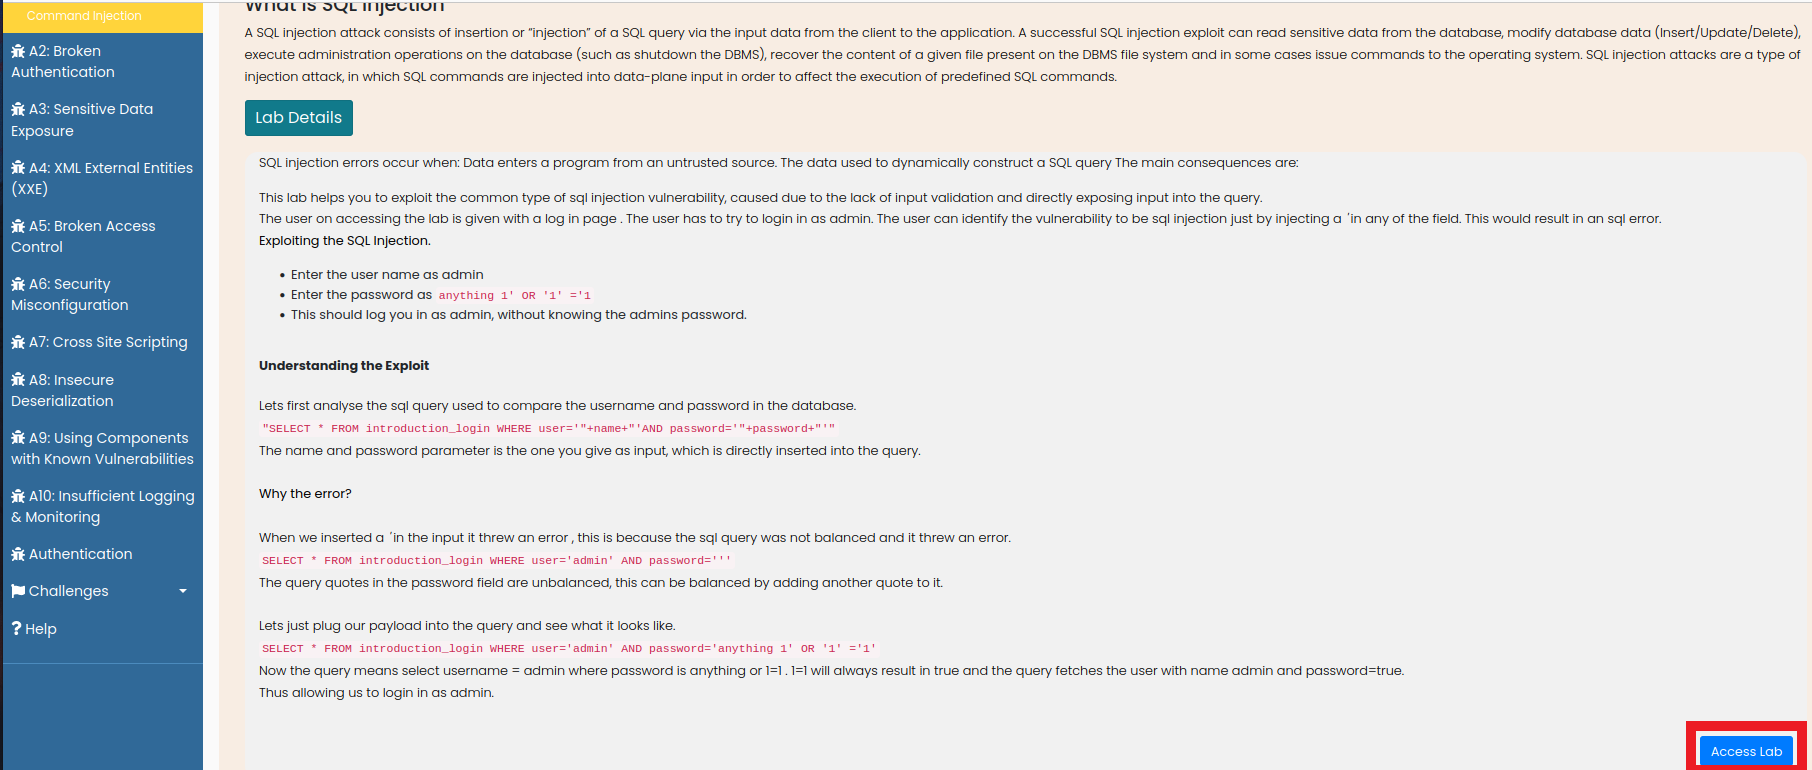
- In the User Name field put
admin - In the Password field put
anything 1' OR '1' ='1

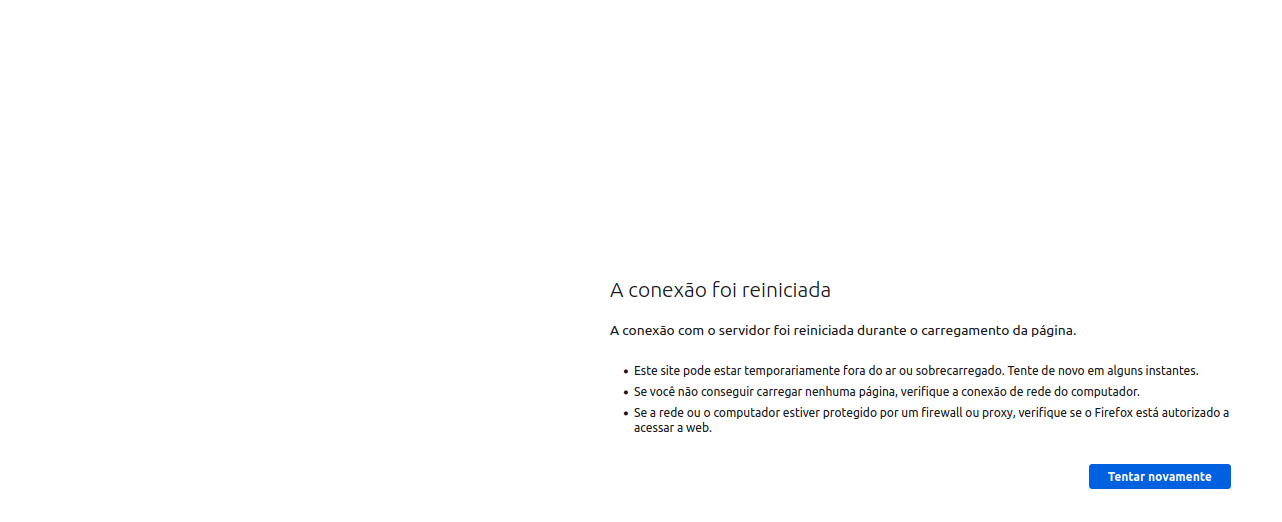
- You will see that the page will take some time to load and then a message will appear that The connection has been restarted
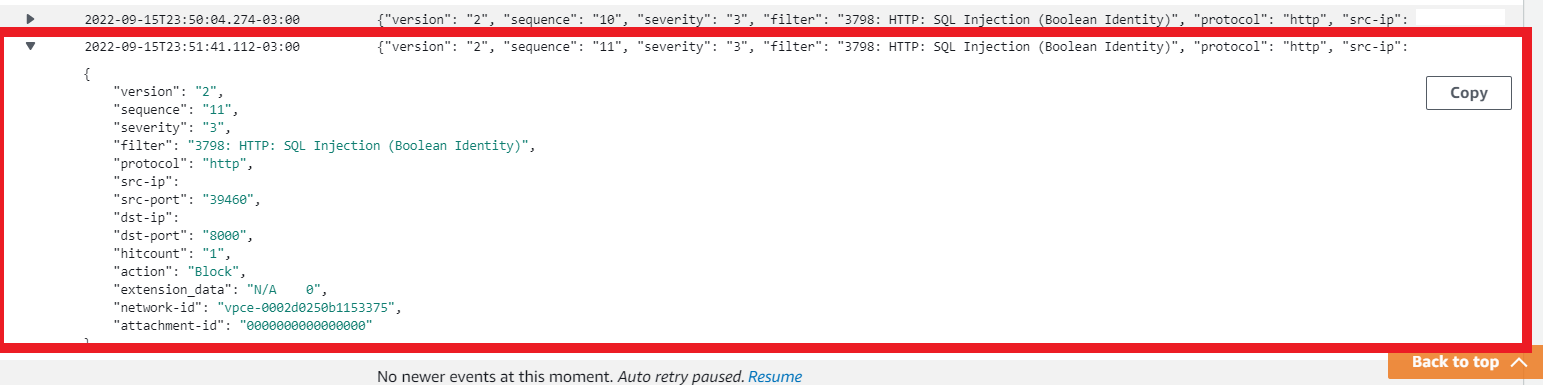
Let’s confirm that it really was Network Security that did the blocking
- In the AWS console
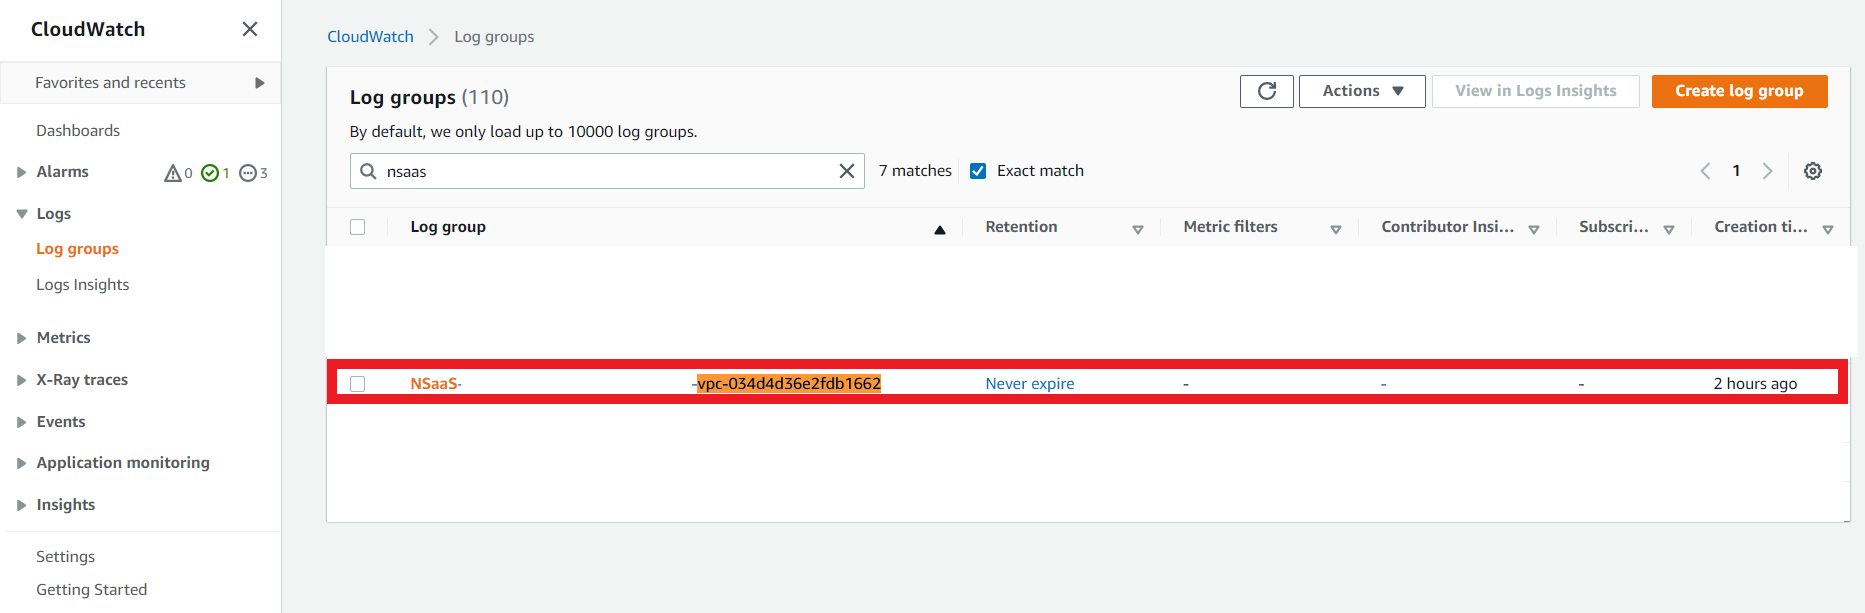
- Search for CloudWatch
- In the left column under Logs > Log Groups
- Type
NSaaS - Click on the option that also contains your VPC ID
- At the bottom of this screen in Log Streams
- Click on ipsBlock
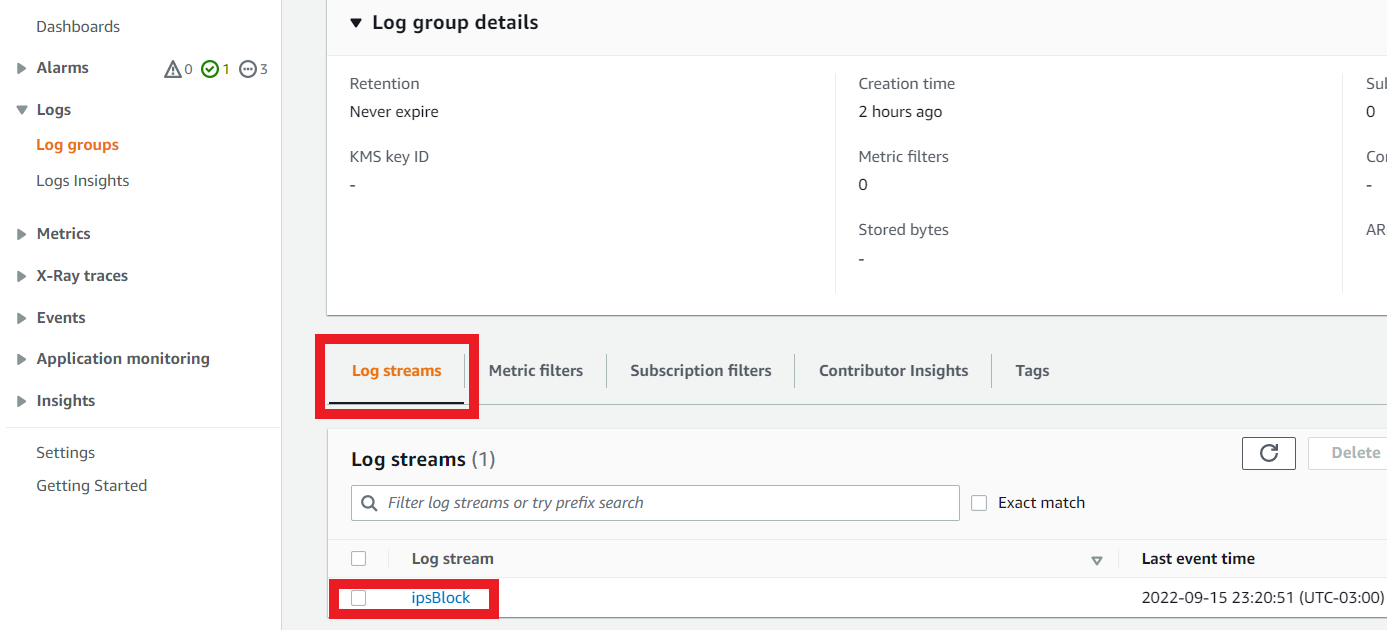
- You should see at least one detection about 3798: HTTP: SQL Injection (Boolean Identity) which was exactly the filter we applied to block